
Related Manuals for DeDietrich Diematic iSystem


Summary of Contents for DeDietrich Diematic iSystem
- Page 1 Ireland Regulation Diematic iSystem For C 330 / C 630 ECO Installation, User and Service Manual C002695-A 7600691-001-06...
-
Page 2: Table Of Contents
Contents Introduction ....................4 Symbols used ............4 Abbreviations ............4 Liabilities ...............4 1.3.1 Manufacturer’s liability ..........4 1.3.2 Installer’s liability .............5 1.3.3 User’s liability ............5 Certifications ............6 Safety instructions and recommendations ..........7 Recommendations ..........7 Technical specifications ................8 Sensor characteristics .........8 Installation ....................9 Package list ............9 4.1.1 Standard delivery ............9 4.1.2... - Page 3 Contents 5.1.2 Description of the display ........27 5.1.3 Access to the various browsing levels ....30 5.1.4 Browsing in the menus ..........31 Putting the appliance into operation ....32 Checks and adjustments after commissioning ...........33 5.3.1 Displaying the parameters in extended mode ..............33 5.3.2 Setting the parameters specific to the installation .............33...
- Page 4 Failure history .............80 Parameter and input/output check (mode tests) ..............80 7.6.1 Control system sequence ........83 31082018 - 7600691-001-06...
-
Page 5: Introduction
Diematic iSystem For C 330 / C 630 ECO 1. Introduction Introduction Symbols used In these instructions, various danger levels are employed to draw the user’s attention to particular information. In so doing, we wish to safeguard the user’s safety, highlight hazards and guarantee correct operation of the appliance. -
Page 6: Installer's Liability
1. Introduction Diematic iSystem For C 330 / C 630 ECO In the interest of customers, we are continuously endeavouring to make improvements in product quality. All the specifications stated in this document are therefore subject to change without notice. -
Page 7: Certifications
Diematic iSystem For C 330 / C 630 ECO 1. Introduction This appliance is not intended to be used by persons (including children) whose physcial, sensory or mental capacity is impaired or persons with no experience or knowledge, unless they have the benefit, through the... -
Page 8: Safety Instructions And Recommendations
2. Safety instructions and recommendations Diematic iSystem For C 330 / C 630 ECO Safety instructions and recommendations Recommendations WARNING Any intervention on the appliance and heating equipment must be carried out by a qualified engineer. For a proper operating of the boiler, follow carefully the instructions. -
Page 9: Technical Specifications
Diematic iSystem For C 330 / C 630 ECO 3. Technical specifications Technical specifications Sensor characteristics Outside sensor Temperature in °C -20 Resistance in Ω 2392 2088 1811 1562 1342 1149 984 842 720 616 528 454 Specifications of the flow sensor circuit B + C... -
Page 10: Installation
4. Installation Diematic iSystem For C 330 / C 630 ECO Installation Package list 4.1.1. Standard delivery The delivery includes: 4 The control panel with the Diematic iSystem module 4 Outside sensor 4 Installation, User and Service Manual 4.1.2. Accessories... -
Page 11: Installing The Outside Sensor
Diematic iSystem For C 330 / C 630 ECO 4. Installation Installing the outside sensor 4.2.1. Choice of the location It is important to select a place that allows the sensor to measure the outside conditions correctly and effectively. Advised positions:... -
Page 12: Fitting And Connecting The Control Panel
4. Installation Diematic iSystem For C 330 / C 630 ECO Inserts Ø4 wood screw ¼For the connection of the outside temperature sensor, refer to the chapter "Electrical Connections". 8800N003-C Fitting and connecting the control panel ¼Refer to the boiler’s installation and service manual. -
Page 13: Connecting A Direct Heating Circuit And A Domestic Hot Water Tank
Diematic iSystem For C 330 / C 630 ECO 4. Installation Connect a safety thermostat if the heating circuit is for underfloor heating. Remove the bridge. Connect the wires from the safety thermostat to the connector. 4.4.2. Connecting a direct heating circuit and a... - Page 14 4. Installation Diematic iSystem For C 330 / C 630 ECO Connect the DHW tank anode. CAUTION If the tank is fitted with a Titan Active System® impressed current anode, connect the anode to the inlet (+ TA on the anode, - on the tank).
-
Page 15: Connecting Two Circuits And A Domestic Hot Water Tank
Diematic iSystem For C 330 / C 630 ECO 4. Installation 4.4.3. Connecting two circuits and a domestic hot water tank TS + On/off PUMP 0-10V S AMB C S AMB B S AMB A 4 3 2 1 2 1... - Page 16 4. Installation Diematic iSystem For C 330 / C 630 ECO Connect the DHW tank anode. CAUTION If the tank is fitted with a Titan Active System® impressed current anode, connect the anode to the inlet (+ TA on the anode, - on the tank).
-
Page 17: Connecting Two Circuits And A Domestic Hot Water Tank After The Mixing Tank
Diematic iSystem For C 330 / C 630 ECO 4. Installation 4.4.4. Connecting two circuits and a domestic hot water tank after the mixing tank TS + On/off PUMP 0-10V S AMB C S AMB B S AMB A 4 3 2 1 2 1... -
Page 18: Hot Water Storage Tank Connection
4. Installation Diematic iSystem For C 330 / C 630 ECO Connect the DHW tank anode. CAUTION If the tank is fitted with a Titan Active System® impressed current anode, connect the anode to the inlet (+ TA on the anode, - on the tank). - Page 19 Diematic iSystem For C 330 / C 630 ECO 4. Installation On/off PUMP 0-10V S AMB C S AMB B S AMB A 4 3 2 1 2 1 TS + S SYST + TA - S ECS S EXT S DEP C...
- Page 20 4. Installation Diematic iSystem For C 330 / C 630 ECO The DHW part is maintained at the DHW set point by the boiler. The heating zone is maintained at the set temperature calculated according to the outside temperature. The zone is reheated when the heating buffer temperature sensor E falls -6°C below the calculated set temperature.
- Page 21 Diematic iSystem For C 330 / C 630 ECO 4. Installation n PS storage tank and DHW tank connected to the boiler On/off PUMP 0-10V S AMB C S AMB B S AMB A 4 3 2 1 2 1...
-
Page 22: Pool Connection
4. Installation Diematic iSystem For C 330 / C 630 ECO Solar sensor probe. Buffer tank. Connect the solar station to the solar collectors. Solar sensor probe. Settings to be made for this type of installation Parameters Access Settings to be made See ¼... - Page 23 Diematic iSystem For C 330 / C 630 ECO 4. Installation Pool heating cut-off control When the parameter I.TEL is on 0/1 B, the swimming pool is no longer heated when the contact is open (factory setting), only the antifreeze continues to be active.
-
Page 24: Connecting The Options
4. Installation Diematic iSystem For C 330 / C 630 ECO n Hourly programming of the secondary circuit pump The secondary pump operates during programme B comfort periods in summer and winter alike. n Stopping To prepare your pool for winter, consult your pool specialist. -
Page 25: Connection In Cascade
Diematic iSystem For C 330 / C 630 ECO 4. Installation Settings to be made to connect a second tank Parameters Access Settings to be made See ¼ "Displaying the parameters in extended mode", Installer level INSTALLATION EXTENDED #SYSTEM Menu page 33 ¼... - Page 26 4. Installation Diematic iSystem For C 330 / C 630 ECO DIEMATIC iSystem - Settings to be made for this type of installation: Master boiler Parameters Access Settings to be made See ¼ "Displaying the parameters in extended mode", Installer level...
-
Page 27: Commissioning
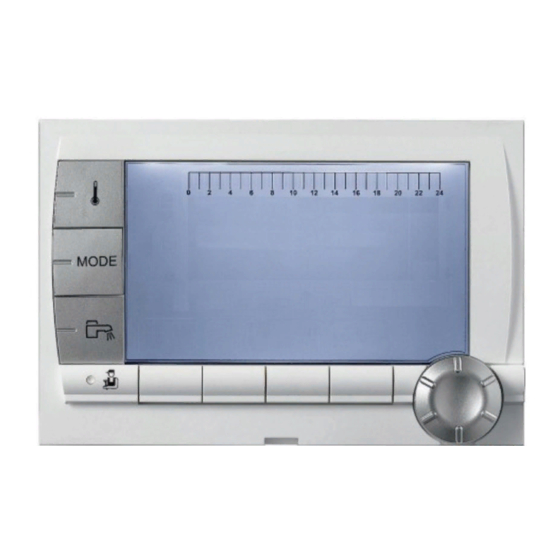
Diematic iSystem For C 330 / C 630 ECO 5. Commissioning Commissioning Control panel 5.1.1. Description of the keys AUTO Temperature setting key (heating, DHW, swimming pool) Operating mode selection key DHW override key Key to access the parameters reserved for the installer... -
Page 28: Description Of The Display
5. Commissioning Diematic iSystem For C 330 / C 630 ECO 5.1.2. Description of the display n Key functions Access to the various menus > Used to scroll through the menus Used to scroll through the parameters The symbol is displayed when help is available Used to display the curve of the parameter selected <... -
Page 29: Operating Modes
Diematic iSystem For C 330 / C 630 ECO 5. Commissioning n Solar (If connected) The solar load pump is running The top part of the tank is reheated to the tank set point The entire tank is reheated to the tank set point <... -
Page 30: Other Information
5. Commissioning Diematic iSystem For C 330 / C 630 ECO n System pressure Pressure indicator: The symbol is displayed when a water pressure sensor is connected. Flashing symbol: The water pressure is insufficient. Steady symbol: The water pressure is sufficient. -
Page 31: Access To The Various Browsing Levels
Diematic iSystem For C 330 / C 630 ECO 5. Commissioning 5.1.3. Access to the various browsing levels n User level The information and settings in the User level can be accessed by everyone. 1. Press the > key. SUNDAY 11:45 <... -
Page 32: Browsing In The Menus
5. Commissioning Diematic iSystem For C 330 / C 630 ECO n After Sales level The After Sales Service information and settings can be accessed by the professional providing the After Sales Service. 1. Press the > key. SUNDAY 11:45 <... -
Page 33: Putting The Appliance Into Operation
Diematic iSystem For C 330 / C 630 ECO 5. Commissioning 5. To modify the parameter, turn the rotary button. 6. To confirm, press the rotary button. CURRENT PROG.C "Choice of the timeprogram applied C" To cancel, press key h . -
Page 34: Checks And Adjustments After Commissioning
5. Commissioning Diematic iSystem For C 330 / C 630 ECO Checks and adjustments after commissioning 5.3.1. Displaying the parameters in extended mode The display mode on the control panel is set as standard in such a way as only to show the conventional parameters. It is possible to switch to extended mode by proceeding as follows: 1. - Page 35 Diematic iSystem For C 330 / C 630 ECO 5. Commissioning Installer level - #SYSTEM menu Parameter Adjustment range Description Factory setting Customer setting (1)(2) Use as a direct heating circuit DIRECT DIRECT CIRC.A Use as an independent programmable outlet PROGRAM.
- Page 36 5. Commissioning Diematic iSystem For C 330 / C 630 ECO Installer level - #SYSTEM menu Parameter Adjustment range Description Factory setting Customer setting Use as a domestic loop pump (1)(4) DHW LOOP DHW LOOP S.AUX Use as an independent programmable outlet PROGRAM.
- Page 37 Diematic iSystem For C 330 / C 630 ECO 5. Commissioning Installer level - #SYSTEM menu Parameter Adjustment range Description Factory setting Customer setting ON or OFF contact: I.TEL can be used as an antifreeze 0/1 DHW ANTIFR I.TEL activation inlet on circuit ECS ON or OFF contact: I.TEL: can be used as an antifreeze...
- Page 38 5. Commissioning Diematic iSystem For C 330 / C 630 ECO Influence of the parameter setting CT.TEL on the I.TEL contact CT.TEL I.TEL C contact closed C contact open 0/1 B+C+DHW The mode selected on the circuits is active. The antifreeze mode is active on the circuits concerned.
-
Page 39: Naming The Circuits And Generators
Diematic iSystem For C 330 / C 630 ECO 5. Commissioning 5.3.3. Naming the circuits and generators 1. Access the installer level: Press key - for around 5 seconds. 2. Select the menu #NAMES OF THE CIRCUITS. SUNDAY 11:45 Turn the rotary button to scroll through the menus or TEMP.: 68°... -
Page 40: Setting The Heating Curve
5. Commissioning Diematic iSystem For C 330 / C 630 ECO 5.3.4. Setting the heating curve 1. Access the installer level: Press key - for around 5 seconds. 2. Select the menu #SECONDARY INSTAL.P. SUNDAY 11:45 Turn the rotary button to scroll through the menus or TEMP.: 68°... -
Page 41: Reading Out Measured Values
Diematic iSystem For C 330 / C 630 ECO 5. Commissioning n Heating curve without BCT Maximum temperature of the circuit C° Water temperature in the circuit for an outside temperature of 0°C DAY set point on the circuit Outside temperature for which the maximum water... - Page 42 5. Commissioning Diematic iSystem For C 330 / C 630 ECO User level - #MEASURES Menu Parameter Description Unit Outside temperature °C OUTSIDE TEMP. Room temperature of circuit A °C ROOMTEMP.A Room temperature of circuit B °C ROOMTEMP.B Room temperature of circuit C °C...
-
Page 43: Modifying The User Settings
Diematic iSystem For C 330 / C 630 ECO 5. Commissioning Modifying the user settings 5.5.1. Setting the set point temperatures To set the various heating, DHW and swimming pool temperatures, proceed as follows: 1. Press the C key. 2. To select the desired parameter, turn the rotary button. -
Page 44: Selecting The Operating Mode
5. Commissioning Diematic iSystem For C 330 / C 630 ECO 5.5.2. Selecting the operating mode To select an operating mode, proceed as follows: 1. Press the MODE key. 2. To select the desired parameter, turn the rotary button. 3. To modify the parameter, press the rotary button. -
Page 45: Forcing Domestic Hot Water Production
Diematic iSystem For C 330 / C 630 ECO 5. Commissioning 5.5.3. Forcing domestic hot water production To force domestic hot water production, proceed as follows: 1. Press the r key. 2. To select the desired parameter, turn the rotary button. -
Page 46: Setting The Time And Date
5. Commissioning Diematic iSystem For C 330 / C 630 ECO 5.5.5. Setting the time and date 1. To access user level: Press the > key. 2. Select the menu #TIME .DAY. SUNDAY 11:45 Turn the rotary button to scroll through the menus or modify a value. -
Page 47: Customising A Timer Programme
Diematic iSystem For C 330 / C 630 ECO 5. Commissioning User level - #CHOICE TIME PROG. Menu Parameter Adjustment range Description CURRENT PROG.A P1 / P2 / P3 / P4 Comfort programme activated (Circuit A) CURRENT PROG.B P1 / P2 / P3 / P4... - Page 48 5. Commissioning Diematic iSystem For C 330 / C 630 ECO 6. b : Day selection Press key b / v until the symbol b is displayed. PROG P2 C Turn the rotary button to the right to select the day(s) desired.
-
Page 49: Setting An Annual Clock
Diematic iSystem For C 330 / C 630 ECO 5. Commissioning User level - #TIME PROGRAM Menu Comfort periods / Filling enabled: P2 _______________ P3 _______________ P4 _______________ _______________ TIME PROG.DHW Monday Tuesday Wednesday Thursday Friday Saturday Sunday Monday TIME PROG.AUX... - Page 50 5. Commissioning Diematic iSystem For C 330 / C 630 ECO circuit A, C and DHW AC+W B+C+W circuit B, C and DHW circuit A, B, C and DHW 4. Set the start date and the end date of the shutdown selected.
- Page 51 Diematic iSystem For C 330 / C 630 ECO 5. Commissioning User level - #ANNUAL PROG Menu Description Factory Adjustment range setting Selection of the circuit stopped OFF STOP N 4 OFF, A, B, A+B, C, AC, B+C, A+B+C, SU,...
-
Page 52: Modifying The Installer Settings
5. Commissioning Diematic iSystem For C 330 / C 630 ECO Modifying the installer settings 5.6.1. Language selection 1. Access the installer level: Press key - for around 5 seconds. 2. Select the menu #LANGUAGE. SUNDAY 11:45 Turn the rotary button to scroll through the menus or TEMP.: 68°... - Page 53 Diematic iSystem For C 330 / C 630 ECO 5. Commissioning User level - #SETTING Menu Parameter Adjustment range Description Factory setting Customer setting 15 to 30 °C Used to set the outside temperature 22 °C SUM/WIN above which heating will be shut down.
-
Page 54: Professional Settings
5. Commissioning Diematic iSystem For C 330 / C 630 ECO 5.6.3. Professional settings 1. Access the installer level: Press key - for around 5 seconds. 2. Set the following parameters: SUNDAY 11:45 Turn the rotary button to scroll through the menus or TEMP.: 68°... - Page 55 Diematic iSystem For C 330 / C 630 ECO 5. Commissioning Installer level - #SECONDARY LIMITS Menu Parameter Adjustment range Description Factory setting OFF, -8 to +10 °C Outside temperature at which the installation’s antifreeze +3 °C OUT.ANTIFREEZE protection is activated.
- Page 56 5. Commissioning Diematic iSystem For C 330 / C 630 ECO Installer level - #SECONDARY INSTAL.P Menu Parameter Adjustment range Description Factory Customer setting setting 0 (10 hours) to 10 Characterisation of building’s inertia: 3 (22 hours) BUILD.INERTIA (50 hours) 0 for a building with low thermal inertia.
- Page 57 Diematic iSystem For C 330 / C 630 ECO 5. Commissioning Installer level - #SECONDARY INSTAL.P Menu Parameter Adjustment range Description Factory Customer setting setting 0 to 10 V Voltage corresponding to the instruction 0.5 V (1)(4) VMIN/OFF 0-10V set minimum...
- Page 58 5. Commissioning Diematic iSystem For C 330 / C 630 ECO Installer level - #SECONDARY INSTAL.P Menu Parameter Adjustment range Description Factory Customer setting setting The anti legionella function acts to LEG PROTEC prevent the development of legionella in the dhw tank, these bacteria are responsible for legionellosis.
- Page 59 Diematic iSystem For C 330 / C 630 ECO 5. Commissioning n CIRC.CURVE .. Heating curve circuit A, B or C Outside temperature (°C) Water flow temperature (°C) Maximum temperature of the circuit B - C M001678-B n ANTICIP.A, ANTICIP.B, ANTICIP.C...
- Page 60 5. Commissioning Diematic iSystem For C 330 / C 630 ECO STOP DRYING TEMP START DRYING TEMP Today NB DAYS DRYING Normal regulation (End of drying) Heating temperature setting (°C) 00:00 00:00 00:00 Example STOP DRYING TEMP: 47 °C START DRYING TEMP: 20 °C...
-
Page 61: Configuring The Network
Diematic iSystem For C 330 / C 630 ECO 5. Commissioning For circuits with a room sensor: 4 When the room temperature is lower than the room sensor set point: The reduced temperature is maintained during reduced periods. The circuit pump operates constantly. - Page 62 5. Commissioning Diematic iSystem For C 330 / C 630 ECO Installer level - #NETWORK Menu Parameter Adjustment range Description Factory setting Customer setting ON / NO ON: System in cascade CASCADE Specific menu: Enlist VMs in cascade VM NETWORK mode (See following chapter: "Connect...
- Page 63 Diematic iSystem For C 330 / C 630 ECO 5. Commissioning 2. Select SYSTEM NETWORK and press the rotary button to go to the specific menu. CASCADE MASTER CONTROLER SYSTEM NETWORK FUNCT TRADITIONAL INTER STAGE TIMER < AUTO C002409-C-04 3. To add a slave appliance to the network, select ADD SLAVE.
-
Page 64: Return To The Factory Settings
5. Commissioning Diematic iSystem For C 330 / C 630 ECO 5.6.5. Return to the factory settings To reset the appliance, proceed as follows: 1. Press key C , > and j simultaneously for 4 seconds. The menu 4" #RESET is displayed. -
Page 65: Maintenance
Diematic iSystem For C 330 / C 630 ECO 6. Maintenance Maintenance General instructions for the user The boiler displays a message whenever maintenance is necessary. 1. When the message, REVISION, is displayed, press ? to display the installer’s telephone number. -
Page 66: Customising Maintenance
6. Maintenance Diematic iSystem For C 330 / C 630 ECO Customising maintenance 6.3.1. Maintenance message The boiler incorporates a function that can be used to display a maintenance message. To set the parameters for this function, proceed as follows: 1. -
Page 67: Contact Details Of The Professional For After Sales Support
Diematic iSystem For C 330 / C 630 ECO 6. Maintenance 6.3.2. Contact details of the professional for After Sales Support In order to assist the user if an error or service message is displayed, it is possible to provide the contact details of the professional to be contacted. -
Page 68: Troubleshooting
7. Troubleshooting Diematic iSystem For C 330 / C 630 ECO Troubleshooting Anti-hunting When the boiler is in Anti-short-cycle operating mode, the symbol ? flashes. 1. Press the "?" key. The message Operation assured when the restart temperature will be reached is displayed. - Page 69 Diematic iSystem For C 330 / C 630 ECO 7. Troubleshooting Code Messages Description Checking / solution Maximum heat exchanger The water flow in the installation is insufficient BL.CS OPEN temperature increase has been Check the circulation (direction, pump, valves)
- Page 70 7. Troubleshooting Diematic iSystem For C 330 / C 630 ECO Code Messages Description Checking / solution Incorrect setting of the gas pressure switch on the SCU PCB Incorrect setting of the gas BL.GAS PRESS pressure switch on the SCU...
-
Page 71: Message History
Diematic iSystem For C 330 / C 630 ECO 7. Troubleshooting Message history The menu #MESSAGE HISTORIC is used to consult the last 10 messages displayed by the control panel. 1. Access the "After Sales" level: Hold down the - key until #PARAMETERS is displayed. - Page 72 7. Troubleshooting Diematic iSystem For C 330 / C 630 ECO 3. Press the ? key. Follow the instructions displayed to solve the problem. 4. Consult the meaning of the codes in the table below: SUNDAY 11:45 TEMP. : 68°...
- Page 73 Diematic iSystem For C 330 / C 630 ECO 7. Troubleshooting Code Faults Cause Description Checking / solution of the fault Temperature of heat exchanger Bad connection DEF.OUTLET S. too low Check the wiring between the PCU PCB and the...
- Page 74 7. Troubleshooting Diematic iSystem For C 330 / C 630 ECO Code Faults Cause Description Checking / solution of the fault Return temperature too low Bad connection BACK S.FAILURE Check the wiring between the PCU PCB and the sensor Check that the SU PCB is correctly in place...
- Page 75 Diematic iSystem For C 330 / C 630 ECO 7. Troubleshooting Code Faults Cause Description Checking / solution of the fault Difference between the return Sensor fault DEF.DT.RET.ECH temperature and the exchanger Check the Ohmic value of the sensor temperature too big...
- Page 76 7. Troubleshooting Diematic iSystem For C 330 / C 630 ECO Code Faults Cause Description Checking / solution of the fault BURNER FAILURE PCU 5 burner start-up failures No ignition Check the wiring between the PCU PCB and the ignition transformer...
- Page 77 Diematic iSystem For C 330 / C 630 ECO 7. Troubleshooting Code Faults Cause Description Checking / solution of the fault The boiler flow sensor has short- Bad connection DEF.OUTLET S. circuited Check the wiring between the PCU PCB and the...
- Page 78 7. Troubleshooting Diematic iSystem For C 330 / C 630 ECO Code Faults Cause Description Checking / solution of the fault Communication failure between Bad connection PCU COM.FAIL the PCU and SCU PCBs Check the wiring between the PCU and SCU...
- Page 79 Diematic iSystem For C 330 / C 630 ECO 7. Troubleshooting Code Faults Cause Description Checking / solution of the fault Domestic hot water sensor fault Bad connection DHW S.FAILURE Remarks: Check whether the sensor is connected: Heating of domestic hot water is no ¼See chapter: "Deletion of sensors from...
-
Page 80: Deletion Of Sensors From The Memory In The Pcb
7. Troubleshooting Diematic iSystem For C 330 / C 630 ECO Code Faults Cause Description Checking / solution of the fault Sensor fault tank 2 Bad connection DHW 2 S.FAIL Check whether the sensor is connected: ¼See chapter: "Deletion of sensors from the memory in the PCB", page 79... -
Page 81: Failure History
Diematic iSystem For C 330 / C 630 ECO 7. Troubleshooting Failure history The menu #DEFAULT HISTORIC is used to consult the last 10 faults displayed by the control panel. 1. Access the "After Sales" level: Hold down the - key until #PARAMETERS is displayed. - Page 82 7. Troubleshooting Diematic iSystem For C 330 / C 630 ECO After Sales level - #PARAMETERS Menu Parameter Description Master boiler active PERMUT Number of boilers requesting heating STAGE Number of boilers recognised in the cascade NB.CASC. Number of DIEMATIC VM control systems recognised in the cascade NB.
- Page 83 Diematic iSystem For C 330 / C 630 ECO 7. Troubleshooting After Sales level - #TEST OUTPUTS Menu Parameter Adjustment range Description Stop/start pump circuit A P.CIRC.A ON / NO Stop/start pump circuit B ON / NO P.CIRC.B Stop/start pump circuit C ON / NO P.CIRC.C...
-
Page 84: Control System Sequence
7. Troubleshooting Diematic iSystem For C 330 / C 630 ECO After Sales level - #INFORMATION menu Parameter Description Remote control version number NUMBER REMOT A Remote control version number NUMBER REMOT B Remote control version number NUMBER REMOT C Clock calibration CALIBRA.CLOCK... - Page 85 Diematic iSystem For C 330 / C 630 ECO 7. Troubleshooting Control system sequence Status Sub-status Operation Boiler on heating service Nominal internal set point Limited internal set point Output control Temperature protection gradient level 1 (Modulate down) Temperature protection gradient level 2 (Part load)
- Page 88 +34 935 4 75 850 39 rue Jacques Stas - B.P.12 L- 2549 LUXEMBO URG info@dedietrich-calefaccion.es +352 (0)2 401 401 www .dedietrich-calefaccion .es www .neuberg.lu www .dedietrich-heating .com MEIER TOBLER DE DIETRICH SERVICE Bahnstr a sse 24 - CH - 8603 SCHWE RZENBACH...
Need help?
Do you have a question about the Diematic iSystem and is the answer not in the manual?
Questions and answers