Table of Contents
Advertisement
Advertisement
Table of Contents

Related Manuals for REXON RL-502


Summary of Contents for REXON RL-502
- Page 1 RL-502 144/430MHZ DUAL BAND FM TRANSCEIVER OPERATION INSTRUCTION RoHS...
-
Page 2: Table Of Contents
Table of Contents Packing List ������������������������������������������������������������������������������������������������1 Cautions ������������������������������������������������������������������������������������������������������2 Parts Name & Functions ������������������������������������������������������������������������3 Fitting & Removing the Battery Pack ������������������������������������������������4 Installation the battery pack ����������������������������������������������������������� 4 Remove the battery pack ����������������������������������������������������������������� 4 Installation the antenna �������������������������������������������������������������������� 4 Attachment belt clip ��������������������������������������������������������������������������� 5 Installation Mic &... - Page 3 Menu Operation ���������������������������������������������������������������������������������11 Scan Type Selection ��������������������������������������������������������������������������11 TOT (Time-Out Timer) ���������������������������������������������������������������������12 VOX Level Setting ������������������������������������������������������������������������������12 Call Setting �������������������������������������������������������������������������������������������12 Roger Beep Setting ���������������������������������������������������������������������������13 Beep Setting ����������������������������������������������������������������������������������������13 Key Lock ������������������������������������������������������������������������������������������������13 Emergency Channel Setting ����������������������������������������������������������14 Backlit Setting �������������������������������������������������������������������������������������14 Transmit Power Setting �������������������������������������������������������������������14 Auto Power Off ����������������������������������������������������������������������������������15 Scan CTCSS Setting ���������������������������������������������������������������������������15 Scan DCS Setting �������������������������������������������������������������������������������15 Saving Mode Setting ������������������������������������������������������������������������16...
- Page 4 VOX Delay Setting �����������������������������������������������������������������������������21 TOT Reminder Setting ���������������������������������������������������������������������21 Busy Channel Locked Out ��������������������������������������������������������������21 Dual Watch Setting ���������������������������������������������������������������������������22 Repeater Setting ��������������������������������������������������������������������������������22 Quick index of menu ��������������������������������������������������������������������������� 23 Annex I ������������������������������������������������������������������������������������������������������ 26 CTCSS �����������������������������������������������������������������������������������������������������26 DCS ���������������������������������������������������������������������������������������������������������26 Annex II ����������������������������������������������������������������������������������������������������� 29 Technical Specifications ������������������������������������������������������������������29...
-
Page 5: Packing List
Packing List ITEM Q’ty RL-502 Radio Antenna Battery Pack Charger Belt Clip Operation Instruction Antenna Battery Charger Belt Clip Operation Instruction PAGE 1... -
Page 6: Cautions
Cautions * NEVER transmit without antenna� * USE DC power supply, take notice of power voltage must be between 6V and 8V to avoid damaging the unit� * PLEASE keep the radio dry� Rainwater or damp will corrode electronic circuits� * DO NOT open the unit�... -
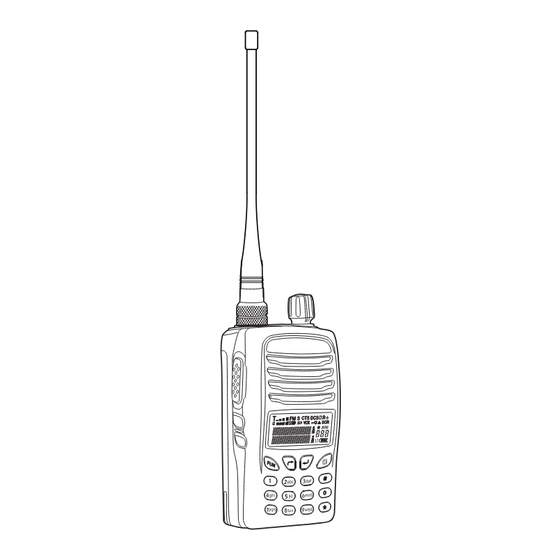
Page 7: Parts Name & Functions
Parts Name & Functions Antenna Connector Power/Volume knob [PWR/VOL] LED Indicator Loudspeaker Microphone LCD Display UP & Down Button Function(FUN) Enter/Menu / Exit button Button VHF/UHF Switch Button Release Button Push to talk Button Extension [PTT] MIC/SPK LAMP Button Monitor Button [MON] Battery Pack PAGE 3... -
Page 8: Fitting & Removing The Battery Pack
Fitting & Removing the Battery Pack Installation the battery pack * Fit the bottom edge of the battery pack into the holes of the transceiver cabinet bottom. * Push the battery pack down to the transceiver aluminum chassis till the end click. Remove the battery pack * Keep pressing the release buckle of the battery pack and lift the battery pack up from the transceiver body. -
Page 9: Attachment Belt Clip
Attachment belt clip Attach the Belt Clip * Remove the battery pack from radio. * Put belt clip into groove on battery pack until end click. Detach Belt Clip: * Remove the battery pack from radio and press the release buckle until spring is opened. -
Page 10: Symbols Description
Symbols Description Indicates battery level Dispersion to above receiving frequency Dispersion to under receiving frequency Indicates Saving Mode Indicated while keypad has been locked Indicates Digital Code Squelch Indicates Continued Tone Code Squelch Indicates VOX is activated VOX Activate Indicates Hi Power Transmission Indicates Low Power Transmission Indicates strength of receiving Indicates Frequency or Channel... -
Page 11: Basic Operation
Basic Operation Turn the radio ON & OFF 1) Rotate the PWR/VOL knob clockwise till the radio is turned on. The radio gets started to auto test for two seconds. During auto testing, all icons will appear on LCD. 2) After auto testing is done, LCD will show channel number and what functions have been activated by your dealer. -
Page 12: Display Mode
Display Mode * Frequency Mode Channel Mode * Memorised Mode Refer the menu item 6 Channel Selection In channel mode, pressing the button to increase or decrease the channel number � The other way, pressing channel number goes to desired channel by alphanumeric keypad� Switch Main band to Sub band In frequency or memorised mode, press ”*”... -
Page 13: Delete A Channel
Delete A Channel Set radio to memorised mode and select the channel will be deleted and then turn off the radio, next to keep- ing press button and turn radio on, The LCD shows “DEL” char, finally press button to save and exit� CLONE Operation To connection as following illustration A)Target Radio: Just to turn the radio on... -
Page 14: Hot Key
Hot key RF Power Setting Squelch Level Setting Display Mode Setting Display Single Band VOX Level Setting TOT Setting Transmitter and Receiver Sub Tone Setting Receiver Sub Tone Setting Transmitter Sub Tone Setting Start Scanning Reverse Frequency Switch to emergency channel Save or duplicate a channel Keypad lock Unlock key pad for 2 second... -
Page 15: Menu Items
Menu items Menu Operation 1. In channel or Frequency Mode 2. Press button to enter menu mode. 3. Press button to select menu item. 4. Press to enter the function. 5. Press to select parameters. 6. Press button to confirm and return menu. 7. -
Page 16: Tot (Time-Out Timer)
TOT (Time-Out Timer) TOT is the function that prevents from locking up a re- peater or frequency by prolonged keying of PTT� The time-out timer limits the amount of time you have to transmit your message� When limited time reaches , Transmitter will be cut off�... -
Page 17: Roger Beep Setting
Roger Beep Setting In menu mode, press button to select item 5 until the LCD shows “ROG”, press to enter the function and press to select the beep type from (0FF, 1, 2�3, 4)� Press button to confirm and return to menu mode, press for other setting or press button comes back to stand by mode�... -
Page 18: Emergency Channel Setting
Emergency Channel Setting In menu mode, press button to select item 8 until the LCD shows “MEM” char, press enter the function and press to select a channel as emergency channel from channel 1 to 128� Press button to confirm and return to menu mode, press for other setting or press button comes back to stand by mode�... -
Page 19: Auto Power Off
stand by mode� Auto Power Off In menu mode, press button to select item 11 until the LCD shows “APO” char, press enter the function and press to select from OFF, 10M, 30M, 1H or 2H Press button to confirm and return to menu mode, press for other setting or press button comes back to stand by mode�... -
Page 20: Saving Mode Setting
At scanning mode, the channel has a DCS code, the LCD appears the code, press to confirm this code and press PTT key to talk. Under menu. Squelch Level Setting In menu mode, press button to select item 14 until the LCD shows “SQL” char, press enter the function and press to select from squelch level from 0FF, 1, 2���, 9�... -
Page 21: Transmitter & Receiver Sub Tone Setting
for other setting or press button comes back to stand by mode� Transmitter & Receiver Sub Tone Setting In menu mode, press button to select item 17 until the LCD shows “C-CTC” char, press to enter the function and press to select CTCSS code ( press “*”... -
Page 22: Frequency Step Setting
Beat Frequency Setting In menu mode, press button to select item 20 until the LCD shows “OFFSET ” char, press to enter the function and press to select offset frequency or keyin the number from 00�000 MHz to 69�9875MHz, Press button to confirm and return to menu mode, press for other setting or press button comes back to... -
Page 23: Fm Radio Mode Setting
FM Radio Mode Setting In menu mode, press button to select item 23 until the LCD shows “FMR ” char, press enter the function and press to select from On/Off� * ON: To enable monitor the TX/Rx activity, and return to FM radio after 10 sends later. -
Page 24: Burst Tone 1750Hz
The operation is just for channel or memorised mode. Burst Tone 1750Hz In menu mode, press button to select item 26 until the LCD shows “1750” char, press enter the function and press to select transmitting timing from (OFF/1000/2000/3000/4000/5000 ms), Press button to confirm and return to menu mode, press for other setting or press... -
Page 25: Vox Delay Setting
* ON: potential difference use in current channel only, it disable function after change channel or frequency * OFF: potential difference use in any channel/frequency Press button to confirm and return to menu mode, press for other setting or press button comes back to stand by mode�... -
Page 26: Dual Watch Setting
Press button to confirm and return to menu mode, press for other setting or press button comes back to stand by mode� * ON: The radio does not allow to transmit with matching group code. * OFF: The radio allows to transmit with matching group code.. Dual Watch Setting In menu mode, press button to select... -
Page 27: Quick Index Of Menu
Quick index of menu In channel/frequency mode, press button to enter menu , press button to select menu item, press to enter the func- tion, press to select parameters, Press button to confirm and return to menu mode, press for other setting or press button comes back to stand by mode�... - Page 28 AUTO/ LED Setting Both ON/OFF Rf Power Setting Both High/Low OFF/10M/30M Both Auto Power Off 1H/2H Scan CTCSS Both CTSCAN Scan DCS Both DCSCAN Frequency Squelch Setting Saving Mode Channel SAVE ON/OFF CH/CHFREQ Display Mode Frequency MODE FREQ/NAME Frequency C-CTC Refer Annex I TX/RX Code Setting Refer Annex I...
- Page 29 5K/6�25K/10K/12�5K Freq Step Setting Both STEP 25K/50K/100K FM Radio Mode Both ON/OFF Both SCNADD ADD/DEL Add Scan Channel Channel Name Tag Both CHNAME 1750Hz Time OFF/1/2 Both 1750EN Setting 3/4/5S Frequency Channel Spacing WIDE/NAR Auto Repeater ON/OFF Channel Setting 0�3/0�5/1 VOX Delay Setting Frequency VOXDL...
-
Page 30: Annex I
Annex I CTCSS PAGE 26... - Page 31 PAGE 27...
- Page 32 PAGE 28...
-
Page 33: Annex Ii
Annex II Technical Specifications GENERAL Frequency 136-174MHZ 400-470MHz Channel Numbers Channel Spacing 12.5KHz/25kHz Modulation Mode. F3E (FM) Supply Voltage 7.4V DC Operation Temperature- 25°C to +60°C Frequency Stability ± 2.5ppm Size (mm) W 59 x L 122 X H 40 Weight 220 grams w/o battery back Approval Directive...
Need help?
Do you have a question about the RL-502 and is the answer not in the manual?
Questions and answers