Table of Contents
Advertisement
Quick Links
DMX-Showlaser-Gerät
DMX Show Laser Unit
LSE-4LRG
Bestellnummer 38.6970
BEDIENUNGSANLEITUNG
INSTRUCTION MANUAL
MODE D'EMPLOI
ISTRUZIONI PER L'USO
GEBRUIKSAANWIJZING
MANUAL DE INSTRUCCIONES
INSTRUKCJA OBSŁUGI
SIKKERHEDSOPLYSNINGER
SÄKERHETSFÖRESKRIFTER
TURVALLISUUDESTA
ELECTRONICS FOR SPECIALISTS ELECTRONICS FOR SPECIALISTS ELECTRONICS FOR SPECIALISTS ELECTRONICS FOR SPECIALISTS
Advertisement
Table of Contents

Related Manuals for IMG STAGELINE LSE-4LRG


Summary of Contents for IMG STAGELINE LSE-4LRG
- Page 1 DMX-Showlaser-Gerät DMX Show Laser Unit LSE-4LRG Bestellnummer 38.6970 BEDIENUNGSANLEITUNG INSTRUCTION MANUAL MODE D’EMPLOI ISTRUZIONI PER L’USO GEBRUIKSAANWIJZING MANUAL DE INSTRUCCIONES INSTRUKCJA OBSŁUGI SIKKERHEDSOPLYSNINGER SÄKERHETSFÖRESKRIFTER TURVALLISUUDESTA ELECTRONICS FOR SPECIALISTS ELECTRONICS FOR SPECIALISTS ELECTRONICS FOR SPECIALISTS ELECTRONICS FOR SPECIALISTS...
- Page 2 Bevor Sie einschalten … Before switching on … Wir wünschen Ihnen viel Spaß mit Ihrem neuen We wish you much pleasure with your new “img Gerät von „img Stage Line“. Bitte lesen Sie diese Stage Line” unit. Please read these operating Bedienungsanleitung vor dem Betrieb gründlich instructions carefully prior to operating the unit.
- Page 3 Π...
-
Page 4: Übersicht Der Bedienelemente Und Anschlüsse
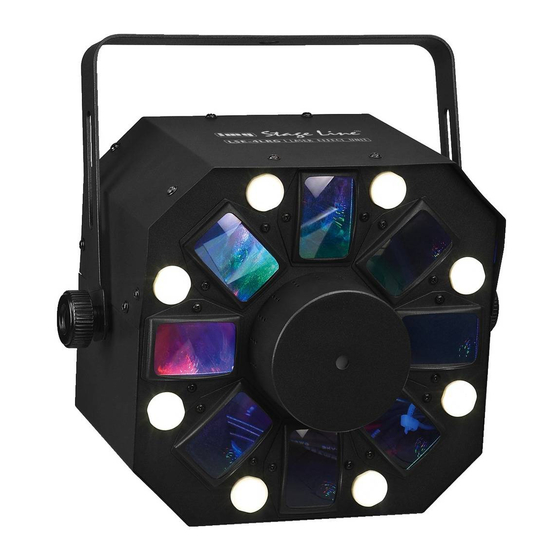
Auf der ausklappbaren Seite 3 finden Sie alle be - Hinweise schriebenen Bedienelemente und Anschlüsse. für den sicheren Gebrauch Das Gerät entspricht allen relevanten Richtlinien Übersicht der Bedienelemente der EU und ist deshalb mit gekennzeichnet. und Anschlüsse 2.1 Hinweise speziell für Lasergeräte 1 weiße Stroboskop-LEDs (8 ×) Das Gerät entspricht der Laserklasse 3 R. -
Page 5: Installation
Sortiment von „img Stage Line“. Gerät zusammen mit allen Zusatzkomponenten (z. B. Spiegel, Linsen, Projektionsfläche) zu einer — Werden mehrere LSE-4LRG verwendet, kann Lasereinrichtung aufbaut, wird rechtlich zum Her- die Buchse POWER OUT (16) des ersten Gerä- steller dieser Einrichtung. Beachten Sie unbe- tes mit der Netzbuchse (15) des zweiten Gerätes... -
Page 6: Bedienung
einem Kaltgerätestecker und einer Kaltgeräte- gramme blinkt oder die Anzeige für musik- kupplung benötigt (z. B. das Kabel AAC-170/SW gesteuerte Programme. aus dem Sortiment von MONACOR). Das zweite 2) Mit der Taste UP oder DOWN die Nummer des Gerät kann dann wieder mit dem dritten Gerät Showprogramms wählen: verbunden werden usw., bis alle Geräte in einer Programmablauf mit... -
Page 7: Dmx-Steuerung
Zur Bedienung über ein DMX-Lichtsteuergerät 4 – 12 (z. B. DMX-1440 oder DMX-510USB von „img 12 – 20 Stage Line“) verfügt das LSE-4LRG über 9 DMX- 20 – 28 Steuerkanäle. DMX ist die Abkürzung für Digital Multiplex und bedeutet digitale Steuerung von DMX-Adressenbelegung des LSE-4LRG mehreren DMX-Geräten über eine gemeinsame... - Page 8 5.3.3 DMX-Funktionen DMX-Wert Funktion DMX-Wert Funktion Kanal 1: Betriebsmodus Kanal 2: farbige LEDs ein- und ausschalten 000 – 009 Blackout (alle Lichtstrahlen aus) 000 – 009 Blackout (alle LEDs aus) 010 – 014 rote LED eingeschaltet Aut 0 (autom. Showprogramm mit Laser + far- 010 –...
-
Page 9: Technische Daten
Technische Daten Laser Laserklasse: ..3 R; bei einem Ab - DMX-Wert Funktion stand ab 1 m wird die Laserklasse 2M ein- Kanal 5: weiße Strobe-LEDs gehalten Leistung / Wellenlänge 000 – 009 Blackout (Strobe-LEDs aus) roter Laser: . -
Page 10: Operating Elements And Connections
All operating elements and connections de - Safety Notes scribed can be found on the fold-out page 3. The unit corresponds to all relevant directives of the EU and is therefore marked with Operating Elements 2.1 Special notes for laser units and Connections The unit corresponds to the laser class 3R. - Page 11 Switch closed = laser on Applications Switch open = laser off The show laser unit LSE-4LRG projects a variety of Important: If no emergency stop switch is connected, red and green laser spot patterns combined with insert the connection plug supplied into the jack RE- colour LED light beams and white stroboscope MOTE;...
-
Page 12: Independent Operation
Operation 3) Press the button ENTER to confirm: Use the control buttons FUNC, UP, DOWN and — When a music-controlled program has ENTER (5) to select the operation mode and vari- been selected, the display will stop flashing. ous functions (fig. 3). The display (7) indicates the Turn the control SENSITIVITY (9) for the setting and the mode. -
Page 13: Dmx Control
Example: If the first DMX chan- In this mode, one unit (master unit) controls the nel of the LSE-4LRG is to be controlled by DMX other units (slave units). Connect the units with address 4, set the start address on the show laser each other in a chain;... - Page 14 5.3.3 DMX functions DMX value Function DMX value Function Channel 1: operating mode Channel 2: switch colour LEDs on and off 000 – 009 blackout (all light beams off) 000 – 009 blackout (all LEDs off) 010 – 014 red LED switched on Aut 0 (automatic show program with laser + 010 –...
-
Page 15: Specifications
Specifications Laser Laser class: ..3 R; for a distance DMX value Function exceeding 1 m, laser class 2 M applies Channel 5: white strobe LEDs Power / wavelength red laser: ..100 mW/ 650 nm 000 –... -
Page 16: Eléments Et Branchements
Vous trouverez sur la page 3, dépliable, les élé- Conseils dʼutilisation et de sécurité ments et branchements décrits. Cet appareil répond à toutes les directives néces- saires de lʼUnion européenne et porte donc le sym- bole Eléments et branchements 2.1 Conseils spécifiques pour les lasers 1 LEDs stroboscope blanches (8 ×) Ce laser correspond à... -
Page 17: Possibilités Dʼutilisation
éteindre les faisceaux laser à distance à la Possibilités dʼutilisation prise REMOTE (17), Le laser LSE-4LRG projette des modèles multiples Interrupteur fermé = laser allumé de spots de laser rouges et verts, combinés avec Interrupteur ouvert = laser éteint des faisceaux couleurs LED et des éclairs strobo-... -
Page 18: Fonctionnement Autonome
— Si plusieurs LSE-4LRG sont utilisés, la prise ment automatique clignote ou pour les pro- POWER OUT (16) du premier appareil peut être grammes gérés par la musique. reliée à la prise secteur (15) du deuxième appa- 2) Avec la touche UP ou DOWN, sélectionnez le reil. -
Page 19: Gestion Dmx
Si le pre- b) Mémorisez le réglage avec la touche ENTER. mier canal DMX du LSE-4LRG doit être géré par le Lʼaffichage ne clignote plus. Sʼil continue à contrôleur par exemple via lʼadresse DMX 4, réglez clignoter, aucun signal de commande de sur le laser lʼadresse de démarrage 4. -
Page 20: Fonctions Dmx
5.3.3 Fonctions DMX Valeur DMX Fonction Valeur DMX Fonction Canal 1: mode de fonctionnement Canal 2 : allumer/éteindre les LEDs de couleur 000 – 009 blackout (tous les faisceaux de lumière éteints) 000 – 009 blackout (toutes les LEDs éteintes) 010 –... -
Page 21: Caractéristiques Techniques
Caractéristiques techniques Laser Valeur DMX Fonction Classe laser : ..3 R ; à une distance au-delà de 1 m, Canal 5 : LEDs stroboscope blanches classe laser 2 M Puissance / Longueur dʼondes 000 –... -
Page 22: Elementi Di Comando E Collegamenti
A pagina 3, se aperta completamente, vedrete 17 Presa REMOTE per un interruttore d'emer- tutti gli elementi di comando e i collegamenti genza descritti. Importante: Se non è collegato nessun interruttore dʼemergenza, il connettore in dotazione deve essere inserito nella presa REMOTE, altrimenti, i raggi laser son si possono attivare. -
Page 23: Avvertenze Generali Di Sicurezza
Lʼapparecchio è ora acceso. dato dalla musica di vari programmi di light-show. 5) Per attivare i raggi laser inserire la chiave in Inoltre è possibile assemblare più LSE-4LRG (fun- zionamento master- slave), per generare degli dotazione nella serratura LOCK (13) e girare la effetti sincronizzati di luci. -
Page 24: Funzionamento Autonomo
1) Premere il tasto FUNC tante volte finché sul di “img Stage Line”. display lampeggia lʼindicazione per i pro- — Se si usano più LSE-4LRG, la presa POWER grammi a svolgimento automatico oppure lʼindi- OUT (16) del primo apparecchio può essere cazione... -
Page 25: Comando Dmx
1. ogni apparecchio deve avere il suo indirizzo di 1) Impostare su tutti gli apparecchi slave il modo start. Se il primo canale DMX del LSE-4LRG deve slave: essere comandato dallʼunità per comando luce a) Premere il tasto FUNC tante volte finché il p. - Page 26 5.3.3 Funzioni DMX Valore DMX Funzione Valore DMX Funzione Canale 1: Modo di funzionamento Canale 2: Accendere e spegnere i LED colorati 000 – 009 Blackout (tutti i raggi di luce spenti) 000 – 009 Blackout (tutti i LED spenti) 010 –...
-
Page 27: Dati Tecnici
Dati tecnici Laser Classe laser: ..3 R; con distanza da Valore DMX Funzione 1 m, conforme a classe 2 M Canale 5: LED bianchi stroboscopici Potenza / Lunghezza dʻonda Laser rosso: ..100 mW/ 650 nm 000 –... -
Page 28: Overzicht Van De Bedienings - Elementen En Aansluitingen
Op de uitklapbare pagina 3 vindt u een over- Veiligheidsvoorschriften zicht van alle bedieningselementen en de aan- Het apparaat is in overeenstemming met alle rele- sluitingen. vante EU-Richtlijnen en is daarom gekenmerkt Overzicht van de bedienings - elementen en aansluitingen 2.1 Specifieke aanwijzingen 1 Witte stroboscoopleds (8 ×) voor laserapparatuur... - Page 29 3) Een noodstopschakelaar waarmee de laser- Toepassingen stralen op afstand kunnen worden uitgescha- keld, kunt u met de bijgeleverde stekker op de Het showlaserapparaat LSE-4LRG projecteert tal- jack REMOTE (17) aansluiten.. rijke rode en groene laserpuntpatronen in combi- Schakelaar gesloten = laser aan...
-
Page 30: Autonoom Bedrijf
— Als u meerdere LSE-4LRG-apparaten gebruikt, 1) Druk enkele keren op de toets FUNC tot op het kan de jack POWER OUT (16) van het eerste display de melding voor automatisch apparaat met de POWER-jack (15) van het lopende programmaʼs knippert of de melding tweede apparaat verbonden worden. - Page 31 3) Sla met de toets ENTER de instelling op. Het guratie beschikbaar: display knippert niet meer. pen 1 = massa, 2 = DMX-, 3 = DMX+ U kunt de LSE-4LRG nu bedienen via het DMX-besturingsapparaat (DMX-functies Voor het aansluiten moeten speciale kabels voor de DMX-signaaloverdracht gebruikt worden (bv.
- Page 32 5.3.3 DMX-functies DMX-waarde Functie DMX-waarde Functie Kanaal 1: Bedrijfsmodus Kanaal 2: gekleurde leds in- en uitschakelen 000 – 009 Blackout (alle lichtstralen uit) 000 – 009 Blackout (alle leds uit) 010 – 014 rode led ingeschakeld Aut 0 (autom. showprogramma met laser 010 –...
-
Page 33: Technische Gegevens
Technische gegevens Laser Laserklasse: ..3 R; bij een afstand DMX-waarde Functie vanaf 1 m wordt de laserklasse 2 M nage- Kanaal 5: witte strobe-leds leefd Vermogen / golflengte 000 – 009 Blackout (alle strobe-leds uit) rode laser: . -
Page 34: Elementos De Funcionamiento Y Conexiones
Puede encontrar todos los elementos de fun- 17 Toma REMOTE para un interruptor de parada cionamiento y las conexiones que se describen de emergencia en la página 3 desplegable. Importante: Cuando no se conecte ningún interruptor de parada de emergencia, inserte el conector entre- gado en la toma REMOTE;... -
Page 35: Notas Generales De Seguridad
El LSE-4LRG se puede utilizar en gado en la toma REMOTE; de lo contrario, no se podrá escenarios y en discotecas, por ejemplo. - Page 36 1) Pulse el botón FUNC repetidamente hasta que “img Stage Line”. en el visualizador empiece a parpadear — Si se utilizan varios LSE-4LRG, la toma (para programas automáticos) o (para pro- POWER OUT (16) del primer aparato se puede gramas controlados por música).
-
Page 37: Control Dmx
Ejemplo: Si hay que controlar el primer canal DMX a) Pulse el botón FUNC repetidamente hasta del LSE-4LRG con la dirección DMX 4, ajuste la que en el visualizador empiece a parpadear dirección de inicio del láser en 4. Los otros 8 cana- les DMX del LSE-4LRG se asignarán automática-... - Page 38 5.3.3 Funciones DMX Valor DMX Función Valor DMX Función Canal 1: modo de funcionamiento Canal 2: conexión y desconexión de los LEDs de colores 000 – 009 Blackout (todos los haces de luz apagados) 000 – 009 Blackout (todos los LEDs apagados) 010 –...
-
Page 39: Especificaciones
Especificaciones Láser Valor DMX Función Clase del láser: ..3 R; para distancias superiores a 1 m, Canal 5: LEDs de estroboscopio blancos láser de clase 2 M Potencia / longitud de onda 000 – 009 Blackout (LEDs de estroboscopio apagados) Láser rojo: . -
Page 40: Elementy Operacyjne I Złącza
Proszę otworzyć instrukcję obsługi na stro- Środki bezpieczeństwa nie 3. Pokazano tam rozkład elementów opera- Urządzenie spełnia wszystkie wymagania norm UE cyjnych i złączy. dzięki czemu zostało oznaczone symbolem 2.1 Uwagi dotyczące laserów Elementy operacyjne i złącza Niniejsze urządzenie należy do klasy laserów 3R. 1 Białe diody stroboskopu (8 ×) Posiada następującą... - Page 41 (15) oraz do gniazdka sie- skopowe. ciowego (230 V~ / 50 Hz). LSE-4LRG może być sterowany sygnałem DMX z kontrolera (9 kanałów DMX), ale także pracować 5) Aby włączyć wiązkę lasera, włożyć kluczyk do niezależnie, odtwarzając automatyczne lub stero- włącznika LOCK (13) a następnie przekręcić...
- Page 42 ściowe POWER OUT (16). Należy połączyć je z gramów sterowanych muzyką) zacznie migać na gniazdem zasilania (15) kolejnego urządzenia. wyświetlaczu zacznie migać na wyświetlaczu. W tym celu można wykorzystać kabel zasilający 2) Za pomocą przycisku UP lub DOWN wybrać z 3-pinowym wtykiem IEC i 3-pinowym gniaz- numer programu: dem IEC (np.
-
Page 43: Sterowanie Dmx
Przykładowo: jeżeli pierwszy kanał b) Wcisnąć przycisk ENTER aby zatwierdzić DMX lasera LSE-4LRG ma być sterowany poprzez wybór. Wyświetlacz przestanie migać. Jeżeli adres startowy 4, należy ustawić na reflektorze ad- wyświetlacz nadal miga, urządzenia pod- res startowy na 4. - Page 44 5.3.3 Funkcje DMX Wartość Wartość Funkcja Funkcja Kanał 1: tryb pracy Kanał 2: włączanie i wyłączanie kolorowych diod 000 – 009 wygaszenie (wyłączenie wszystkich wiązek) 000 – 009 wygaszenie (wszystkie diody wył.) 010 – 014 czerwona dioda włączon Aut 0 (automatyczny program świetlny z lase- 010 –...
- Page 45 Specyfikacja Laser Wartość Funkcja Klasa lasera: ..3 R; przy odległości powyżej 1 m, klasa 2 M Kanał 5: białe diody stroboskopu Długość fali / moc lasera czerwony laser: ..100 mW/ 650 nm 000 –...
-
Page 46: Vigtige Sikkerhedsoplysninger
Læs nedenstående sikkerhedsoplysninger grun- digt igennem før ibrugtagning af enheden. Bortset fra sikkerhedsoplysningerne henvises til den engelske tekst. Vigtige sikkerhedsoplysninger Denne enhed overholder alle relevante EU-direkti- ver og er som følge deraf mærket 1.1 Note specielt for laser 1.2 Generelle sikkerhedsanvisninger Denne laser overholder class 3 R og har følgende ADVARSEL Enheden benytter livsfarlig net spæn- effekt og bølgelængde:... -
Page 47: Montering Og Ibrugtagning
Montering og ibrugtagning Enheden skal monteres på en sikker og forsvarlig måde. Personen, der installerer enheden sammen med øvrige komponenter (f. eks. spejle, linser, pro- jektionsområde) for at skabe et laser show, bliver den ansvarlige producent af dette samlede system. Vær under alle omstændigheder opmærksom på... - Page 48 Läs igenom säkerhetsföreskrifterna innan enheten tas i bruk. Ytterligare information återfinns på övriga språk i manualen. Säkerhetsföreskrifter Denna enhet uppfyller alla relevanta direktiv inom EU och har därför fått märkning. 1.1 Att notera för laser 1.2 Generella säkerhetsföreskrifter Denna laser är i enlighet med reglementet for klass VARNING Enheten använder högspänning in - 3 R och har följande effekt och våglängd: ternt.
- Page 49 Montering och driftsättning Enheten måste monteras på ett säkert och profes- sionellt sätt. Den som monterar denna och övriga enheter (speglar, optik, etc.) blir den officiella leve- rantören och straffansvarig vid felaktig montering. Var uppmärksam på alla varningar i kapitel 1.1. VARNING 1.
- Page 50 Ole hyvä ja tutustu seuraaviin ohjeisiin varmistaak- sesi tuotteen turvallisen käytön. Tarvitessasi lisätie- toja tuotteen käytöstä löydät ne muun kielisistä käyttöohjeista. Turvallisuudesta Tämä laite täyttää kaikki siihen kohdistuvat EU- direktiivit ja sille on myönnetty hyväksyntä. 1.1 Erityistä huomioitavaa lasereista 1.2 Yleisesti turvallisuudesta Tämä...
-
Page 51: Asennus Ja Käyttöönotto
Asennus ja käyttöönotto Laite tulee kiinnittää huolellisesti ja ammattitaitoi- sesti. Laitteen sekä lisäosien (esim. peili, linssit, projektio alue) asentajasta tulee laserjärjestelmän valmistaja. Huomioi silti varoitukset osiosta 1.1. VAROITUS 1. Turvallisuus säännökset ovat erilai- set eri maissa, joten tarkista sen maan säännökset, johon laserefek- tilaite asennetaan. - Page 54 ® MONACOR INTERNATIONAL GmbH & Co. KG • Zum Falsch 36 • 28307 Bremen • Germany Copyright © by MONACOR INTERNATIONAL. All rights reserved. A-1587.99.03.09.2015...
Need help?
Do you have a question about the LSE-4LRG and is the answer not in the manual?
Questions and answers