Table of Contents
Advertisement
Available languages
Available languages
Quick Links
Advertisement
Table of Contents

Related Manuals for auna Retro Plattenspieler


Summary of Contents for auna Retro Plattenspieler
- Page 1 Retro Plattenspieler 10027090 10027091 10027092 http://www.auna-multimedia.com...
- Page 2 Sehr geehrter Kunde, zunächst möchten wir Ihnen zum Erwerb Ihres Gerätes gratulieren. Bitte lesen Sie die folgenden Anschluss- und Anwendungshinweise sorgfältig durch und befolgen Sie diese um möglichen technischen Schäden vorzubeugen. Warnung Zur Reduzierung der Gefahr von Brand, elektrischem Schlag und Beschädigung: •...
-
Page 3: Transport Des Gerätes
Aufstellung • Stellen Sie das Gerät auf eine trockene, ebene, wasserfeste und hitzebeständige Oberfl äche. • Suchen Sie einen Aufstellort, an dem Kinder nicht an das Gerät gelangen können. • Die Steckdose muss leicht zugänglich sein, um im Notfall das Gerät schnell vom Stromkreis trennen zu können. • Installieren oder positionieren Sie dieses Gerät nicht in einem Bücherregal, Einbauschrank oder einem sonstigen engen Raum. - Page 4 (Puck) aus seiner Halterung auf der Oberseite des Plattenspielers und platzieren ihn auf der Spindel, bevor Sie die Platte aufl egen. Wechseln der Nadel Ihr Auna Plattenspieler ist bereits mit Universal-Nadel und Tonabnehmer ausgestattet, die sich für 331/3-, 45- und 78-rpm-Schallplatten eignen. Um die Nadel zu ersetzen, verfahren Sie bitte wie folgt: Entfernen des Tonabnehmers •...
-
Page 5: Sicherheitshinweise Und Gewährleistung
Line Out: • Verbinden Sie ein Klinke-Kabel (3,5mm, nicht im Lieferumfang enthalten) mit der Line-Out-Buchse auf der Rückseite des Plattenspielers und mit dem AUX-Eingang einer externen HiFi-Komponente wie zum Beispiel einem Verstärker. • Eventuell müssen Sie den Eingangspegel des anderen Geräts überprüfen. Subwoofer-Ausgang: • Der Subwoofer-Ausgang erlaubt Ihnen den Anschluss eines aktiven Subwoofers (nicht im Liefer umfang enthalten). -
Page 6: Hinweise Zur Entsorgung
Hinweise zur Entsorgung Befi ndet sich die linke Abbildung (durchgestrichene Mülltonne auf Rädern) auf dem Produkt, gilt die Europäische Richtlinie 2012/19/EU. Diese Produkte dürfen nicht mit dem normalen Hausmüll entsorgt werden. Informieren Sie sich über die örtlichen Regelungen zur getrennten Sammlung elektrischer und elektronischer Gerätschaften. Richten Sie sich nach den örtlichen Regelungen und entsorgen Sie Altgeräte nicht über den Hausmüll. -
Page 7: Precautions For Use
Precautions for use • Unpack all parts and remove protective material. • Do not connect the unit to the mains before checking the main voltage and before all other connections have been made. • Do not cover any vents and make sure that there is a space of several centimeters around the unit for ventilation. - Page 8 26. Do not allow anything to rest on the power cord. Do not locate this product where persons will walk on the cord. 27. If an extension cord is used with this product, make sure that the total of the ampere ratings on the products plugged into the extension cord do not exceed the extension cord ampere rating. Also, make sure that the total of all products plugged into the wall outlet does not exceed 10 amperes.
-
Page 9: Description And Operation
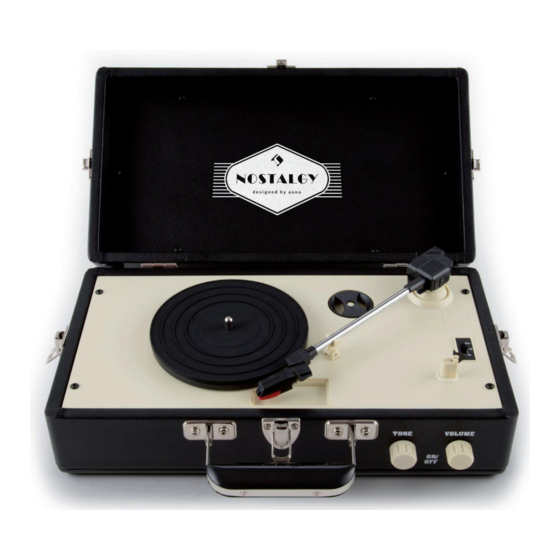
Description & Operation Description & Operation Operation 1. Rotate the ON-OFF VOLUME SWITCH located on the front panel to switch the unit ON. 2. Release the TONE ARM from the ARM LOCK and place it on the ARM REST. Important: The ARM LOCK is taller than the turntable and needs to be folded down to allow larger records to be played. - Page 10 Needle removal & installation The record player is already fitted with a universal needle (or stylus) suitable for playing 331/3, 45 or 78rpm records. The procedure for removing and re-fitting the needle is as follows: Removing the needle holder Gently pull down the tip of the stylus holder (1). Pull the cartridge forward (2). Pull it out and remove it from the tone arm head (3). Fitting a stylus cartridge After following the “Removing the Needle Holder” instructions on the previous page, follow steps 1 to 4 below to refit Position the red stylus holder with the Sapphire stylus facing down.
-
Page 11: Hints On Disposal
Line in Any component with an audio output, such as for instance a DAB Radio Module, CD/Cassette Player, MP3 Player, can be connected by using a cable with a 3.5mm dia. jack plug (a 3.5mm to 3.5mm Line In cord is supplied). 1. Turn the unit on and adjust the volume. 2. Plug the supplied Line In cord into the LINE-IN JACK on the rear of the unit. 3. Insert the plug at the other end of the Auxiliary cable into the Output Jack or 3.5mm dia. Headphone Jack of the external Audio Player.
Need help?
Do you have a question about the Retro Plattenspieler and is the answer not in the manual?
Questions and answers