Table of Contents
Advertisement
Available languages
Available languages
Quick Links
Advertisement
Chapters
Table of Contents

Related Manuals for auna Billy Bob Series


Summary of Contents for auna Billy Bob Series
-
Page 3: Table Of Contents
Sehr geehrter Kunde, wir gratulieren Ihnen zum Erwerb Ihres Gerätes. Lesen Sie die folgenden Hinweise sorgfältig durch und befolgen Sie diese, um möglichen Schäden vorzubeugen. Für Schäden, die durch Missachtung der Hinweise und unsachgemäßen Gebrauch entstehen, übernehmen wir keine Haftung. Scannen Sie den folgenden QR-Code, um Zugriff auf die aktuellste Bedienungsanleitung und weitere Informationen rund um das Produkt zu erhalten:... -
Page 4: Sicherheitshinweise
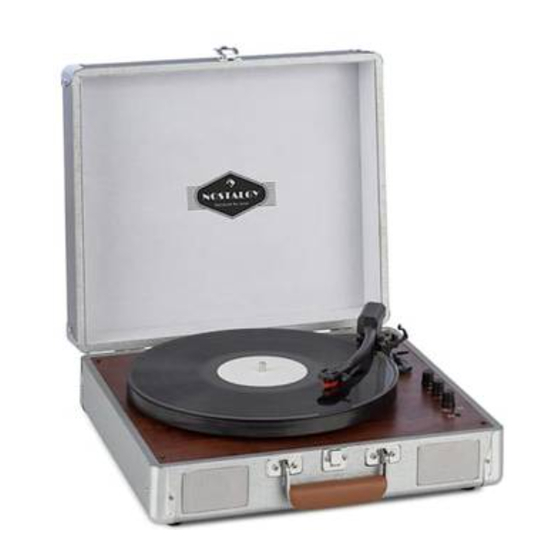
SICHERHEITSHINWEISE Wählen Sie einen sicheren Standort aus und stellen Sie das Gerät nicht in direktes Sonnenlicht oder neben eine Wärmequelle. 2. Vermeiden Sie Umgebungen, an denen das Gerät Vibrationen, übermäßigem Staub, Kälte oder Feuchtigkeit ausgesetzt ist. 3. Um Stromschläge zu vermeiden, darf das Gehäuse nicht geöffnet werden. - Page 5 Tonarm-Verriegelung Kopfhöreranschluss AUTO STOP ein/aus Schalter Nadel-Kartusche Drehzahlsteuerungs- Spindel Wahlschalter Pitch-Regler L/R Cinch-Ausgänge Funktionsknopf AUX-Eingang Kontrollleuchte Stromanschluss Ein-/Aus-Schalter und Lautsprecher Lautstärkeregler...
-
Page 6: Inbetriebnahme Und Bedienung
INBETRIEBNAHME UND BEDIENUNG Stecken Sie das Netzkabel fest in den Anschluss am Plattenspieler und stecken Sie dann den Stecker in die Steckdose. Eine Platte abspielen Stellen Sie den Funktionsknopf auf PH. Schalten Sie den Netzschalter ein. Die Kontrollleuchte wird rot. Hinweis: Vergewissern Sie sich, dass sich kein Audiokabel am AUX- Eingang befindet. - Page 7 5. Drehen Sie den Lautstärkeregler, um die Lautstärke einzustellen. 6. Benutzen Sie den Pitch-Regler, um die Geschwindigkeit stufenlos einzustellen. BT-Modus Stellen Sie den Funktionsknopf auf BT. Die Kontrollleuchte wird blau und blinkt. 2. Schalten Sie Ihre BT-Funktion auf Ihrem Handy oder Tablet ein und suchen Sie dann den Plattenspieler mit dem Namen „Billy Bob“.
-
Page 8: Reinigung Und Pflege
REINIGUNG UND PFLEGE Öffnen und schließen sie den Deckels vorsichtig. 2. Berühren Sie die Nadelspitze nicht mit den Fingern und vermeiden Sie es, die Nadel gegen den Plattenteller oder die Plattenkante zu stoßen. 3. Reinigen Sie die Nadelspitze häufig. Verwenden Sie dafür eine weiche Bürste. -
Page 9: English
Dear Customer, Congratulations on purchasing this equipment. Please read this manual carefully and take care of the following hints to avoid damages. Any failure caused by ignoring the items and cautions mentioned in the instruction manual is not covered by our warranty and any liability. -
Page 10: Safety Instructions
SAFETY INSTRUCTIONS Choose a safe location and avoid placing the unit in direct sunlight or near any heat source. 2. Avoid environments subject to vibration, excessive dust, cold or moisture. 3. Due to the risk of electrical shock, do not open the cabinet. Should a foreign object accidentally find its way into the interior of the unit, contact your local dealer. - Page 11 Tone-arm lock Headphone jack AUTO STOP on/off Switch Stylus (Needle) Cartridge Speed Control Selection Spindle Switch Pitch Control Knob L/R RCA Output Jack Function Knob AUX IN Port Indicator DC IN Power Jack Power Switch and Volume Speakers Control Knob...
-
Page 12: Start And Operation
START AND OPERATION Firmly and securely insert the DC plug of the adaptor to the DC IN Jack on the back of the unit. Plug the adaptor’s AC plugs into a power outlet. Phono Mode Switch the function knob to PH mode. Turn on the power switch. The indicator will become red color. - Page 13 5. Turn the VOLUME CONTROL KNOB to adjust the volume. 6. Adjust the pitch control knob to adjust the speed gradually BT Mode Switch the function knob to BT. The indicator will become blue color with flashing. 2. Turn on your BT function on your mobile phone or tablet PC and then search the turntable player with its name „Billy Bob“.
-
Page 14: Cleaning And Care
CLEANING AND CARE When opening or closing the turntable cover, handle it gently. 2. Do not touch the needle tip with your fingers; avoid bumping the needle against the turntable platter or record edge. 3. Frequently clean the needle tip-use a soft brush in a “back-to-front’ motion only. - Page 15 Estimado cliente: Le felicitamos por la adquisición de este producto. Lea atentamente el siguiente manual y siga cuidadosamente las instrucciones de uso con el fin de evitar posibles daños. La empresa no se responsabiliza de los daños ocasionados por un uso indebido del producto o por haber desatendido las indicaciones de seguridad.
-
Page 16: Indicaciones De Seguridad
INDICACIONES DE SEGURIDAD Seleccione una ubicación segura y no coloque el aparato bajo la luz directa del sol ni junto a una fuente de calor. 2. Evite entornos en donde el aparato se pueda ver expuesto a vibraciones, demasiado polvo, frío o humedad. 3. - Page 17 Bloqueo del brazo del Conexión para auriculares tocadiscos Interruptor para activar/ Cartucho de la aguja desactivar AUTO STOP Interruptor de selección giratorio Regulador de modulación Salida RCA L/R (Pitch) Botón de función Entrada AUX Indicador luminoso de Toma para suministro control eléctrico Interruptor on/off y...
-
Page 18: Puesta En Marcha Y Uso
PUESTA EN MARCHA Y USO Conecte el cable de alimentación a la toma del tocadiscos y conecte el enchufe a la toma de corriente. Reproducir un disco Ajuste el botón de función a PH. Active el interruptor principal. La luz de control se ilumina en color rojo. - Page 19 5. Gire el regulador de volumen para regular el volumen. 6. Utilice el regulador de modulación (pitch) para ajustar la velocidad por niveles. Modo BT Coloque el botón de función en BT. El testigo luminoso se ilumina en color azul y parpadea. 2.
-
Page 20: Limpieza Y Cuidado
LIMPIEZA Y CUIDADO Abra y cierre la tapa con cuidado. 2. No toque la punta de la aguja con los dedos y evite golpear la aguja contra el tocadiscos o el borde del disco. 3. Limpie la punta de la aguja con regularidad. Para ello, utilice un cepillo con cerdas suaves. - Page 21 Cher client, Toutes nos félicitations pour l’acquisition de ce nouvel appareil. Veuillez lire attentivement les instructions suivantes de branchement et d’utilisation afin d’éviter d’éventuels dommages. Le fabricant ne saurait être tenu pour responsable des dommages dus au non-respect des consignes de sécurité et à...
-
Page 22: Consignes De Sécurité
CONSIGNES DE SÉCURITÉ Choisissez un emplacement sûr et n‘installez pas l‘appareil à l‘ensoleillement direct ou à proximité d‘une source de chaleur. 2. Évitez les environnements où l‘appareil est sujet aux vibrations, à la poussière excessive, au froid ou à l‘humidité. 3. - Page 23 Loquet de bras de lecture Prise casque Interrupteur AUTO STOP Cartouche (tête de lecture) marche/arrêt Sélecteur de vitesse Axe du plateau Réglage du pitch Sorties RCA L/R Bouton de fonction Entrée AUX Témoin de contrôle Prise d'alimentation Bouton de marche/arrêt et Enceinte réglage du volume...
-
Page 24: Mise En Marche Et Utilisation
MISE EN MARCHE ET UTILISATION Branchez fermement le câble d‘alimentation sur la prise de la platine vinyle, puis insérez la fiche dans la prise murale. Lecture d‘un disque Réglez le bouton de fonction sur PH. Allumez l‘interrupteur d‘alimentation. Le voyant s‘allume en rouge. Remarque : Assurez-vous qu‘il n‘y a pas de câble audio sur l‘entrée AUX. - Page 25 5. Tournez le bouton de réglage du volume pour ajuster celui-ci. 6. Utilisez le réglage du pitch pour régler la vitesse en continu. Mode BT Réglez le bouton de fonction sur BT. Le voyant lumineux clignote en bleu. 2. Activez la fonction BT sur votre téléphone mobile ou votre tablette et recherchez ensuite la platine vinyle portant le nom „Billy Bob“.
-
Page 26: Nettoyage Et Entretien
NETTOYAGE ET ENTRETIEN Branchez fermement le câble d‘alimentation sur la prise de la platine vinyle, puis insérez la fiche dans la prise. 2. Ouvrez et fermez le couvercle avec précaution. 3. Ne touchez pas la pointe de l‘aiguille avec vos doigts et évitez de cogner l‘aiguille contre le plateau tournant ou le bord de la plaque. - Page 27 Gentile cliente, La ringraziamo per aver acquistato il dispositivo. La preghiamo di leggere attentamente le seguenti istruzioni per l’uso e di seguirle per evitare possibili danni tecnici. Non ci assumiamo alcuna responsabilità per danni scaturiti da una mancata osservazione delle avvertenze di sicurezza e da un uso improprio del dispositivo.
- Page 28 AVVERTENZE DI SICUREZZA Scegliere un luogo appropriato per posizionare il dispositivo, non nella diretta luce solare o vicino a una fonte di calore. 2. Evitare ambienti in cui il dispositivo è esposto a vibrazioni, polvere eccessiva, freddo o umidità. 3. Per evitare folgorazioni, non aprire l’alloggiamento. Se inavvertitamente un corpo estraneo dovesse finire all’interno del dispositivo, rivolgersi a un tecnico specializzato.
- Page 29 Blocco del braccio Collegamento cuffie AUTO STOP Interruttore On/ Cartuccia puntina Interruttore per selezionare Perno centrale i giri Regolazione del pitch Uscite cinch Dx/Sx Tasto funzione Ingresso AUX Spia di controllo Connessione dell’alimentazione Interruttore On/Off e Altoparlante regolazione volume...
- Page 30 MESSA IN FUNZIONE E UTILIZZO Inserire il cavo saldamente nella connessione del giradischi e la spina nella presa elettrica. Riprodurre un disco Posizionare il tasto funzione su PH. Attivare l’alimentazione. La spia di controllo diventa rossa. Avvertenza: assicurarsi che non ci sia un cavo nell’ingresso AUX. Se è collegato un cavo audio, la modalità...
- Page 31 5. Regolare il volume ruotando la manopola. 6. Utilizzare la regolazione del pitch per regolare la velocità senza intervalli. Modalità BT Posizionare il tasto funzione su BT. La spia diventa blu e lampeggia. 2. Attivare la funzione BT sullo smartphone o sul tablet e cercare il giradischi “Billy Bob”.
- Page 32 PULIZIA E MANUTENZIONE Aprire il coperchio con cura. 2. Non toccare la puntina con le dita ed evitare che la puntina sbatta contro il piatto o contro il bordo del disco. 3. Pulire spesso la punta della puntina. Utilizzare una spazzola morbida. 4.
Need help?
Do you have a question about the Billy Bob Series and is the answer not in the manual?
Questions and answers