Table of Contents
Advertisement
Quick Links
R-30 Y 2W .IOM.ENG01
R-30-Y
2W Vertical Float Level Control Valve
The following is a step by step narrated description of the Eliptix R-30-Y 2W Vertical Float Level
Control Valve installation, operation and maintenance processes.
The A.R.I. R-30 Series is a line of metal, diaphragm-operated, hydraulic control valves.
The valves are suitable for installation in agriculture, water transmission and waterworks systems
for irrigation, landscape and infrastructure applications.
The R-30 series has an innovative elliptic shaped diaphragm that integrates well with a wide variety
of regulating control pilots, solenoids and control accessories.
They are compatibility designed for water level control, flow control, electric & remote control as
well as pressure reducing & pressure sustaining operation.
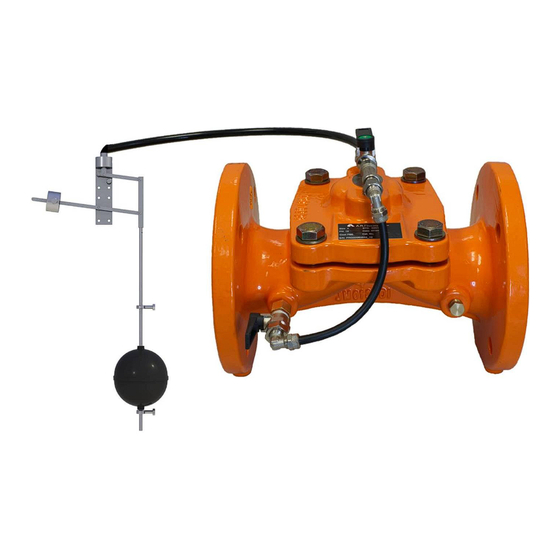
The R-30-Y 2W Vertical Float Level Control valve is a hydraulic on/off control valve designed to
maintain a preset level of water in a tank or a reservoir, according to the position of the float valve.
Low water level causes the buoy to drop and the float valve to open; this issues a command that
opens the main valve. Rising level of water brings the buoy up, closes the float valve, and
commands the closure of the main valve.
Advertisement
Table of Contents

Related Manuals for ARI ELIPTIX R-30 Series


Summary of Contents for ARI ELIPTIX R-30 Series
- Page 1 R-30 Y 2W .IOM.ENG01 R-30-Y 2W Vertical Float Level Control Valve The following is a step by step narrated description of the Eliptix R-30-Y 2W Vertical Float Level Control Valve installation, operation and maintenance processes. The A.R.I. R-30 Series is a line of metal, diaphragm-operated, hydraulic control valves. The valves are suitable for installation in agriculture, water transmission and waterworks systems for irrigation, landscape and infrastructure applications.
-
Page 2: Table Of Contents
R-30 Y TABLE OF CONTENTS 1. SAFETY INSTRUCTIONS ..........................4 General ..................................4 Handling ..................................4 Installation ................................... 5 Commissioning and Operation ..........................5 Maintenance ................................5 Before returning to regular operation ........................6 2. INSTALLATION ..............................7 2.1. Pre installation requisites .......................... - Page 3 R-30 Y Disclaimer This document is an Installation, Operation and Maintenance (IOM) manual for A.R.I. Flow Control Accessories Ltd. (A.R.I.) products. The information enclosed herein contains restricted, privileged, proprietary and confidential information, intended only for usage by authorized A.R.I. technicians. If you are not a qualified technician, you must not take any action in reliance upon this document, unless otherwise permitted in writing by A.R.I.
-
Page 4: Safety Instructions
R-30 Y 1. SAFETY INSTRUCTIONS General A.R.I. products always operate as components in a larger system. It is essential for the system designers, installers, operators and maintenance personnel to comply with all the relevant safety standards. Installation, operation or maintenance of the product should be done only by qualified workers, technicians and/or contractors using only good engineering practices, complying with and observing all conventional safety instructions in order to minimize risk and/or danger and/or hazard to workers, the public or to property in the vicinity in accordance with all relevant local standards. -
Page 5: Installation
R-30 Y Installation Install the product according to the detailed Installation Instructions provided with it by A.R.I. and according to the description given in this manual. The user should install manual Isolation Valves at the valve's upstream and downstream ports. In all installation sites, the user should enable good visibility and verify that the work and auxiliary equipment used are done in accordance with the relevant local authorized standards. -
Page 6: Before Returning To Regular Operation
R-30 Y Before returning to regular operation Re-assemble any protection covers or protection mechanisms removed during service or maintenance operations. Make sure that all the tools, ladders, lifting devices, etc. used during the maintenance procedures are taken away from the product area and stored. Remove grease and fat material residues in order to avoid slipping. -
Page 7: Installation
R-30 Y 2. INSTALLATION 2.1. Pre installation requisites Important: Before performing any work on the valve make sure that all workers on site are familiar with the safety instructions and the relevant local and general safety instructions and work regulations. Before installing the valve, flush the pipeline to remove scale, dirt and other particles that might affect the valve performance. -
Page 8: Installation Procedure
R-30 Y 2.2. Installation procedure Install the valve as indicated by the arrow on the valve bonnet, indicating flow direction [1]. In addition of the control valve it is recommended to install the following valves: Isolation valves upstream and downstream of the control valve [8]. ... -
Page 9: Initial Start-Up - The Control Valve
R-30 Y 2.3. Initial Start-up - The Control Valve Make sure that the upstream and the downstream isolation valves are closed; [8] and [8A]. Make sure that the 2-way outlet ball valve [2A] is closed. Gradually open the upstream isolation valve [8]. Check for leaks;... -
Page 10: Initial Set-Up - The On/Off Application
R-30 Y Vertical Float Level Control Valve 2.4. Initial Set-up - The Application The following is a general description of the R-30-Y 2W Level Control Application: This ON/OFF Level Control Valve is an automatic control valve, designed to be opened and closed according to the position of a float valve which is equipped with a buoy that floats on the reservoir water. -
Page 11: Operation Instructions
R-30 Y 3. OPERATION INSTRUCTIONS For automatic operation of the level control valve open the 2-way ball valves [2] and [2A]. To manually close the valve, close the outlet 2-way ball valve [2A], and make sure that the inlet 2-way ball valve [2] is open. -
Page 12: Maintenance
R-30 Y 4. MAINTENANCE Under regular operation A.R.I's valves require minimal maintenance and no lubrication, however in freezing climates the valve should be dismantled and drained for the winter months. 4.1. Periodic Inspection Every 6 months visually inspect the valve's diaphragm for any tears. Every 12 months inspect the valve's operation and clean the Finger Filter. -
Page 13: Troubleshooting
R-30 Y 5. TROUBLESHOOTING Problem Cause Check Solution Valve does not open 1. The inlet pressure is 1. Check the inlet 1. Make sure that the water supply too low pressure (or the pump) is switched ON. 2. The outlet 2-way ball 2. -
Page 14: Dismantling And Assembling The Valve
R-30 Y 6. DISMANTLING AND ASSEMBLING THE VALVE 6.1. Preparation Required tools: Standard hand tools: 14 mm spanner open at one end and ring at the other 16 mm spanner open at one end and ring at the other ... -
Page 15: Disassembling The Valve
R-30 Y 6.3. Disassembling the valve: Using a 24mm spanner, release the 4 bolts of the valve's bonnet in a diagonal manner [A] - [D]. Un-screw the bonnet's bolts' [E] & [F] and remove the bonnet from the valve's body [G] & [H]. - Page 16 R-30 Y Remove the valve's spring [I] & [J]. Remove the valve's diaphragm [K] & [L].
-
Page 17: Cleaning The Finger Filter
R-30 Y 6.4. Cleaning the Finger Filter: Disassemble and clean the finger-filter; using a 20mm spanner, release the upstream 2-way manual valve [A], [B]. Then using a 19mm spanner, release the finger-filter and clean it [C], [D]. -
Page 18: Reassembling The Valve
R-30 Y 6.5. Reassembling the valve: Make sure that all the valve's components are in good condition, clean and free from sediments. Check the diaphragm for any wear and tear; if necessary replace it with a new one. Make sure that the finger-filter is clean. Reassemble the valve in reverse order of the above described disassembling steps. -
Page 19: Dimensional Drawing
R-30 Y 7. DIMENSIONAL DRAWING... -
Page 20: Limited Warranty
R-30 Y 8. A.R.I. LIMITED WARRANTY A.R.I. Standard International Warranty A.R.I. manufactured products are guaranteed to be free from defect in material and/or workmanship and to perform as advertised when properly installed, used and maintained in accordance with current instructions, written or verbal. Should any item prove defective within the time period set forth for that item(s), but in any case not later than within 12 (twelve) months of that product having left A.R.I.’s premises, and subject to receipt by A.R.I.
Need help?
Do you have a question about the ELIPTIX R-30 Series and is the answer not in the manual?
Questions and answers