Advertisement
Available languages
Available languages
Table of Contents
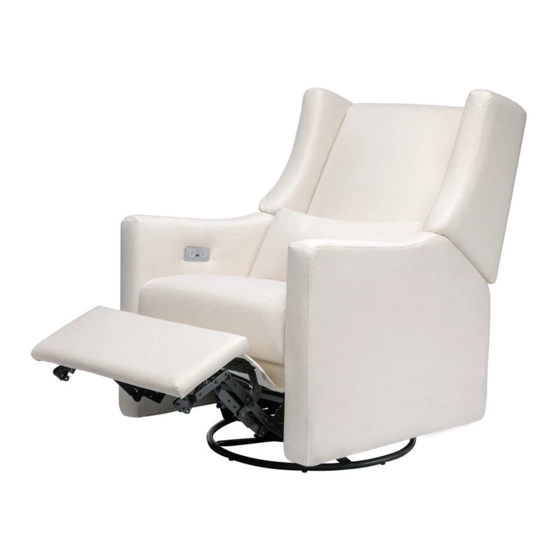
KIWI GLIDER RECLINER WITH
ELECTRONIC CONTROL AND USB
Care and Maintenance
Congratulations! This product will provide many
years of service if you adhere to the following
guidelines for care, maintenance, and operation.
This product is for residential use only. Any insti-
tutional use is strictly prohibited.
DO NOT SUBSTITUTE PARTS. ALL MODELS HAVE THEIR
OWN SPECIFIC QUANTITY OF PARTS AND HARDWARE.
YOUR MODEL MAY LOOK DIFFERENT FROM THE ONE
ILLUSTRATED DUE TO STYLISTIC VARIATIONS.
revised 21MAR2017
11288
Advertisement
Table of Contents

Related Manuals for Babyletto KIWI


Summary of Contents for Babyletto KIWI
- Page 1 KIWI GLIDER RECLINER WITH ELECTRONIC CONTROL AND USB Care and Maintenance Congratulations! This product will provide many years of service if you adhere to the following guidelines for care, maintenance, and operation. This product is for residential use only. Any insti- tutional use is strictly prohibited.
- Page 2 Maintenance and Cleaning: To preserve the hand-crafted quality of your furni- ture, we recommend using a cotton cloth and a non-toxic cleaner. Periodic polishing or oiling on wood stains will help to maintain the rich wood tones. For our upholstered products, we recom- mend using water to clean suede products and light foam cleaners for all other fabrics.
- Page 3 WARNING • Failure to follow these warnings and the assembly instructions could result in serious injury or death. • Read all instructions before assembling this prod- uct. • Keep instructions for future use. • Do not throw away packaging material until assembly is complete.
- Page 4 ONE YEAR LIMITED WARRANTY: We will replace any missing parts at the time of pur- chase or any defective item within a one year period from the date of original purchase. An extended war- ranty period of three years is valid only on the elec- tronic controls and electronic mechanisms of this product.
- Page 5 KIWI GLIDER RECLINER WITH ELECTRONIC CONTROL AND USB Parts List Parts Ref. No Description Seat A x 1 Back Base B x 1 Cushion C x 1 Be sure you follow the instructions in the order that they appear.
- Page 6 KIWI GLIDER RECLINER WITH ELECTRONIC CONTROL AND USB Assembly Instructions Step 1 (back) (Base Cover) (back)
- Page 7 Step 1 (in details) (back) (back)
- Page 8 KIWI GLIDER RECLINER WITH ELECTRONIC CONTROL AND USB Tips on the Locking Mechanism (back) Make sure the locking mechanism on each metal glide is aligned in the center. Click ! (back) Firmly push each side into place one at a time.
- Page 9 Step 2...
- Page 10 Step 3...
- Page 11 Step 4 Congrats! * If chair is not functioning after following these steps, please check the cord underneath the chair is fully plugged in to the chair motor.
- Page 12 STORE THE CORD OUT OF REACH OF CHILDREN. DANGER: To reduce the risk of electric shock: Always unplug the powered recliner from the electrical outlet before cleaning. KIWI GLIDER RECLINER WITH ELECTRONIC CONTROL AND USB Control Panel • Please note that changes or modifications not...
- Page 13 • NOTE: This equipment has been tested and found to comply with the limits for a Class B digital device, pursuant to Part 15 of the FCC Rules. These limits are designed to provide reasonable protection against harmful interference in a residential installa- tion.
- Page 14 KIWI GLIDER RECLINER WITH ELECTRONIC CONTROL AND USB Tension Adjustment From Chair to Recliner The chair can be made to recline by simply pressing the button located at the inside right of the armrest.
-
Page 15: Tension Adjustment
KIWI GLIDER RECLINER WITH ELECTRONIC CONTROL AND USB Tension Adjustment From Recliner to Chair The chair is returned to the upright position by pressing the button located at the inside right of the armrest. CAUTION : Do not allow children to play on this mechanized furniture or operate the mecha- nism. - Page 16 KIWI GLIDER RECLINER WITH ELECTRONIC CONTROL AND USB To Disassemble : (back) (back)
- Page 17 FAUTEUIL INCLINABLE KIWI À COMMANDE ÉLECTRONIQUE ET USB Soin et Entretien Félicitations! Ce produit vous procurera des années de service si vous suivez les directives ci-dessous pour soin, l’entretien et l’utilisation. Ce produit est destiné uniquement à une utilisation résidentielle. Toute utili- sation dans une institution est strictement interdite.
- Page 18 Entretien et nettoyage : Pour préserver la qualité artisanale de votre mobili- er, nous recommandons l’utilisation d’un chi on de coton et d’un nettoyant non-toxique. Un polissage ou un huilage périodique du bois teint contribuera à maintenir la richesse de ses coloris. Pour nos pro- duits rembourrés, nous recommandons d’utiliser de l’eau pour nettoyer les surfaces de suède et un nettoyant peu moussant pour les tissus.
- Page 19 AVERTISSEMENT • Le non respect de ces avertissements et directives d’assemblage peut entraîner de graves blessures ou la mort. • Lire toutes les instructions avant d’assembler ce pro- duit. • Conserver ces instructions pour un usage ultérieur. • Ne pas jeter le matériel d'emballage avant d’avoir terminé...
- Page 20 GARANTIE LIMITÉE D’UN AN : Nous remplacerons toute pièce manquant au moment de l’achat ou tout article défectueux au cours de la péri- ode de garantie d’un an à compter de la date initiale de l’achat. Une garantie prolongée de trois ne s’applique qu’aux commandes électroniques et aux mécanismes électroniques de ce produit.
- Page 21 FAUTEUIL INCLINABLE KIWI À COMMANDE ÉLECTRONIQUE ET USB Liste des pièces Pièces N° de réf. Description Dossier A x 1 de siège Base B x 1 Coussin C x 1 Suivre les instructions dans l’ordre où elles apparaissent.
- Page 22 FAUTEUIL INCLINABLE KIWI À COMMANDE ÉLECTRONIQUE ET USB Instructions de montage Étape 1 (arrière) (Cache-base) (arrière)
- Page 23 Étape 1 (détails) (arrière) (arrière)
- Page 24 FAUTEUIL INCLINABLE KIWI À COMMANDE ÉLECTRONIQUE ET USB Conseils sur le mécanisme de verrouillage (arrière) S’assurer que le mécanisme de verrouillage de chaque rail métallique est aligné au centre. Clic ! (arrière) Pousser fermement chaque côté en place un à...
- Page 25 Étape 2...
- Page 26 Étape 3...
- Page 27 Étape 4 Félicitations! * Si le fauteuil ne fonctionne pas après avoir suivi ces étapes, prière de s’assurer que le cordon sous le fauteuil est bien branché dans le moteur du fauteuil.
- Page 28 Afin de réduire les risques de décharge électrique : Toujours débrancher le fauteuil inclinable à commande électrique de la prise de courant avant le nettoyage. FAUTEUIL INCLINABLE KIWI À COMMANDE ÉLECTRONIQUE ET USB Panneau de contrôle • Il convient de noter que toute modification qui n'est pas autorisée par la partie responsable de la...
- Page 29 • REMARQUE : Cet équipement a été testé et dé- claré conforme aux limites des appareils numéri- ques de classe B, en vertu de la partie 15 des règle- ments de la FCC. Ces limites sont établies pour fournir une protection raisonnable contre les interférences nuisibles dans une installation rési- dentielle.
- Page 30 FAUTEUIL INCLINABLE KIWI À COMMANDE ÉLECTRONIQUE ET USB Dispositif de réglage de la tension Pour passer en position inclinée Il est possible d'incliner le fauteuil en appuyant sur le bouton situé du côté intérieur droit de l'appui-bras.
- Page 31 FAUTEUIL INCLINABLE KIWI À COMMANDE ÉLECTRONIQUE ET USB Dispositif de réglage de la tension Pour revenir en position droite Le fauteuil retourne à la position verticale si l'on appuie sur le bouton situé du côté intérieur droit de l'appui-bras. ATTENTION : Ne pas laisser des enfants jouer sur ce fauteuil mécanisé...
- Page 32 FAUTEUIL INCLINABLE KIWI À COMMANDE ÉLECTRONIQUE ET USB Démontage : (arrière) (arrière)
Need help?
Do you have a question about the KIWI and is the answer not in the manual?
Questions and answers