Crestron 3 Series Quick Start Manual
Control system automated processors
Hide thumbs
Also See for 3 Series:
- Reference manual (68 pages) ,
- Operation manual (48 pages) ,
- Supplemental manual (22 pages)
Table of Contents
Advertisement
Quick Links
CP3/CP3N
3-Series Control System® Automated Processors
The Crestron® CP3 and CP3N are compact, rack-mountable 3-Series® automated control processors with numerous integrated control ports.
Featuring the 3-Series control engine, the CP3 and CP3N unify the disparate technologies in residential, commercial, and government buildings
so that they can communicate and work together intelligently. The CP3N also supports the Crestron Control Subnet, which is an isolated gigabit
Ethernet network dedicated exclusively to Crestron devices.
NOTE:
The CP3 and CP3N are functionally similar. For simplicity within this guide, the term "control system" is used to refer to both the CP3 and
CP3N unless otherwise noted.
Check the Box
Item
CP3 or CP3N
Bracket, Rack Ear, 1U (P/N 2032122)
Cable, USB 2.0, A - B, 6 ft (1.83 m) (P/N 2014966)
Connector, 3-Pin (P/N 2003575)
Connector, 4-Pin (P/N 2003576)
Connector, 5-Pin (P/N 2003577)
Connector, 8-Pin (P/N 2003580)
Connector, 9-Pin (P/N 2003581)
Foot, 0.5 in. x 0.5 in. x 0.23 in., Rubber, Black (P/N 2002389)
Power Cord, 5 ft 10 in. (1.78 m) (P/N 2042043)
Power Pack, 24 VDC, 2.5 A, 100-240 VAC (P/N 2045873)
Install the Device
The control system may be mounted into a rack or placed onto a flat surface.
Mount into a Rack
The control system occupies 1U of rack space. Use a #1 Phillips screwdriver to remove the required screws from the control system assembly (shown
in the illustration below), and then attach the two included rack ears with the removed screws. Mount the control system into the rack with four
mounting screws (not included).
Place onto a Flat Surface
When the control system is placed onto a flat surface or stacked with other equipment, attach the four included feet near the corners on the
underside of the control system.
Control system
Rack ears (2)
Assembly screws
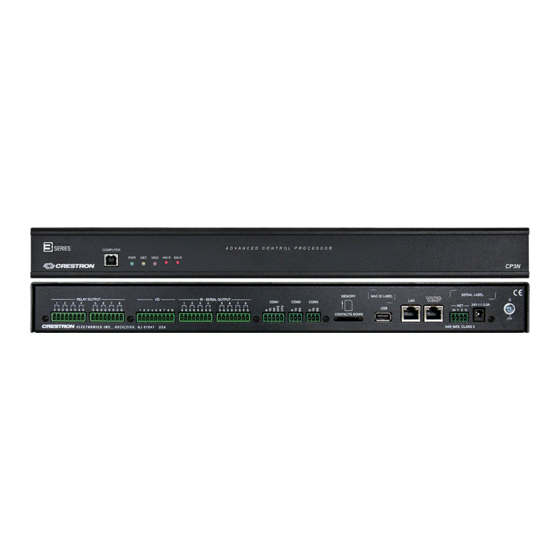
Connect the Device
Make all necessary connections to the control system as shown in the illustration below.
RELAY OUTPUT (1–8):
IR - SERIAL (1–8):
To contact closure
To TLL/RS-232
devices
devices
Qty
1
2
1
I/0 (1–8):
2
To controllable
devices
1
1
Observe the following when connecting the control system:
4
•
Use Crestron power supplies for Crestron equipment.
1
•
The control system can be powered with the included 24 VDC power supply or via Cresnet® network power with the NET 4-pin terminal block
port.
4
•
The included cables may not be extended.
1
•
Connect the chassis ground lug to a known earth ground circuit (for example, building steel) to ensure that the control system is grounded
1
properly.
•
Apply power after all connections have been made.
COM 1 Connections
Port
RS-232
RS-422
G
GND
GND
TX
TX (from CP3/CP3N)
TX- (from CP3/CP3N)
RX
RX (to CP3/CP3N)
RX+ (to CP3/CP3N)
RTS
RTS (from CP3/CP3N)
RTS+ (from CP3/CP3N)
CTS
CTS (to CP3/CP3N)
CTS- (to CP3/CP3N)
1. RS-422 transmit and receive are balanced signals that require two lines plus a ground in
each direction. RXD+ and TXD+ should idle high (going low at start of data transmission).
RXD- and TXD- should idle low (going high at start of data transmission). If necessary,
RXD+/RXD- and TXD+/TXD- may be swapped to maintain correct signal levels.
2. A ground terminal connection is recommended but not required.
Connect the Control Subnet (CP3N Only)
The CP3N has a dedicated Control Subnet that is used for communication between the control system and Crestron Ethernet devices without
interference from other traffic on the network.
NOTE:
Do not connect the CONTROL SUBNET port to the LAN. The CONTROL SUBNET port must only be connected to Crestron Ethernet devices.
For more information on using the Control Subnet, refer to the 3-Series Control System Reference Guide (Doc. 7150) at
www.crestron.com/manuals.
CONTROL SUBNET:
COM2/COM3:
100/1000BASE-TX
To serial
USB:
Ethernet to
controlled
To storage
Control Subnet
To any Cresnet®
network device
devices
devices
(CP3N Only)
MEMORY:
LAN:
COM1:
24V, 2.0A:
To serial
SD-compatible
100/1000BASE-TX
From AC
controlled
card slot
Ethernet to LAN
power pack
devices
1
RS-485
GND
2
TX-/RX-
Not used
TX+/RX+
Not Used
NET:
Ground
Advertisement
Table of Contents

Subscribe to Our Youtube Channel
Related Manuals for Crestron 3 Series


Summary of Contents for Crestron 3 Series
- Page 1 Featuring the 3-Series control engine, the CP3 and CP3N unify the disparate technologies in residential, commercial, and government buildings so that they can communicate and work together intelligently. The CP3N also supports the Crestron Control Subnet, which is an isolated gigabit Make all necessary connections to the control system as shown in the illustration below.
-
Page 2: Additional Information
(2) this device must accept any interference received, including interference that may cause entities claiming the marks and names or their products. Crestron disclaims any proprietary interest in the marks and names of Reduced Airflow: Installation of the equipment in a rack should be such that the amount of airflow required for safe operation undesired operation.
Need help?
Do you have a question about the 3 Series and is the answer not in the manual?
Questions and answers