Table of Contents
Advertisement
Advertisement
Chapters
Table of Contents

Related Manuals for HK Audio Cohedra


Summary of Contents for HK Audio Cohedra
- Page 1 Manual 3.1 English co_coco_BDA_de_engl_2.indd 1 18.09.2006 17:08:46...
- Page 2 • The unit has been built by HK AUDIO ® in accordance with • Das Gerät wurde von HK AUDIO ® gemäß IEC 60065 gebaut und hat • Read all of these instructions! das Werk in sicherheitstechnisch einwandfreiem Zustand verlassen. Um IEC 60065 and left the factory in safe working order.
- Page 3 • L'appareil a été conçu par HK AUDIO ® selon la norme IEC 60065 et • L'apparecchio è stato costruito dalla HK AUDIO ® secondo la normativa • El aparato ha sido producido por HK AUDIO ® según el IEC 60065 y salió a quitté l'entreprise dans un état irréprochable. Afin de conserver cet europea IEC 60065 ed ha lasciato il nostro stabilimento in stato de la fábrica en un estado técnicamente perfecto.
- Page 4 This manual is addressed to all technicians who are responsible for setting up, operating and maintaining the HK Audio® Cohedra™ Compact system. In addition, we would like to explain in detail the principles and functions of HK Audio® Cohedra™ technology to all interested planning and installation engineers.
-
Page 5: Table Of Contents
Fig. 7: The COHEDRA acoustic lens ....8 Fig. 8: Effect of the synthetic fiber fleece ....9 ® Fig. 9: Front view of the COHEDRA CDR 208 mid/high enclosure ....9 Fig. 10: 8" speaker cover serving as a CD horn and part of the compression chamber .......9... -
Page 6: Line Array Approaches In Recent Years
Manual COHEDRA ® & COHEDRA ® Compact 1 Line Array Approaches The answer is quite simple in view of the molecular in Recent Years structure of air. Air molecules offer frictional resis- tance, impeding the sound wave's diffusion. Some sound molecules drift outwards when the Line arrays are a fixture on the contemporary sound wave's impact excites inert molecules at its fringes. -
Page 7: Development Objectives
It is very important that the gap is distributed as tility, affording greatest flexibility in setup options. uniformly as possible across the full breadth of the ® radiator. COHEDRA achieves this by using two different housing shapes for the mid/high array, 3 Emphasized Radiation affording the greatest possible uniformity in gap Technology™... -
Page 8: The High Frequency Wave Front
S1 and S2. However, acoustically speaking this creates some- Figure 6: The COHEDRA® acoustic lens’ mode of operation thing approaching an organ pipe. The only remedy is to connect a very large horn, an option that for technical reasons is often infeasible. -
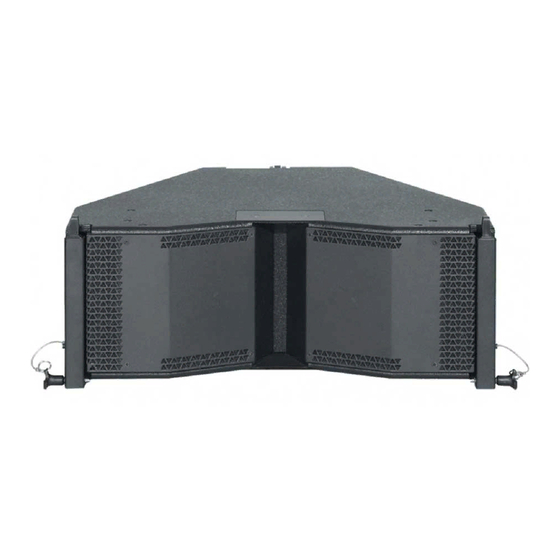
Page 9: Midrange
HF signal. In the case of conventional speaker this requires a smaller speaker membrane with less Figure 9: Front view of the COHEDRA® clusters this is not so significant because several moving mass. The answer is a special 10" woofer. - Page 10 CDR 210 F Sub Subwoofer .......13 Index of Figures: Fig. 1: Cohedra CDR 208 T ........11 Fig. 2: Cohedra CDR 208 S ........11 Fig. 3: Cohedra CDR 210 Sub ......12 Fig. 4: Cohedra CDR 210 F Sub ......13 co_coco_BDA_de_engl_2.indd 10 18.09.2006 17:08:51...
- Page 11 25 10/16" x 9 8/16" x 23 10/16" [inch] The CDR 208 S (T) enclosures' horizontal dispersion pattern is 80°. Frequency response ranges from *) Specifications refer to a cluster of four Cohedra 88 Hz to 16 kHz (±3 dB). The CDR 208 S (T) enclo- components.
- Page 12 Manual COHEDRA ® & COHEDRA ® Compact Figure 3: Cohedra CDR 210 Sub 1.2 CDR 210 Sub Subwoofer The Cohedra CDR 210 Sub Subwoofer's Technical Data Design and Construction of the Subwoofer Power handling (RMS): 600 watts The CDR 210 Sub enclosure is made of 19 mm,...
- Page 13 The COHEDRA Loudspeakers ® Figure 4: Cohedra CDR 210 F Sub 1.3 The CDR 210 F Sub Subwoofer The CDR 210 F Sub Enclosure's Technical Data Power handling (RMS): 600 watts Design and Construction of the Subwoofer Power handling (program): 1200 watts The CDR 210 F Sub's enclosure is made of 19 mm, Frequency range (±3 dB): 47 Hz to f x...
- Page 14 Manual COHEDRA ® & COHEDRA ® Compact Chapter B 1 The COHEDRA Compact Loudspeakers ® ® COHEDRA Compact Enclosures ..15 1.1 The CDR 108 C Mid/High Unit 1.2 The Subwoofer CDR 210 C Index of Figures: ®...
- Page 15 32.5 cm deep (including rigging attachments). 2+ = sub +, 2- = sub 2- Two grips on the side panels facilitate transport and Figure 1: Cohedra Compact CDR 108 C set-up. Housing Material: 15-mm (5/8"), 13-ply birch plywood...
- Page 16 & COHEDRA ® Compact 1.2 The Subwoofer CDR 210 C The Cohedra CDR 210 C Subwoofer’s Technical Data Power handling (RMS): 600 watts RMS, Design and Construction of the Subwoofer 1200 watts program Made of 19 mm, 13-ply birch plywood, the CDR 210 Frequency range (±3 dB): 47 Hz to fx...
- Page 17 1.3 Dimensions and Weights of the Cases and Bass Bin Dollies ........19 ® 1.4 COHEDRA Truck Space ........ 19 Index of Figures: Fig. 1: COHEDRA ® Mid/ High-Case ....18 ® Fig. 2: COHEDRA Subwoofer-Dolly ....18 Fig. 3: 16 Mid/ High-Cabinets and 16 Subwoofers ........
- Page 18 1.2 Subwoofers Serving to transport subwoofers is a dolly designed Figure 1: COHEDRA® Mid/ High Case to carry four stacked subwoofers. Subwoofers are secured to the dolly using a cargo strap. 1.3 Dimensions and Weights of...
- Page 19 The dimensions of COHEDRA cases, racks and dollies were selected specifically to make the most of available truck space. The diagrams below offer suggestions on how to load different COHEDRA ® systems into a truck with a width of 240 cm. co_coco_BDA_de_engl_2.indd 19...
- Page 20 1.2 Dimensions and Weights ....21 Index of Figures: ® Fig. 1: COHEDRA Compact Mid/High Case. . . 21 Fig. 2: 16 Mid/High enclosures and 8 Subwoofers.
- Page 21 Height: 60 cm/ 23 1/4" Depth: 60 cm/ 23 5/8" Depth (standing on casters): 75 cm/ 29 1/2" Figure 1: COHEDRA® Compact Mid/High Case Height (standing on casters): 70 cm/ 27 1/2" Weight: approx. 48 kg/ 105.6 lbs. Weight (without rigging frame) : approx. 98 kg/ 215 lbs.
- Page 22 Manual COHEDRA ® & COHEDRA ® Compact Chapter D Rigging & Curving the COHEDRA System ® Rigging and Curving Mid/high Cabinets ....23 Index of Figures: ® Fig. 1: 12 COHEDRA mid/high enclosures ..26 Use 26 Fig. 2: Mid/high enclosure with 1.1 Intended Use ..........
-
Page 23: Intended Use
Rigging and Curving COHEDRA System ® Rigging and Curving • unauthorized structural modifications performed COHEDRA Mid/high on rigging frames ® • unauthorized modification of the parameters indi- Cabinets cated in the operating manual • inadequate or improper repairs Please read these instructions carefully before you... -
Page 24: Storage, Maintenance, Inspection And
Refer to table 1 to determine flown loads. The sum ® When not in use store the truss indoors in a safe of the weights of COHEDRA mid/high enclosures place where it cannot be tipped over and is protect plus the weight of the rigging frames equals the from exposure to the elements. -
Page 25: Maximum Number Of Flown Cohedra Cdr 210 F Subwoofers
Rigging and Curving COHEDRA System ® 3.5 Maximum Number 3.7 Pick Points for Flying ® ® of Flown COHEDRA COHEDRA Mid/high Enclosures CDR 210 F Subwoofers Use only the top rigging frame's shackles to attach The standard rigging frame can fly up to 20 vertically motors, chain hoists and straps. -
Page 26: Fig. 3: Top Rigging Frame
• four quick-release pins per mid/high enclosure for Figure 5: Bottom rigging frame connecting enclosures to the rigging frames Figure 1: 12 COHEDRA® mid/high enclosures Figure 6: Lashing strap for curving the array Figure 2: Mid/high enclosure with integrated flight... -
Page 27: Determining The Curving Angle Between Two Cohedra
The rigging equipment is designed so that the cur- enclosures in position. ® ving angle can still be adjusted when COHEDRA mid/high arrays are flown (see Fig. 9). How is this done? Figure 9: Setting the curving angle on a flown array... -
Page 28: Fig. 11: Open Case With Four Mid/High Range Enclosures
Manual COHEDRA ® & COHEDRA ® Compact 7 Mounting the Top Rigging Frame The tasks described below require two people. Remove all three quick-release pins from their re- ceptacles on the top rigging frame and the top pin on the back of the top mid/high range enclosure (preferably CDR 208 S). -
Page 29: Mounting The Top Rigging Frame
(see Fig. 14). Your choice of pick point depends on how sharply ® you aim to curve the COHEDRA mid/high array. Note: Use the third eyelet (from the front) to set the array to a curving angle of about 0°. - Page 30 Fig. 17 a). Insert both front pins first, ensuring that they engage fully and securely. You may have to shift the two enclosures slightly to ease the pins Figure 16: Hoisting the top four COHEDRA® mid/high into position (see Fig. 17 b). In order to attach the enclosures...
-
Page 31: Attaching The Bottom Rigging Frame And Raising The Mid/High Array
0° angle, meaning that the pin is easily repositioned! Figure 19: Attaching the lashing strap between the top and bottom rigging frames Figure 20: Hoisting the fully assembled COHEDRA® mid/high array co_coco_BDA_de_engl_2.indd 31 18.09.2006 17:09:03... -
Page 32: Ground Stacking
Manual COHEDRA ® & COHEDRA ® Compact 10.2 Ground Stacking with 10 Ground Stacking the Rigging Frame 10.1 Ground Stacking with This option is recommended for smaller (four mid/ high units) configurations in venues that do not the Stack Frame... -
Page 33: Bass Cluster/ Stacking
Rigging and Curving COHEDRA System ® 11.2 Bass Cluster/ Stacking In the classic right/left stacked configuration, one half of the bass bins is arrayed to the right of the stage, the other to the left. Advantages: The stacked bass bin configuration depicted above is a conventional and widely accepted option. -
Page 34: Flying Cdr 210 F Subs
CDR 208 S mid/high cabinets described in We recommend the following procedure to help ® the chapter on rigging and curving COHEDRA prevent errors and troubleshoot problems quickly. systems. Your choices of curving angles (or splay) The adverse affect of a mid/high cabinet dropping between two flown CDR 210 F Sub cabinets are 0°,... -
Page 35: Disassembling And Removing The System
Rigging and Curving COHEDRA System ® 14.4 Configuring the Control- manual to learn more about how to do this. ler Network with the Audio Before you can procedure further, you must first Controller Software connect to the amp racks the DFCs' remote line and all of the system's audio cords. -
Page 36: Use
® COHEDRA Compact CDR 210 C Subwoofers .. 39 Fig. 9: Quick-release pin ........40 2.6 Pick Points for Flying COHEDRA ® Fig. 10: Horizontal array comprising three Compact Enclosures ........39 CDR 108 Cs ..........41 2.7 Structural Modifications of Fig. -
Page 37: Intended Use
1.2 Unintended Use ® the safety standards authority TÜV. The COHEDRA rigging system’s provisions for use require that it be Improper use of rigging frames and incorrect installed in accordance with the following specifica- handling of this load-carrying equipment can pose tions. -
Page 38: Rigging Hardware
Refer to table 1 to determine flown loads. The sum of the weights of COHEDRA ® Compact mid/high Inspections enclosures plus the weight of the rigging frames §... -
Page 39: Table 2: Weight Of Cdr 210 F Sub
211.2 316.8 422.4 633.6 Weight of the standard rigging frame with shackles: 10.5 kg/ 23.10 lbs. Table 2: Weights of COHEDRA® Compact CDR 210 C subwoofers 2.6 Pick Points for Flying COHEDRA ® Compact Enclosures Use only the top rigging frame’s shackles to attach motors, chain hoists and straps. -
Page 40: Components And Applications Of Cohedra ® Compact Rigging Hardware
Once the pin engages in the hole, the nib must glide back to its initial position. Figure 2: 16 COHEDRA® – CDR 108 C 3.1 Flying Enclosures Using Quick-release Pins... -
Page 41: Flying Arrays With Lightweight Rigging Frames
Preparations 3.2 Flying Arrays with Light- The following section describes how to set up an ® array in compression mode. Use COHEDRA CAPS weight Rigging Frames to select rigging frame pick points for determining As an alternative to the standard rigging frame that the angles between CDR 108 C enclosures. - Page 42 Be sure to use cords of sufficient length! ® Rigging Additional COHEDRA Compact Enclos- ures Figure 18 b Hoist the mid/ high cabinets to a height that allows you to roll a second case holding four CDR 108 C enclosures under the array.
-
Page 43: Fixed Mode
Tighten the strap until it exerts enough force to curve the array as desired. ® Once you have hoisted the COHEDRA Compact array, secure it against gusts of wind or accidental twisting using two lashing straps or ropes. 4.2 Fixed Mode... -
Page 44: Flying Cdr 210 C Subwoofers
• a standard rigging frame. This ensures the various subwoofers’ low-frequency • the pick points on the side panels of COHEDRA ® signals couple for maximum sonic effect. To this end, Compact CDR 210 C subwoofers set one row of speakers bottom side up (see Fig. -
Page 45: Ground-Stacking
Rigging and Curving COHEDRA Compact System ® 7.2 With CDR 210 C Subwoofers 7 Ground-stacking This option is recommended for smaller venues, Depending on application, use two or three CDR 210 C for example, in which enclosures cannot be flown, subwoofers as the base of the stack. -
Page 46: Operating The System
2 drives the four units outside its directivity radius! ® below that, and so forth. Thus, one HK AUDIO • Turn the channel 1 gain knob back down after LS cable can serve to drive a total of four mid/high hearing the signal! units per channel. -
Page 47: Tearing Down And Transporting The System
Rigging and Curving COHEDRA Compact System ® 9 Tearing Down and Transporting the System As the somewhat clichéd but certainly true adage goes: To disassemble the system, proceed in the reverse order of assembly. These tips should make the task of tearing down the... - Page 48 Manual COHEDRA ® & COHEDRA ® Compact Chapter E Setup with Caps Introduction ............49 Index of Figures: 1.1 Acoustic Simulation for Line Arrays ....49 Fig. 1: Simulation of a RT 112 F‘s directivity ....42 1.2 Remarks on SPL Calculation in CAPS ....50 Fig.
-
Page 49: Introduction
® 1 Introduction Figure 2, in turn, depicts a simulation of direct ® sound propagation using a COHEDRA CDR 208 CAPS (Cohedra Acoustic Prediction Software) enclosure as a source with spherical reflectivity. providesthe tools and support you need to plan... -
Page 50: Remarks On Spl Calculation In Caps
Manual COHEDRA ® & COHEDRA ® Compact Acoustic simulation for COHEDRA ® CAPS EASE DLL Runs on all Win xx platforms Dynamic Link Library plug-in for EASE 4.0 2D cut model 3D volume model Direct sound calculation Calculation of all simulations:... -
Page 51: The Purpose Of Caps
FOH location the Next button. • Prepare rigging plans ® • Calculate the delay between COHEDRA line The CAPS Installation Assistant installs and copies arrays and ground-stacked subwoofers and the requisite files to the selected folder. It will let... -
Page 52: Launching Caps
Use the menu option Gyro's Little Helper to open creates links called CAPS on the desktop of your a utility that calculates the inclination of audience computer and in START > PROGRAMS > HK AUDIO areas. It's rarely feasible to directly measure the Figure 3: Dialog "Select System"... -
Page 53: Help Menu
® COHEDRA mid/high array depicted in a side view. Click Calculate to compute the COHEDRA ® array's sound level envelope in the audience areas and view a color view thereof. Use the Optimize button to open a panel providing an optimization function. -
Page 54: Rigging Panel
This includes information on the pick-point ® as well as the height and weight of the COHEDRA array; that is, the composite of the CDR 208 S, CDR 208 T, the flight frame and the speaker cords' individual weights. -
Page 55: Creating A New Project
Width box and a height greater than ® the projected height of the flown COHEDRA array (possibly the height of the tiers). Under Reference Point indicate in the X and Y boxes the respective X and Y coordinates of a reference point. -
Page 56: Defining The Simulation's Bandwidth
Project In the side view, you'll now see a view of the room ® To create a COHEDRA® configuration for a project, with the audience areas and a COHEDRA array go to the Setup panel after entering project data, consisting of the number of enclosures that you room data and audience areas. -
Page 57: Aligning Enclosures Using The Optimization Function
In the side view, click the audience area in which ® you want to begin aligning the COHEDRA Click the Optimize button to open a window for Fig. 14: Example ground stack array's enclosures. As a rule, you'll start with the the optimization function. -
Page 58: Viewing The Sound Level Envelope
Deactivating Area Speakers only and Neighboring shows the three configurations that deliver the ® angles only increases the number of COHEDRA best optimization results, as well as the original configurations to be analyzed during the configuration; that is, your manually configured optimization process. -
Page 59: Viewing The Dispersion Pattern
In these ® while CAPS computes. Then the COHEDRA array's cases, it is preferable to fly the bass bins. dispersion pattern is shown in a color side view. At... -
Page 60: Creating A Rigging Plan
Compact 6 Creating a Rigging Plan Note: In order to prevent horizontal interference, the Go to the Rigging panel to view the COHEDRA ® distance between two neighboring subwoofer blocks array's rigging plan. Select the menu option may not be greater than half the wavelength of the Create Print Version from the File menu. -
Page 61: Fig. 1: 12 Cohedra
Chapter F COHEDRA Controlling Concept ® ® The COHEDRA Controller Concept ..... 56 1.1 Frequency and Phase Equalization Using FIR Filter Technology ..........56 1.2 3-Way Virtual Crossover ........56 1.3 The DFC Limiter in Combination with the VX 2400 ..........56 1.4 Specific Speaker Filters ........ - Page 62 Beyond that, the rendered audio signal as well as real phase equalization. retains its natural characteristics despite the use of limiters. ® The functions of the HK AUDIO Digital Field 1.4 Specific Speaker Filters Controller (DFC) go far beyond those of a standard controller:...
- Page 63 Chapter G Controller and Controller software Digital Field Controller (DFC) ..... 60 Index of Figures: 1.1 Connections ..........61 Fig. 1: DFC front view ........60 1.2 Display and Control Features ......62 Fig. 2: Rear view of the DFC ......61 1.3 Basic Settings ..........62 Fig.
-
Page 64: Digital Field Controller (Dfc)
This is possible because the DFC splits the input FIR filter technology lets you correct the phase and signal into three frequency bands – the low, middle equalize the frequency response of HK AUDIO ® and high ranges. It then equalizes, limits, and per- sound systems independently. -
Page 65: Connections
This port serves to control the HK AUDIO PB 4 ® circuit's three-pin male XLR port. Patchbay and to provide power to the COHEDRA Pin assignments are: PB 5 Patchbay. pin 1 = ground, pins 2 and 3 = signal. -
Page 66: Display And Control Features
Manual COHEDRA ® & COHEDRA ® Compact 1.2 Display and 1.3 Basic Settings Control Features Loading stored settings To load previously programmed and stored DFC Limiter LEDs (red) settings, press the Menu button to go to the main • Available for each frequency band (HF, MF, LF) menu and press the + and - buttons to select the •... -
Page 67: Setting Delay Times
Controller and Controller Software 1.4 Setting Delay Times Selecting a Controller/Rack Mode This function is only available in combination with the PB4, which is used exclusively for HK AUDIO ® Selecting the delay display mode R-Series configurations. The DFC can indicate delay settings in milliseconds (ms) or meters (m). -
Page 68: Adjusting The Equalizer
Manual COHEDRA ® & COHEDRA ® Compact 1.7 Disabling Buttons on Setting high frequency delay time the DFC Press the Menu button to go to the main menu and the + and - buttons to select the window for the op- tion HiDel (press + seven times). -
Page 69: Remote Control And Remote Monitoring
The DFC's Midi port lets you control and monitor up to 32 DFCs remotely using a PC. The DFC connects ® to the PC via a special HK AUDIO interface. To this end, all DFCs are connected in a loop starting... -
Page 70: Technical Data
Manual COHEDRA ® & COHEDRA ® Compact 1.11 Technical Data Analog Input Remotes / Midi Input: 3-pin XLR female Midi In port: 3-pin XLR female Pin assign: 1 = ground, 2 = signal(+), 3 =signal(-) Pin assign: 1 = ground, 2 = (+), 3 = power circuit... -
Page 71: Audio Controller Software Version 3.01
Write-protected.) Not until write protection DFC Software Version 3.01 lets you control and mo- is deactivated will DFC Software 3.01 be ready to nitor up to 32 HK AUDIO ® Digital Field Controllers run! (DFCs) remotely using a PC (or notebook) and the HK AUDIO ®... -
Page 72: Launching Dfc Software
Manual COHEDRA ® & COHEDRA ® Compact Connect the PC interface to the serial port of the Selecting the serial interface PC (COM port) using the included serial connector See figure 3. The option Port in the Options menu cable (9-pin Sub-D male/female). If your computer... -
Page 73: Menu Bar
Controller and Controller Software 2.5 Menu Bar Group menu See figure 8. See figure 6. The Menu is located in the upper area • The option Add creates a new DFC group that you of the screen and includes the Program, Controller, can assign individual DFCs to. - Page 74 When selected (a checkmark appears next to the See figure 13. option Limiter Window in the View menu), it ® The option About HK AUDIO Controller displays remains visible in the foreground of the screen. information on the software, version and copyright.
-
Page 75: Adjusting Controller Parameters
Info file (*.HKI) must be stored in the DFC Note: This function is only available when using the Software's Speaker folder. If the DFC Software PB4 in combination with HK AUDIO ® R-Series! is unable to locate this file, a window pops up indicating the following message: Speaker connection info for ... -
Page 76: Activating The Key Lock On The Dfc
Manual COHEDRA ® & COHEDRA ® Compact 2.9 Activating the Key Lock Click the Solo button in the master channel strip to on the DFC mute all connected DFCs with the exception of the given DFC (Solo-In-Place function). When solo is... -
Page 77: Graphic Eq
Controller and Controller Software Reversing phase Click the Phase rev. button in the Bass, Mid and High channel strips to reverse the phase of the entire DFC. When phase reversal is activated, the lettering on the Phase rev. button changes from Off to On and its color from grey to red. -
Page 78: Forming Groups
Manual COHEDRA ® & COHEDRA ® Compact Exit the graphic EQ via the OK (your settings Changing group names are retained) or Cancel button (your settings are The group name is initially factory-set to Group 1 to deleted). max. Group 32. For reasons of clarity, we recommend... -
Page 79: Working With Several Programs
DFC settings in dedicated Program speaker filters for numerous application scenarios ® windows. You have several options for viewing these and configurations of HK AUDIO speakers and simultaneously on the user panel. power amps. You can get these on CD-ROM or down- load them from out website www.hkaudio.com. - Page 80 Important note: The BLK.DEF file contains all filter See figure 19. The Reload Equipment window offers sets in the sequence recommended by HK AUDIO ® a box called Speaker Type; select the filter that you and available at the time of the DFC Software 3.01 want to upload to the PC from the filters contained release.
- Page 81 Components ........... 82 Design and Construction ......83 Dimensons and Weights ......83 Displays and Control Features ....83 ® FU4 Fan Unit (with COHEDRA Power Rack 16 only) ........83 PS 32 Power Supply ....... 84 Connections ..........84 L1, L2, L3 Circuit Breakers and Phase Indicators ........84...
-
Page 82: Cohedra ® Power Rack 16
VX 2400 Power Amps Chapter I Rack 16. Alternatively, the Power Rack can also drive Digital Field Controller (DFC) Chapter G Figure 1: COHEDRA® Power Rack 16, front view either 16 Mid/High cabinets or 16 subwoofers. PB5 Patchbay Chapter H... -
Page 83: Design And Construction
Circuit breaker Channel A, Channel B volume knobs Figure 3: 1 COHEDRA® Power Rack 8, front view The rack is equipped with rails on the front and LED indicators Mains (green), back. The various devices attach to these rails via Protect (red), Signal (green), Clip (red) their 19"... -
Page 84: Ps 32 Power Supply
® each phase. This convenient configuration makes Do not operate HK AUDIO sound systems' electronic it easy to plug devices installed in a rack or cabinet equipment (amps, controllers, and electrical acces-... - Page 85 Chapter I Power Amp VX 2400 Protective Circuits ........86 Limiter ............86 Fan 86 Displays and Control Features ...... 87 4.1 Mains Switch ..........87 4.2 LED Indicators ..........87 4.3 Channel A, Channel B Gain Knobs ....87 4.4 Circuit Breaker ..........
-
Page 86: Protective Circuits
50 to 60 Hz line frequency. In accordance with the Important note: ® VDE 0860 and IEC 60065 norms, the power amp If you use the HK AUDIO Digital Field Controller will continue operating soundly at voltage fluctuations (DFC) in combination with the VX 2400, be sure ranging up to 10%. -
Page 87: Displays And Control Features
4 ohms ® HK AUDIO Digital Field Controllers. This is attri- per power amp channel! butable to the tolerance of some LEDs and the fact that the DFC's limiter makes full use of the amp's available output power. -
Page 88: Limiter Switch
Manual COHEDRA ® & COHEDRA ® Compact 4.6 Limiter Switch Stereo mode: The power amp operates in dual-channel mode (that is, using two independent channels). On: Activates internal limiters In stereo mode (Mode selector switch is set to Off: Deactivates internal limiters Stereo), patch the signal into both channels' Input 4.7 Ground switch... -
Page 89: Speaker Output A, Output B
Power Amp VX 2400 7 Technical Data 5.3 Speaker Output A, Output B Each output channel of the VX 2400 is equipped Inputs (per channel): 1 XLR female 3-pin, 1 stereo ¼ " jack with one four-pin Speakon connector and one binding XLR pin assignments: Pin 1 = ground, pin 2 = signal (+), pin 3 = signal (-) post;... - Page 90 Manual COHEDRA ® & COHEDRA ® Compact Chapter J Patchbay PB5 PB 5 Patchbay ............91 Front Panel Connections and Control Features .......... 91 1.1 Analog Audio Input ........91 1.2 DIGITAL AES/EBU Digital Audio Input ..91 1.3 Channel 1 to 4 Speaker Outputs ..... 91 1.4 Mid/ High and Sub Multi Outs ......
-
Page 91: Patchbay Pb5
Speaker Outputs The PB 5 is an interface for connecting and switching one HK AUDIO ® Digital Field Controller, two VX The PB 5 is equipped with four NL 4 Speakon ports 2400 power amps, and the speaker system. It offers... -
Page 92: Ground Switch
Manual COHEDRA ® & COHEDRA ® Compact Figure 2: PB 5 rear view with patch cables 1.5 Ground Switch Ground On This setting couples the audio signal's ground to the chassis ground of the power amps and control- lers connected to the PB 5. -
Page 93: Rear Panel Connectors
Patchbay PB5 3 PB 5 Rack 2 Rear Panel Connectors Configurations 2.1 Patch Cables for Connecting the VX 2400 and DFC 3.1 Power Amp Channel DFC Digital In digital audio patch cord Routing for a PB 5 Plug the DFC Digital In cord (a cable with a male XLR connector located in the bottom opening of the Top power amp Channel PB 5 output... -
Page 94: Mid/High Only
Manual COHEDRA ® & COHEDRA ® Compact 3.3 Mid/High only Set all Mid/High - Sub switches to Mid/ High mode. This routes the DFC's HF Out (mid/high frequency signal) to all four audio inputs. In this configuration, all power ramps in the rack deliver the mid/high signal to the mid/high range enclo- sures. - Page 95 4.3 The Driver's Voice Coil ........97 Index of Figures: Fig. 1: The VX 2400's air intake ......96 ® Fig. 2: The COHEDRA Power Rack 16's fan unit ......96 Fig. 3: Foam rubber and fleece ......96 Fig. 4: Service tools ..........97 Fig.
- Page 96 Remove the two front grilles to replace fleece. an update is available for your product. Figure 2: The COHEDRA® Power Rack 16’s fan unit You'll find it under the acoustic foam, wedged in • Use only original HK AUDIO ®...
- Page 97 3 Overview of 4.3 The Driver's Voice Coil Required Tools Proceed as follows to replace the DE 900's voice coil: Just three tools are needed: • Unfasten the mid/high enclosure's rear rigging • Allan (hexagonal socket) wrench, 3 mm to replace connector.
- Page 98 4.2 The 1" Driver’s Voice Coil .......99 Index of Figures: Fig. 1: The VX 2400’s air intake ......99 ® Fig. 2: The COHEDRA Power Rack 16’s fan unit .99 Fig. 3: Required service tools ........99 Fig. 4: CDR 108 C with grille and compression chamber removed ....99...
- Page 99 COHEDRA Compact system, please unfasten the eight Phillips head screws. Figure 2: The COHEDRA® Power Rack 16’s fan unit use the names and part numbers listed in Table 1 to • Remove the service panel from the housing. order it! •...
- Page 100 Manual COHEDRA ® & COHEDRA ® Compact Chapter L Appendix/Reference Libary 1 Near Field and Far Field Line Array Frequency: 50 Hz 100 Hz 150 Hz Length [m] Near field Near field Near field 1,18 2,35 3,52 2,64 5,29 7,94...
- Page 101 co_coco_BDA_de_engl_2.indd 101 18.09.2006 17:09:36...
- Page 102 Manual COHEDRA ® & COHEDRA ® Compact co_coco_BDA_de_engl_2.indd 102 18.09.2006 17:09:36...
- Page 103 CDR208-24 fullr 24.06.04 24x CDR 208 + 24 x CDR 210 F CDR208-24 100Hz 24.06.04 24x CDR 208 + 24 x CDR 210 CDR208-24 130Hz 24.06.04 Tabelle 2: Overview of COHEDRA®-DFC filter sets as of June 2004 co_coco_BDA_de_engl_2.indd 103 18.09.2006 17:09:36...
- Page 104 Manual COHEDRA ® & COHEDRA ® Compact 3 CDR 208 S, T Measurement Charts See figure 2 and 3! Abbildung 2: CDR 208 S, T horizontal directivity Abbildung 3: CDR 208 S, T vertical directivity, 1 unit co_coco_BDA_de_engl_2.indd 104 18.09.2006 17:09:37...
- Page 105 This is to certify that This is to certify that HK AUDIO COHEDRA ® ® HK AUDIO ® Cohedra Compact ® complies with the provisions of the Directive of the Council of the European Communities on the complies with the provisions of the Directive of...
Need help?
Do you have a question about the Cohedra and is the answer not in the manual?
Questions and answers