Beurer GL50 Instructions For Use Manual
Hide thumbs
Also See for GL50:
- Instructions for use manual (40 pages) ,
- Instructions for use manual (40 pages) ,
- Short instructions (12 pages)
Table of Contents
Advertisement
Advertisement
Table of Contents

Related Manuals for Beurer GL50


Summary of Contents for Beurer GL50
- Page 1 GL50 Codefree 3 IN 1 BLOOD GLUCOSE MONITOR step by step...
-
Page 2: Table Of Contents
8 What if there are problems? ....................30 9 Technical specifications ...................... 32 10 Comparison of measured values with laboratory value ..........33 11 Usage limits for specialist personnel from the healthcare sector ......35 12 Guarantee and customer service ..................37 Beurer GL50... -
Page 3: Getting To Know Your Instrument
Your Beurer team. Getting to know your instrument The GL50 blood glucose measuring system is intended for fast and simple blood glucose measurement of fresh whole-blood samples, either for self-testing or in a clinical environment by trained personnel. It enables you to measure your blood glucose quickly and easily, store the measured values and dis- play the average of all measured values, thereby providing optimum assistance for monitoring your diabetes. -
Page 4: Delivery Scope, Replacements And Accessories
• The blood glucose monitor (A), test strips (C) and additionally available control solutions have been specially designed to complement each other. For this reason, use only test strips (C) and control solutions that have been approved for this blood glucose monitor (A). Beurer GL50... -
Page 5: Follow-Up Purchases
• Consult your GP with regard to insulin doses. 1.4 Signs and symbols The symbols on the packaging, type plate of the blood glucose monitor and accessories represent the following: In vitro diagnostics Manufacturer Please observe the Instructions Serial number for use Beurer GL50... -
Page 6: Warnings And Safety Notes
Therefore, please ensure that this monitor displays a unit of measurement with which you are familiar. The unit of measurement accompanies each blood glucose value. Please contact Customer Services if the device displays the incorrect unit of measurement. Beurer GL50... - Page 7 Consult your GP regularly regarding your measured values. Do not alter the procedures prescribed by your GP. • The Beurer GL50 monitor provides a simple way of monitoring your own blood glucose levels, however, you may need to obtain information on how to use the system from your healthcare pro- fessional (for example, your GP, chemist or diabetes consultant).
- Page 8 Note The Beurer GL50 measuring system is intended for measuring capillary whole blood. Storage and maintenance Warning • Store the blood glucose monitor and its accessories out of reach of small children and pets. Small parts, such as lancet needles, batteries or test strips may be life-threatening when swallowed. If swallowed, seek medical attention immediately.
-
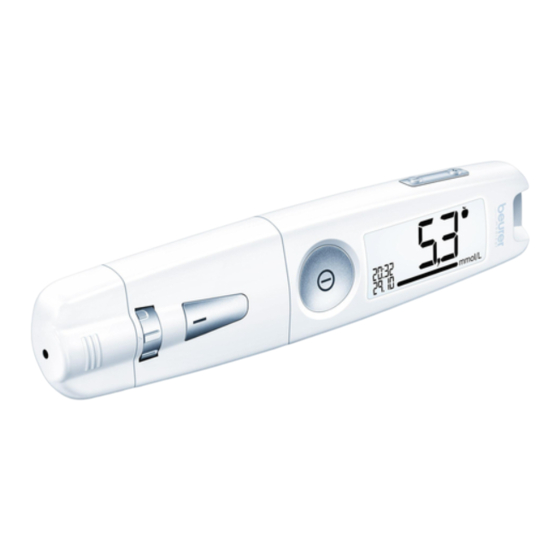
Page 9: Description Of Units And Accessories
EC Directive – WEEE (Waste Electrical and Electronic Equipment). If you have any questions, please contact the local authorities responsible for waste disposal. escription of units and accessories 3.1 Blood glucose monitor An overview of the monitor 1 Lancing device 2 Plug-in USB 3 Monitor Beurer GL50... -
Page 10: Lancing Device And Lancet Needles
6 Tensioning slider 7 Trigger 3.3 USB cover If you would like to use the blood glucose monitor without the integrated lancing device, you can use the supplied USB cover in place of the lancing device. Beurer GL50... -
Page 11: Display Symbols
The blood glucose monitor is supplied with the following basic settings: • Acoustic signal on • Backlighting on Warning Ensure that you are using the device with the correct blood glucose unit (either mg/dL or mmol/L) setting for you. If in doubt, consult your GP. Beurer GL50... -
Page 12: Test Strips
) on the label). The shelf life is limited to the expiry date (see date next to the egg timer symbol ). This does not apply for individual test strips, which are to be used imme- diately after opening. Beurer GL50... -
Page 13: Initial Use And Basic Settings
Insert two new CR 2032 3 V batteries. Make sure that the batteries are inserted the correct way round. See the graphic in the battery compartment. Close the battery compartment lid again carefully. Reattach the clip to the rear of the monitor. Fit the lancing device and monitor back together. Beurer GL50... -
Page 14: Making And Changing Basic Settings
To switch the acoustic signal off, press the “+” or “–” button. “ ” and “ ” are displayed. The speaker symbol is no longer shown in the display. Confirm by pressing the ON/OFF button. The blood glucose monitor is now ready for use. Beurer GL50... -
Page 15: Taking Measurements
Prepare all parts Prepare the following items: GL50 measuring device (A), test strip box or test strips in film packaging (C) and sterile lancet needles (D). Wash your hands Wash your hands with soap and warm water before taking a blood sample. -
Page 16: Preparing The Lancing Device For Taking A Sample
Tension the lancing device Pull the slider in the direction of the arrow (to the right in the image) un- til it stops and then release. The slider automatically springs back into position. The lancing device is now tensioned. Beurer GL50... -
Page 17: Taking A Blood Sample And Measuring The Glucose Level
Take the monitor in your left hand. Hold the blood glu- cose monitor so that the display is facing you and the Beurer logo is on the right-hand side. Insert the test strip into the slot on the rear end of the blood glucose monitor with the contacts first. - Page 18 Briefly remove the test strip and reinsert it so that the device automatically switches itself back on. • Contact Customer Services if you are unable to cover the test strip in blood correctly. Beurer GL50...
-
Page 19: Reading The Result And Labelling Measurements
Read the result Hold the blood glucose monitor so that the display is facing you (Beurer logo on the right-hand side). As soon as the blood input gap is filled with sufficient blood, the device performs the blood glucose measurement. The blood glucose monitor counts down for approx. -
Page 20: Post-Processing And Disposal
Carefully dispose of all blood samples and materials that you have come into contact with. This prevents injuries and the infection of others. Replace cap Place the cap back on the device. Turn the clip back over the cap. Beurer GL50... -
Page 21: Evaluating Measured Blood Glucose Values
Seek medical advice if dubious results persist. • Seek medical attention immediately if your symptoms do not correspond to your measured blood glucose values and you have followed all instructions for the Beurer GL50 blood glucose measur- ing system. -
Page 22: Functional Check Using Control Solution
Also test the blood glucose monitor if it has been dropped or is damaged. The control solution is available separately. Please observe the additional notes in the instructions for using the control solution for the test. Beurer GL50... - Page 23 Important • Do not use third-party control solution. Correct functioning of your monitor can only be tested us- ing Beurer LEVEL3 + LEVEL4 control solutions. • Control solution measurements: When using the device, specialist personnel must follow statutory guidelines. • Do not apply any blood samples or control solutions to the test strip before inserting it in the moni- tor.
- Page 24 The test strips and control solution were kept at Repeat the test using new, correctly stored ac- a temperature and humidity outside the speci- cessories (test strips and control solution). fied range. Beurer GL50...
-
Page 25: Measurement Memory
“+” or “–” rocker switch [3]. “Mem” and the number of saved blood glucose tests are displayed briefly (Image 1). The display then changes to the most recent saved value including the measurement unit, date, time, “Mem” and any label (Image 2). Beurer GL50... -
Page 26: Displaying Average Blood Glucose Values
You can cancel the process at any time. To do so, press the ON/OFF button or wait until the device switches itself off automatically after two minutes. 1 Number of days, e.g. 7, for which the average value is calculated 2 Number of saved values used to calculate the average, e.g. 8 3 Average value Beurer GL50... -
Page 27: Displaying Average Blood Glucose Values For Labelled Values
• the unit of measurement for blood glucose values and • “ ” are shown on the display. Press “+” repeatedly to display the average blood glucose level from the last 14, 30 and 90 days taken “after a meal” . Beurer GL50... -
Page 28: Evaluating Measured Values On A Pc
6.4 Evaluating measured values on a PC The GL50 monitor features an integrated plug-in USB stick. The blood glucose evaluation software GlucoMemory is installed on the USB stick (for position of the USB connection, see page 9). The GL50 is compatible with Diabass and SiDiary. -
Page 29: Storing, Maintaining And Disinfecting The Device
Storing Keep the Beurer GL50 blood glucose monitor in the case supplied after each measurement and do not expose it to direct sunlight. Note • Do not store the device, test strips or control solution in your vehicle, in the bathroom or in a cool- ing appliance, if this would not comply with storage the conditions. -
Page 30: What If There Are Problems
The oper- ating range specified in the technical specifica- tions is valid without restriction. Used or contaminated test strip in- • Insert an unused test strip that has not ex- serted. pired. • Repeat the blood glucose measurement. Beurer GL50... - Page 31 Remove the test strip and press the ON/OFF changed and these changes were not com- button until “ ” is displayed. pleted (see “4.2 Making and changing basic Repeat test. settings” on page 14). Device faulty. Contact Customer Services. Beurer GL50...
-
Page 32: Technical Specifications
The test is based on the measurement of an electric current that is generated by the chemical reaction of the glucose with the enzyme glucose dehydrogenase (Aspergillus oryzae) on the strip. During the reaction, a mediator transports electrons through the electrode surface and so gener- ates a current. Beurer GL50... -
Page 33: Comparison Of Measured Values With Laboratory Value
Precision Three lots of the GL50 blood glucose test strips have been tested to assess the precision of the GL50 blood glucose measuring system. This includes a repeat assessment using venous blood and a laboratory precision assessment using the control material. - Page 34 The GL50 blood glucose monitor in comparison with the YSI. Three lots of GL50 blood glucose test strips have been tested to assess the system accuracy of the GL50 blood glucose measuring system and to compare it with the reference method in which capillary whole blood concentrations of 32.4 to 511.8 mg/dL (1,8 to 28,4 mmol/L) have been used.
-
Page 35: Usage Limits For Specialist Personnel From The Healthcare Sector
(Within ±0.83 mmol/L or ±15%) 663/678 (97,8%) In comparison to the YSI, the GL50 met the EN ISO 15197:2015 standard, whereby 95% of the blood glucose values measured have to fall within the following zones: either ± 15 mg/dL (± 0.83 mmol/L) of the measured average value when using the reference measuring procedure for blood glucose concentrations <100 mg/dL (<5.55 mmol/L) or ±15% for blood glucose concentrations of ≥100 mg/... - Page 36 300 mg/dL (0.05 mmol/L) -3.1 mg/dL -2.6% (-0.17 mmol/L) Heparin 2.1 mg/dL (0.0018 mmol/L) -3.0mg/dL -1.3% (-0.17 mmol/L) Ibuprofen 50 mg/dL (2.43 mmol/L) -2.6 mg/dL -1.9% (-0.15 mmol/L) Icodextrin 1094 mg/dL (0.64~0.78 -4.17 mg/dL -2.9% mmol/L) (-0.23 mmol/L) Beurer GL50...
-
Page 37: Guarantee And Customer Service
12 G uarantee and customer service Warranty / Service Beurer GmbH, Söflinger Straße 218, 89077 Ulm, Germany (hereinafter referred to as “Beurer”) pro- vides a warranty for this product, subject to the requirements below and to the extent described as follows. - Page 38 The buyer will then receive further information about the processing of the warranty claim, e.g. where they can send the product and what documentation is required. A warranty claim shall only be considered if the buyer can provide Beurer, or an authorised Beurer partner, with –...
- Page 39 Beurer GL50...
- Page 40 Beurer GmbH Söfl inger Straße 218 89077 Ulm, Germany • • www.beurer.com www.beurer-healthguide.com •...
Need help?
Do you have a question about the GL50 and is the answer not in the manual?
Questions and answers