Table of Contents
Advertisement
Quick Links
Playpen Barrier
Fits openings 73cm - 3.7m
IMPORTANT! READ AND FOLLOW
THESE INSTRUCTIONS CAREFULLY
AND KEEP FOR FUTURE REFERENCE.
This product complies with safety standard EN 12227:2010.
AFTER SALES SUPPORT
For installation video, visit
info@childsafetyhelp.com
www.permachildsafety.com/playpen-
Product Code: 2747, 2751
barrier-installation-video
Advertisement
Table of Contents

Subscribe to Our Youtube Channel
Related Manuals for Perma child safety Playpen Barrier


Summary of Contents for Perma child safety Playpen Barrier
- Page 1 Playpen Barrier Fits openings 73cm - 3.7m IMPORTANT! READ AND FOLLOW THESE INSTRUCTIONS CAREFULLY AND KEEP FOR FUTURE REFERENCE. This product complies with safety standard EN 12227:2010. AFTER SALES SUPPORT For installation video, visit info@childsafetyhelp.com www.permachildsafety.com/playpen- Product Code: 2747, 2751...
-
Page 2: Parts List
G. 1x Bottom cap H. 8x Screws 7x Corner tubes If any parts are missing do not attempt to use your Playpen Barrier. Please call after sales support to obtain replacements. Only use parts supplied by the manufacturer with your Playpen Barrier. -
Page 3: Safety Information
Playpen Barrier User Guide Safety Information WARNING WHEN USED AS A SAFETY BARRIER: WARNING - Incorrect fitting or positioning of this safety barrier can be dangerous. WARNING - Do not use the safety barrier if any components are damaged or missing. -
Page 4: General Assembly
Playpen Barrier User Guide General Assembly Select the appropriate fixing method from the following list. This barrier must only be fixed to a solid and secure surface. To install you will need a Phillips screwdriver, pencil and drill. Timber Plasterboard... - Page 5 Playpen Barrier User Guide Adding Extra Panels Align opposite ends of panels, place the corner tube into the top hole first, pull the corner tube up so you can position the bottom of the corner tube into the bottom hole.
- Page 6 Playpen Barrier User Guide Underside Bracket Wall Assembly Expanded: Parts Required: 1x Top Underside Wall Bracket 1x Lower Wall Bracket 1x Bottom Cap NOTE: Place Lower Wall Bracket (F) over Corner Tube (J) before assembly. Assembled:...
- Page 7 Playpen Barrier User Guide 1. Mark screw positions with pencil. 2. Disassemble and screw in Top Underside Wall Bracket (C) and Lower Wall Bracket (E). 3. Reassemble Panel A, Corner Tube (I) and Bottom Cap (G) into Top Underside Wall Bracket (C)
- Page 8 Playpen Barrier User Guide Topside Bracket Wall Assembly Parts Required: Expanded: 1x Top Topside Wall Bracket 1x Lower Wall Bracket 1x Top Cap NOTE: Place Lower Wall Bracket (E) over Corner Tube (I) before assembly. Assembled:...
- Page 9 Playpen Barrier User Guide 1. Mark screw positions with pencil. 2. Disassemble and screw in Top Topside Wall Bracket (D) and Lower Wall Bracket (E). 3. Reassemble Panel A, Corner Tube (I) and Top Cap (F) into Top Topside Wall Bracket (D)
-
Page 10: Operation
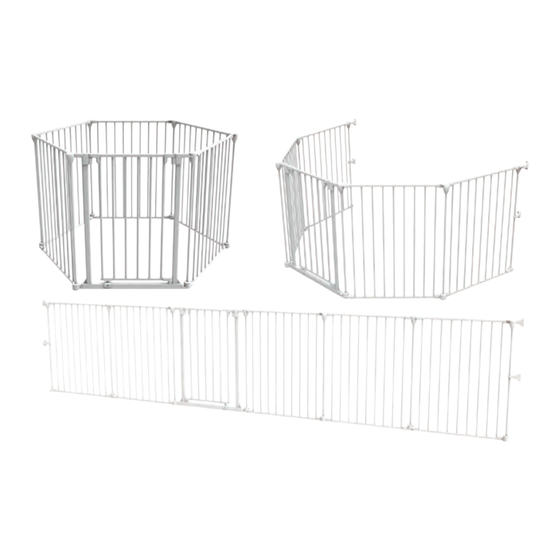
Playpen Barrier User Guide Operation Using one hand place thumb on the button and grip gate with fingers. Slide button and lift gate, then open gate in either direction, when released gate will swing closed automatically. Always check gate is properly closed. - Page 11 Playpen Barrier User Guide Using Playpen Barrier as Room Divider or Safety Barrier Up to 6 panels including the gate may be used in open configurations providing the 2 end panels are securely fixed to a wall with the fixings provided.
- Page 12 Playpen Barrier User Guide Playpen Assembly 1. Align Panel A and Panel B/C, place the corner tube into the top hole first, pull the corner tube up so you can position the bottom of the corner tube into the bottom hole.
- Page 13 Playpen Barrier User Guide Safety Play Mat (Sold Separately) Note: A safety play mat is required if playpen is used with children. The play mat is available separately, contact after sales support for details. Your child’s play mat can now be placed into the playpen and secured to the bottom bars of each panel with the ties.
-
Page 14: Warranty Certificate
Playpen Barrier User Guide Warranty Certificate Congratulations! You have made an excellent choice of this quality product. Our commitment to quality also includes our service. Should you, contrary to expectations, experience defects due to manufacturing faults, we will provide you with a warranty against defects as follows:... - Page 15 Playpen Barrier Warranty Card Details: Product Name: Playpen Barrier Product Number: 2747, 2751 Your Name: _______________________________________________________ Address: _________________________________________________________ ________________________________________________________________ Phone:___________________________________________________________ Email: ___________________________________________________________ Date of Purchase: __________________________________________________ Location of Purchase:________________________________________________ We recommend that you keep a copy of your receipt, showing the date of purchase, with this warranty certificate and keep for your reference.
Need help?
Do you have a question about the Playpen Barrier and is the answer not in the manual?
Questions and answers