
Related Manuals for PowerTech MP3764


Summary of Contents for PowerTech MP3764
- Page 1 12/24V 30A Flush Mount PWM Solar Charge Controller for Lithium and Lead Acid Batteries MP3764 User Manual More information https://www.caravansplus.com.au...
-
Page 2: Table Of Contents
Contents Important Safety Instructions ............ 1. Overview ................. 2 2. Exterior ..................2.1 Accessories (Included)............. 2.2 Accessories (Optional)............. 3. Installation and wiring .............1 Installation of the controller ........3.2 Wiring ................ -
Page 3: Important Safety Instructions
Please keep this manual for future review. Important Safety Instructions This manual contains all instructions of safety, installation, and operation of MP3764 Solar Charge controller. Read all the instructions and warnings carefully before installation. No user serviceable component inside the controller. DO NOT disassemble or attempt to repair the controller. -
Page 4: Overview
RV and Vessel, also included surface mount cover to suit personal preference. The MP3764 adopts highly efficient PWM charging m ode, also comes equipped with special LCD display to show the real-time operating status of the system. -
Page 5: Exterior
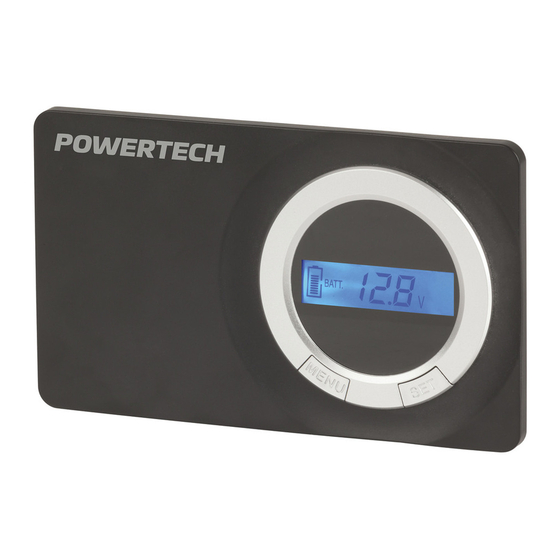
2. Exterior Controller case Battery terminals Mounting hole sizeφ 4.5mm PV terminals ⑴ SET button Remote temperature sensor port RS485 communication port ⑵ MENU button Remote battery voltage sensor port (1)The controller will charge the battery at 25 as default and no temperature compensation when the temperature sensor is damaged. -
Page 6: Accessories (Included)
2.1 Accessories (Included) Temperature Sensor 5.08-2P Terminal Model: RT-MF58R47K3.81A) to RS485 communication cable (Model: MP3747) 2.2 Accessories (Optional) 1)Remote Temperature Sensor(Model:RTS300R47K3.81A) Acquisition of battery temperature for undertaking temperature compensation of control parameters, the standard length of the cable is 3m (length can be customized). The RTS300R47K3.81A connects to the port on the controller. -
Page 7: Installation And Wiring
3. Installation and wiring 3.1 Installation of the controller 1) Determine the Installation Location and Heat-dissipation Space Determination of installation location: The controller shall be installed in a place with sufficient air flow through the radiators of the controller and a minimum clearance of 150 mm from the upper and lower edges to ensure natural thermal convection. -
Page 8: Wiring
5) Secure the controller 6) Install the control case 3.2 Wiring Step1: connect the battery CAUTION: A fuse which current is 1.25 to 2 times the rated current of the controller must be installed on the battery side with a distance from the battery not greater than 150 mm. - Page 9 Step2: Connect the PV CAUTION: While wiring the controller do not turn on the breaker or fuse and make sure that the leads of "+" and "-" poles are connected correctly. CAUTION: If the controller is used in the ungoverned or frequent lightning area, must install a reasonable arrester in the PV array input side.
-
Page 10: Lcd Display
4. LCD display 1) Automatic cycle interface Display: PV voltage, current, power, Battery voltage and Battery temperature 2) Clear the generated energy Operation: Step 1: Press the “SET” button and hold 5s under the PV power interface and the value is flashing. Step 2: Press the “SET”... - Page 11 Step2: Press the “MENU” button when the battery type interface is flashing. Step3: Press the “SET” button to confirm the battery type. ⑴ Set battery type by PC Download software www.epever.com——Solar Station Monitor www.epever.com——ChargeController(Sealed) (1)Only Sealed, Gel and Flooded via the LCD, The battery type of User can be set via the PC software, APP software and MT50.
-
Page 12: Protection
5. Protection Protection Instruction When the charging current of the PV array exceeds the PV Overcurrent controller’s rated current, it will be charged at the rated current. When the voltage of PV will exceed 50V, the controller will PV Overvoltage stop charging and restart to charge when the PV voltage is below 45V When the PV voltage is below 50V and short circuit, the... -
Page 13: Troubleshooting
6. Troubleshooting Faults Possible reasons Troubleshooting The PV of LCD display 0 when Confirm that PV wire the sunshine PV array connections are correct falls on PV disconnection and tight modules properly Measure battery voltage Min.8V will start up with multi-meter. Min.8V display the controller. -
Page 14: Technical Specifications
7. Technical Specifications Electrical Parameters Item GM3024N Nominal System 12/24VDC or Auto Voltage Battery Input 8V〜32V Voltage Range Rated Charge Current Max. PV Short Circuit Current Max. PV Open Circuit Voltage Battery Type Sealed(default)/Gel/Flooded/User Self-consumption ≤4.2mA/12V;≤2.6mA/24V Temperature -3mV/ /2V(Default) Compensate Coefficient Charge Circuit 0.21V Voltage Drop... - Page 15 Lead-acid Battery Voltage Parameters Table1 Parameters are in the 12V system at 25 , ×2 in 24V. Sealed Flooded User Item Over Voltage Disconnect 16.0V 16.0V 16.0V 9〜17V Voltage Charging Limit Voltage 15.0V 15.0V 15.0V 9〜17V Over Voltage Reconnect 15.0V 15.0V 15.0V 9〜17V...
-
Page 16: Dimensions
8. Dimensions More information https://www.caravansplus.com.au... -
Page 17: Appendix
9. Appendix "1. "1. " . More information https://www.caravansplus.com.au... - Page 18 Distributed by: TechBrands by Electus Distribution Pty. Ltd. 320 Victoria Rd, Rydalmere NSW 2116 Australia Ph: 1300 738 555 Int’l: +61 2 8832 3200 Fax: 1300 738 500 www.techbrands.com Made in China More information https://www.caravansplus.com.au...
Need help?
Do you have a question about the MP3764 and is the answer not in the manual?
Questions and answers