Table of Contents
Advertisement
Quick Links
Nuvo In-Wall / In Ceiling Subwoofer Amplifiers
Installation Instructions
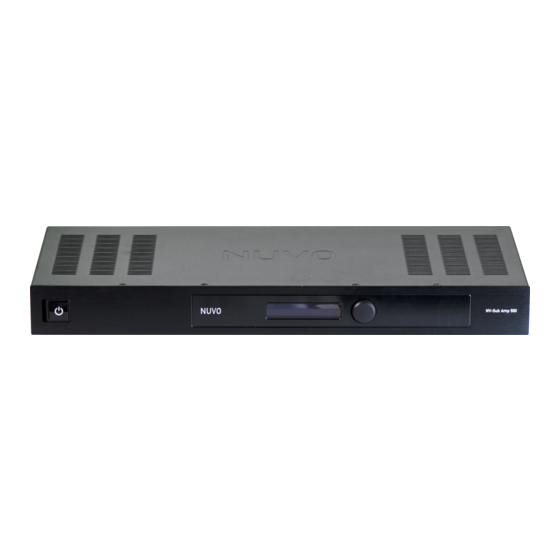
Part Numbers
NV-SUBAMP100-xx
NV-SUBAMP200-xx
NV-SUBAMP500-xx
AMPLIFIER FEATURES
NV-SUBAMP100-xx
NV-SUBAMP200-xx
19
NV-SUBAMP500-xx
NOTE: Power mode, Volume control, Phase control, and Crossover control are accessed on the LCD display menu using the control knob.
19
2
3
14
Fig. 1
15
4
17
16
8
Fig. 2
9
8
17
18
10
Fig. 3
1507315 Rev A 20190328
1
13
5
7
6
15
6
7
5
20
10
20
10
10
12
21
12 11
21
12 11
Advertisement
Table of Contents

Subscribe to Our Youtube Channel
Related Manuals for Nuvo NV-SUBAMP100 Series


Summary of Contents for Nuvo NV-SUBAMP100 Series
- Page 1 Nuvo In-Wall / In Ceiling Subwoofer Amplifiers Installation Instructions 1507315 Rev A 20190328 Part Numbers NV-SUBAMP100-xx NV-SUBAMP200-xx NV-SUBAMP500-xx AMPLIFIER FEATURES NV-SUBAMP100-xx Fig. 1 NV-SUBAMP200-xx 12 11 Fig. 2 NV-SUBAMP500-xx NOTE: Power mode, Volume control, Phase control, and Crossover control are accessed on the LCD display menu using the control knob.
- Page 2 Phase control EQ mode This instruction sheet covers the installation of the Nuvo In-Wall/In-Ceiling Subwoofer Amplifiers. These amplifiers offer a substantial amount of dynamic power to increase the quality of your audio system. UNDERSTANDING THE LCD PANEL FEATURES (FOR NV-SUBAMP500-XX MODELS)
-
Page 3: Factory Reset
Crossover Main Screen Power Options Screen Crossover provides an option for a low pass filter for the amplifier. Choose This setting sets the power state. Choose from one of the following options: from one of the following options: • Switch: The amplifier is always on. This is the default setting. •... -
Page 4: Installation
If using a 12 V power supply plugged into an outlet on the receiver, connect the wires to the trigger terminals. – When using a Nuvo wireless subwoofer connection kit, +12V Out Switched Outlet you can modify the USB power cable for the receiver by Fig. - Page 5 + – – Fig. 8 Fig. 9 STEP 4: Connect the subwoofer(s) to the amplifier using either option a or option b: a. Use the SUB terminal connections (for NV-SUBAMP200-xx and NV-SUBAMP500 models) See Figure 8: 1. Strip 1/4 in. (6.4 mm) of the cable jacket on each end of two cables. 2.
- Page 6 ADJUSTING THE AMPLIFIER CONTROLS STEP 1: Plug your amplifier into a functional outlet and turn the power switch to ON. If applicable to your model, a status light will illuminate when the amplifier is powered or a signal is detected, depending on the various settings selected. STEP 2: Set the power mode for the amplifier: •...
-
Page 7: Amplifier Dimensions
AMPLIFIER DIMENSIONS NV-SUBAMP100-xx 8.0 in. (204 mm) 7.5 in. (191 mm) 6.67 in. (170 mm) 7.1 in. (181 mm) 4.5 in. 2.0 in. (50.5 mm) (114 mm) NV-SUBAMP200-xx 16.9 in. (428 mm) 1.75 in. (44.5 mm) 8.1 in. (206 mm) NV-SUBAMP500-xx 16.9 in. -
Page 8: Amplifier Specifications
Unit Weight (kg / pounds) 1.40 / 3.09 3.10 / 6.83 4.40 / 9.70 Languages Supported English, French, German, Italian, Portuguese, Spanish Legrand reserves the right to change specifications without notice. Nuvo Subwoofers have a lifetime warranty, exceptions apply, go to www.legrand.us for details. -
Page 9: Regulatory Compliance
Ce document contient des informations importantes sur la sécurité et la conformité réglementaire du produit. Pour plus de détails concernant les instructions d’utilisation et d’installation, veuillez consulter notre site Web à l’adresse http://www.legrand.us/nuvo. aspx. Pour nous joindre : Soutien technique :... -
Page 10: Suporte Técnico
(That is, make certain the audio device and the television or radio are on circuits controlled by different circuit breakers or fuses.) If necessary, consult Nuvo Technical Support, refer to the service and support information available for your Nuvo product, or consult an experienced radio/television technician for... -
Page 11: Region Selection
However, this device should be operated with a minimum distance of at least 20 cm between the Nuvo Player antennas and a person's body, and must not be collocated or operated in conjunction with any other antenna or transmitter subject to the conditions of the FCC Grant. - Page 12 Europe - EU Declaration of Conformity A copy of the EU Declaration of Conformity is available at: www.legrand.us/aboutus/sustainability/high-performance-buildings/eco-iconography.aspx This equipment can be used in the following countries:...
- Page 13 Important Safety Information (English) Read these instructions. Keep these instructions. Heed all warnings. Follow all instructions. Do not use this product near water or moisture or let objects or liquids enter the product. Install according to manufacturer's instructions. Clean only with a dry, soft cloth. Do not block the ventilation openings.
- Page 14 Wichtige Sicherheit Auskunft (Deutsch) Lesen Sie diese Anweisungen. Behalten Sie diese Anweisungen. Beachten Sie alle Warnungen. Folgen Sie allen Anweisungen. Verwenden Sie dieses Produkt nicht in Wassernähe oder bei Feuchtigkeit und vermeiden Sie das Eindringen von Gegenständen oder Flüssigkeiten in das Produkt. lnstallieren Sie immer nach den Anweisungen des Herstellers.
- Page 15 Informações importantes de segurança (Português) Leia estas instruções. Guarde estas instruções. Tenha em atenção todos os avisos. Siga todas as instruções. Não utilize este produto junto de água ou humidade, nem deixe que os objetos ou líquidos entrem em contacto com o produto. Instale de acordo com as instruções do fabricante.
-
Page 16: Disposal And Recycling Information
Disposal and Recycling Information This symbol indicates that your product must be disposed of properly according to local laws and regulations. When your product reaches its end of life, contact Nuvo Technologies or your local authorities to learn about recycling options.
Need help?
Do you have a question about the NV-SUBAMP100 Series and is the answer not in the manual?
Questions and answers