Table of Contents
Advertisement
Available languages
Available languages
Quick Links
Advertisement
Table of Contents

Related Manuals for Xblitz NaviiGPS


Summary of Contents for Xblitz NaviiGPS
- Page 1 Xblitz NAVIIGPS Cam recorder / Kamera samochodowa...
- Page 3 Uwagi dotyczące instalacji Zamontuj kamerę jak najbliżej lusterka wstecznego, tak aby uzyskać jak najlepsze pole widzenia. NIE montuj kamery w miejscu, które spowoduje zaburzenie odpowiedniego pola widzenia w czasie jazdy. Upewnij się, że obiektyw kamery znajduje się w zasięgu wycieraczki przedniej szyby, tak aby zapewnić odpowiednią pracę...
- Page 4 wyznaczonych przepisami prawa. Producent ponosi odpowiedzialności za utratę danych powstałych podczas użytkowania urządzenia. Wprowadzenie Dziękujemy zakup zaawansowanej kamery samochodowej. Urządzenie to zostało zaprojektowane z myślą o nagrywaniu video z dźwiękiem podczas jazdy autem. Główne funkcje Kamera samochodowa FullHD (1920x1080@30 kl./sek.) Kolorowy wyświetlacz LCD o przekątnej 2 cali Szerokokątny obiektyw 140 stopni Funkcja automatycznego nagrywania w przypadku wykrycia...
-
Page 5: Funkcje Przycisków
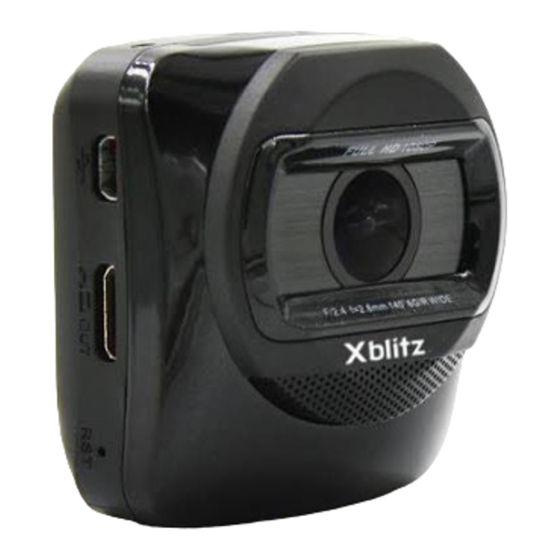
Elementy kamery Opis Złącze przyssawki na szybę Gniazdo microUSB (zasilanie) Gniazdo HDMI Reset Głośnik Obiektyw Mikrofon Numer seryjny Przycisk zasilania (wł./wył.) Gniazdko karty pamięci Wskaźnik zasilania LED Wyświetlacz LCD Przycisk MODE Przycisk UP (strzałka w górę) Przycisk DOWN (strzałka w dół) Przycisk OK Funkcje przycisków Przycisk zasilania (power): wciśnij krótko aby włączyć... - Page 6 Przycisk MODE: w trybie standby wciśnij krótko aby wejść do menu u rządzenia lub wciśnij i przytrzymaj aby wejść w tryb foto i video; w czasie odtwarzania foto lub video wciśnij krótko aby zakończyć odtwarzanie; w trybie menu wciśnij krótko aby wyjść z menu.
- Page 7 KORZYSTANIE Z KAMERY Instalowanie karty pamięci: włóż kartę microSD do gniazda tak aby złote styki były skierowane w stronę tyłu kamery, wciśnij kartę aż usłyszysz kliknięcie i karta „wskoczy” na swoje miejsce. Aby wyjąć kartę pamięci z gniazda naciśnij ją aż karta „wyskoczy”...
- Page 8 Miej na uwadze, że kiedy temperatura otoczenia osiągnie poziom stopni Celsjusza wyższy, ładowarka samochodowa nadal będzie zapewniać zasilanie kamery, ale wbudowana bateria nie będzie ładowana, co wynika ze specyfiki baterii litowo-polimerowych. WŁĄCZANIE KAMERY Włączanie automatyczne: po uruchomieniu silnika pojazdu, kamera automatycznie włączy się...
- Page 9 można wyłączyć też ręcznie naciskając przycisk OK. Uwaga: W niektórych autach nagrywanie jest kontynuowane nawet po wyłączeniu silnika. Jeśli ma to miejsce, wykonaj jedną z następujących czynności: ręcznie wyłącz gniazdo zapalniczki samochodowej lub wyjmij adapter ładowarki z gniazda zapalniczki samochodowej. Nagrywanie innych plików video: wciśnij przycisk OK aby rozpocząć...
- Page 10 Nagrywanie video – ekran główny Ikonka Opis Wskazuje rozdzielczość nagrania Wciśnij UP aby włączyć/wyłączyć mikrofon Logo GPS, jeśli jest zielone, oznacza to, że udało się ustalić pozycję GPS Ikonka ładowania baterii Bieżąca data Pozostały czas nagrania Bieżący czas Nagrywanie Bieżący czas wykonanego nagrania Czujnik ruchu uruchomiony lub wciśnięty przycisk DOWN –...
- Page 11 Ikonka Opis Tryb zdjęć Bieżąca rozdzielczość zdjęć Ustawienia samowyzwalacza Ikonka ładowania baterii Bieżąca data Pozostała liczba zdjęć Bieżący czas Odtwarzanie video W trakcie nagrywania video, naciśnij przycisk OK aby zakończyć nagrywanie. Po wykonaniu tej czynności kamera znajduje się w trybie video standby. Teraz wciśnij przycisk DOWN (strzałka w dół) aby wyświetlić...
- Page 12 aby wybrać żądane zdjęcie z listy plików foto, a następnie wciśnij przycisk OK aby odtworzyć wybrane nagranie. Użyj przycisków UP i DOWN aby wybrać poprzednie lub następne nagranie. Wciśnij przycisk MODE aby zakończyć odtwarzanie i powrócić do widoku listy plików foto. Usuwanie i zabezpieczanie plików video/foto Aby skasować...
-
Page 13: About This Guide
/TV experiences. This product meet FCC poiicy lesion 15th. lis operation should meet below two conditions: (1) This product cannot eause any harmful interference (2) This product should receive any interference, include the interference caused by accidental operalion. Xblitz... -
Page 14: Fcc Notice
The recycling of materiaIs will help to conserve naturaI resources and ensure thai il is recycled in a manner thaiprotects human health and environment. Xblitz. - Page 15 Notice Notes on lnstallation damage the nt film.
- Page 16 flames can cause...
-
Page 17: Package Details
1.lntroduction Thank you for purchasing this advanced Car Recorder. This device is specifically designed for real time video and audio recording when driving. 1.1 Functions -Full HD Car camcorder(1920x1080 @30fps) -2." LCD color screen -140 degree wide angie full glass Iens -Automatic Emergency recording for collision detection -Support SDHC, up to 64GB 1.2 Package details... - Page 18 1.3 Car DVR Description Description Suction cup connect Power bu on Card slot Power HDMI LED indicatorPowerbu on Reset screen Speaker Mode Wide angle lens Down Microphone Serial No.
-
Page 19: Button Functions
1.4 Button functions - CDPower:Off status, short press turn on; Stand by status, long press 2 seconds turn off; Mod e change/Exist/Snapshot: Instandby status, short press to enter menu, long press to enter photograph and video made; When play files, short press to exist play, Short press to exist corresponding video, When setting menu funclion,... -
Page 20: Getting Started
2 Getting Started 2.1 lnserting the Memory Card Insert the memory card with the gołd contacts facing the back of the camcorder. Push the memory card until it clicks inio place. To remove the memory card Push to eject the memory card out of the slot. Note: 1. -
Page 21: Mount To Windshield
2.2 lnstalling in Vehicles 2.2.1 Mount to Windshield 1. Attach the bracket to the device Slide into the bracket holder until you hear a click. 2. With the suction-cup laying fiat, position the suction-cup on the windshield. 3. Make sure the base is securely locked in place. -
Page 22: Adjust The Device Position
2.2.2 Adjust the device position 1. Loose the knob to swivel the device vertically. 2. Loose the knob to swivel the device horizontally up to 360°. 3. Then tighten the knob to make sure the device is securely locked in place.•... -
Page 23: Connecting To Power
2.3 Connecting to Power Use only the supplied car adapter to power up the device and charge the built-in batiary. 1. Connect one end of the car adapter to the USB connector of the camcorder. 2. Plug the other end of the car chargerto the cigarette lighter socket of your vehicle. -
Page 24: Powering The Camcorder On/ Off
2.4 Powering the Camcorder On/ Off 2.4.1 Auto Power On/Off Once the vehicle engine is started, the device automatically turns on and start recording. Once the vehicle engine shuts down, the camcorder automati cally saves the recording and turns off the powerwithin 10 seconds. 2.4.2 Manuał... - Page 25 2.5 lnitial Settings Before using the device, we recommend you to set up the correct dale and time. 2.5.1 Set the Dale and Time set the correct dale and time, do the following in standby window: - 1.Press [MODE] button to enter the OSD menu.• - 2.Press [•] button, to select system setups.
-
Page 26: Recording Videos
3. Recording Videos... -
Page 27: Emergency Recording
3.1.3 Emergency Recording During Video Recording, press the[""] button to enter emergency recording mode icon will beshown immediately on the upper center of the screen, and the recorded file will be protected. press the [•]button. To stop the emergency made, Note: theG·... - Page 28 3.1.4 Video photograph 10 11 12 - ..10lOFHD Item Descrlptlon CIBII lndicates the video resolutlon. Press( A]key to turn on/off Micro position logo,display green colour when GPSpositon sucessful Charging logo Current date mmm'iJ Rest recording time Current time Recordlng Current already recorded time...
-
Page 29: Taking Photographs
3.1.5 Taking Photographs You can also use this camcorder to take photos of the current scene. 1. From the standby screen, press the [MODE] button to enter Photo mode. 2. Press [OK] to button to take a photo. ł.P Snapshot during recording Photo made 3.1.6 The Photograph Sreen Item... -
Page 30: Playback Videos And Photos
3.2 Playback Videos and Photos lf recording is in progress, press the [OK] button to stop recording. The standby screen is displayed. 3.2.1 Playing videos 1. In the standby screen. Or photograph screen. list -, ,.: T] key to video pl a y ,·-. -
Page 31: Viewing Photos
3.2.2 Viewing photos 1. In the standby screen. Or photograph screen. ._ 1920x1080 [•I 3. 3.Press the [1'] button to browse for the desired video file [•I and press the [OK] button to play the video. Press the (1'] button to choose prevlous or next video or photo. Play [MODE] key to return back photo list. - Page 32 2. Press[.ł.] [TJ button to select file. Press OK eky to enter PLAY/PREVIEW screen. 3. Long Press[MODE] key to return back MENU 4. Press [.ł.] [TJ button to the right action, and press OK Item Selectlon Descrlptlon Delete the current file Delete Dełete files which notprotected in thelist...
-
Page 33: Adjusting The Settings
4. Adjusting the Settings 4.1 Using the Menu You can adjust the settings menu. you need to set. 1 : if on recording. press [OK) key to pause recording. Video setting 3:System setting ;--;_;,_- -:.,;- - - - --,;=o 4. Press[MODE] key, return to Menu made. [-"I 5. -
Page 34: Menu Tree
7. Press[&) key to select the desired setting then press [OK]key to confirm setting. 8. Repeat 5, 6, 7 steps, till finish settin. 9. Finish setting, press[MOOE] key to exist menu mode. 4.2 Menu Tree Refer to the below table for details on menu items and available menu options. - Page 35 Menu optlon Avallable optlon Description GPS satellite GPS SETTING ONI OFF positioning Set current time Timezone ONI OFF zone,auto update selection when gps sucessful Press[•l l"l Current speed mare keySelect speed settings Limited speed than Auto is closing close SPPED STAMP function In photograph mode, press[MODE] key to display belowmenu...
- Page 37 Firmware version Version...
-
Page 38: Specifications
5. Specifications Item Descrlption Image sensor " CMOS Sensor 1920 (H) x 1080 (V) Effective oixels Support Micro SDHC, up to 32GB Storage card Class10 LCD screen 2" LCD color TFT (230K pixels) 140°Wide Angle Fixed Lens Focus lens Fl.8, f=2.8mm Focus range 1.5m- lnfinity Full HD (1920 x 1080).30/ps...
Need help?
Do you have a question about the NaviiGPS and is the answer not in the manual?
Questions and answers