Table of Contents
Advertisement
Advertisement
Table of Contents

Related Manuals for Citrix ADC MPX Series


Summary of Contents for Citrix ADC MPX Series
- Page 1 Citrix ADC MPX Citrix Product Documentation | docs.citrix.com November 19, 2019...
-
Page 2: Table Of Contents
Citrix ADC MPX 59xx Citrix ADC MPX 7500 and MPX 9500 Citrix ADC MPX 8005, MPX 8015, MPX 8200, MPX 8400, MPX 8600, and MPX 8800 Citrix ADC MPX 89xx Citrix ADC MPX 9700, MPX 10500, MPX 12500, and MPX 15500... - Page 3 Taiwan BSMI RoHS statement FCC compliance statement Prepare for installation Install the hardware Initial configuration Lights out management port of the Citrix ADC MPX appliance Configure the network settings on the LOM port © 1999-2019 Citrix Systems, Inc. All rights reserved.
- Page 4 Upgrade the LOM firmware on a Citrix ADC MPX appliance Hardware health attributes Wiping your data before sending the ADC appliance to Citrix Migrate the configuration of an existing Citrix ADC appliance to another Citrix ADC appliance165 Troubleshooting Hardware FAQs...
-
Page 5: Common Hardware Components
On the appliance’s back panel, system status LEDs indicate the overall status of the appliance. The following table describes the indicators of the system status LED. Note: System status LEDs are available on only some Citrix ADC appliances. System status LEDs... -
Page 6: Citrix Systems, Inc. All Rights Reserved
Link/Activity No link. Solid green Link is established but no traffic is passing through the port. Blinking green Traffic is passing through the port. 1G SFP (1 Gbps) Left Link/Activity No link. © 1999-2019 Citrix Systems, Inc. All rights reserved. - Page 7 MPX 5900 platform) Blinking green Traffic is passing through the port. Management Left Speed No connection, (RJ45) or a traffic rate of 10 megabits per second (Mbps). Green Traffic rate of 100 Mbps. © 1999-2019 Citrix Systems, Inc. All rights reserved.
- Page 8 • 1000 W AC/DC – MPX 14xxx – MPX 25xxx – T1300 – MPX 15xxx – MPX 26xxx – MPX 26xxx-100G • 1200 W AC/DC – MPX 26xxx-50S 3Y power supply LED behavior © 1999-2019 Citrix Systems, Inc. All rights reserved.
- Page 9 The Acbel power supply is used on the following platforms: • 450 W AC – MPX 59xx – MPX 89xx • 450 W DC – MPX 59xx – MPX 89xx Acbel 450 W power supply LED behavior © 1999-2019 Citrix Systems, Inc. All rights reserved.
- Page 10 Power Supply 960 W AC 960 W DC LED behavior when G1W2-5960V3V Rev.5 DG1W-3960 V No Power to any power supply No power to this power Continuous beep sound Continuous beep sound supply © 1999-2019 Citrix Systems, Inc. All rights reserved.
- Page 11 – MPX 24xxx – MPX 22xxx – T1200 Flex (750 W) power supply LED behavior Power Supply 750 W AC 750 W DC LED behavior when F750E-XX A00 No Power to any power supply © 1999-2019 Citrix Systems, Inc. All rights reserved.
- Page 12 • 50 Gb • 100 Gb All Citrix ADC appliances have a combination of some or all of these ports. For details on the type and number of ports available on your appliance, see the section describing that platform. © 1999-2019 Citrix Systems, Inc. All rights reserved.
- Page 13 You need a fiber optic cable to connect to a port. If the other end of the fiber optic cable is attached to a 1G SFP port, the 10G SFP+ port automatically nego- tiates to 1G speed. © 1999-2019 Citrix Systems, Inc. All rights reserved.
- Page 14 Only 50G/100G (QSFP28) and 40G (QSFP+) transceivers can be directly used on a QSFP28 interface. Use a QSA28 adapter on a QSFP28 interface to use 10G (SFP+) and 25G (SFP28) transceivers. The following diagram shows the transceiver compatibility. © 1999-2019 Citrix Systems, Inc. All rights reserved.
- Page 15 Citrix ADC MPX © 1999-2019 Citrix Systems, Inc. All rights reserved.
- Page 16 Citrix ADC MPX © 1999-2019 Citrix Systems, Inc. All rights reserved.
- Page 17 Copper 1G SFP distance specifications Description: Citrix ADC 1G SFP Ethernet copper (100 m) - 4 pack Transmitter wavelength (nm): Not applicable Cable type: Category 5 (Cat-5) copper cable...
- Page 18 • MPX 22xxx • MPX 24xxx Short reach fiber 1G SFP distance specifications Description: Citrix ADC 1G SFP Ethernet SX (300 m) - 4 pack Transmitter wavelength (nm): 850 nm (nominal) Fiber type: 50/125um MMF, 2000MHz-km (OM3) Typical Reach (m): 550 m...
- Page 19 • MPX 22xxx • MPX 24xxx Long reach fiber 1G SFP distance specifications Description: Citrix ADC 1G SFP Ethernet long range (10 km) - Single Transmitter wavelength (nm): 1310 nm (nominal) Fiber type: 9/125um SMF Typical reach (m): 10 km Applicable platforms: •...
- Page 20 • MPX 11500/13500/14500/16500/18500/20500 • MPX 11515/11520/11530/11540/11542 • MPX 17550/19550/20550/21550 • MPX 22xxx • MPX 24xxx • MPX 25xxxT • MPX 25100 40G, MPX 25160 40G • MPX 14xxx • MPX 14xxx-40G • MPX 14xxx-40S © 1999-2019 Citrix Systems, Inc. All rights reserved.
- Page 21 62.5/125um MMF, 26 m 160MHz-km Long reach fiber 10G SFP+ distance specifications Description: Citrix ADC 10G SFP+ Ethernet long range (10 km) - Single Transmitter wavelength (nm): 1310 nm (nominal) Fiber type: 9/125um SMF Typical reach (m): 10 km Applicable platforms: •...
- Page 22 • MPX 14xxx-40S • MPX 14xxx FIPS Citrix direct attached (DAC) copper TwinAx 10G SFP+ passive cables specifications Description: Citrix ADC 1 m DAC SFP+ cable for up to 1 m distance Applicable platforms: • MPX 5901/5905/5910 • MPX 8005/8015/8200/8400/8600/8800 •...
- Page 23 • MPX 14xxx FIPS • MPX 25xxxTA • MPX 25xxxA • MPX 25xxxT • MPX 25xxx-40G Description: Citrix ADC 5 m DAC SFP+ cable for up to 5 m distance Applicable platforms: • MPX 8005/8015/8200/8400/8600/8800 • MPX 17500/19500/21500 • MPX 11500/13500/14500/16500/18500/20500 •...
-
Page 24: Datasheets
Notes: • Support for this cable is available in release 10.1 build 122.17 and later. • The peer switch must be 40G. You connect 4*10G ports on the Citrix ADC appliance. • To obtain these cables, contact Cisco partner representatives. - Page 25 11.0-62.10 11.1-47.14 12.0-41.16 12.1-48.13 13.0-36.27 40C/14040- 40C/14060- 40C/14080- 40C/14100- MPX 14020- 10.5-59.69 11.0-62.10 11.1-47.14 12.0-41.16 12.1-48.13 13.0-36.27 40G/14040- 40G/14060- 40G/14080- 40G/14100- MPX 14040- 10.5-59.71 11.0-62.10 11.1-47.14 12.0-41.16 12.1-48.13 13.0-36.27 40S/14060- 40S/14080- 40S/14100- © 1999-2019 Citrix Systems, Inc. All rights reserved.
- Page 26 MPX 25100- 10.5-59.69 11.0-62.10 11.1-47.14 12.0-41.16 12.1-48.13 13.0-36.27 40G/25160- 40G/25200- 11.1-60.13 12.0-60.10 12.1-50.31 13.0-36.27 26100/26160/26200 MPX 26100- 11.1-60.13 12.0-60.10 12.1-50.31 13.0-36.27 50S/26160- 50S/26200- MPX 26000- 11.1-56.15 12.0-57.19 12.1-50.31 13.0-36.27 100G/MPX 26000T- 100G © 1999-2019 Citrix Systems, Inc. All rights reserved.
-
Page 27: Hardware Platforms
February 25, 2019 The Citrix ADC MPX 5500 is a 1U appliance, with 1 dual-core processor, and 4 gigabytes (GB) of mem- ory.The Citrix ADC MPX 5500 is a 1U appliance, with 1 dual-core processor, and 4 gigabytes (GB) of memory. - Page 28 The following components are visible on the back panel of the MPX 5500: • Four GB removable CompactFlash card that is used to store the Citrix ADC software. • Power switch, which turns off power to the MPX 5500, just as if you were to unplug the power supply.
-
Page 29: Citrix Adc Mpx 5550 And Mpx 5650
Citrix ADC MPX 5550 and MPX 5650 February 25, 2019 The the Citrix ADC models MPX 5550 and MPX 5650 are 1U appliances. Each model has one quad-core processor and 8 gigabytes (GB) of memory. The following figure shows the front panel of the MPX 5550/5650 appliance. -
Page 30: Citrix Adc Mpx 59Xx
• Non-maskable interrupt (NMI) button, which is used at the request of Technical Support to pro- duce a Citrix ADC core dump. You must use a pen, pencil, or other pointed object to press this red button, which is recessed to prevent unintentional activation. - Page 31 • Two 10G/1G SFP+ Ethernet Ports, numbered 10/1 to 10/2 from left to right. The following figure shows the back panel of the MPX 59xx appliance. Figure 2. Citrix ADC MPX 59xx, back panel The following components are visible on the back panel of the MPX 59xx appliances: •...
-
Page 32: Citrix Adc Mpx 7500 And Mpx 9500
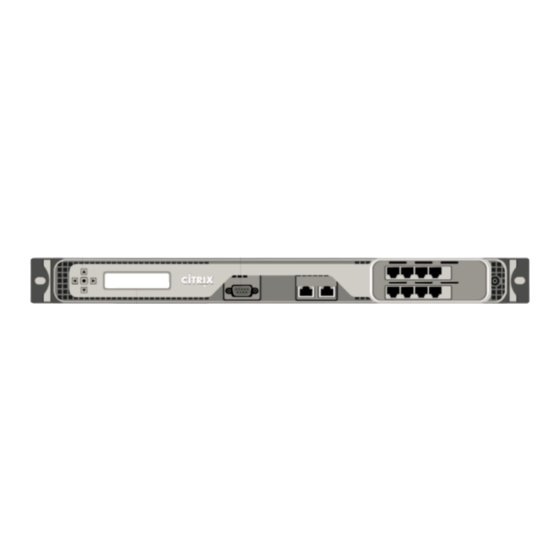
Citrix ADC MPX 7500 and MPX 9500 February 25, 2019 The Citrix ADC MPX 7500/9500 are 1U appliances, each with 1 quad-core processor, and 8 giga- bytes (GB) of memory. The MPX 7500/9500 appliances are available in two port configurations: 8x10/100/1000Base-T copper Ethernet ports and 4x1G SFP + 4x10/100/1000Base-T copper Ethernet ports. - Page 33 The following components are visible on the back panel of the MPX 7500 /9500: • Four-gigabyte removable CompactFlash card that is used to store the Citrix ADC software. • Power switch, which turns off power to the MPX 7500/9500, just as if you were to unplug the power supply.
-
Page 34: Citrix Adc Mpx 8005, Mpx 8015, Mpx 8200, Mpx 8400, Mpx 8600, And Mpx 8800
For information about performing initial configuration of your appliance, see Initial Configuration. Citrix ADC MPX 8005, MPX 8015, MPX 8200, MPX 8400, MPX 8600, and MPX 8800 February 25, 2019 The Citrix ADC models MPX 8005, MPX 8015, MPX 8200, MPX 8400, MPX 8600 , and MPX 8800 are 1U appliances. - Page 35 • One 10/100Base-T copper Ethernet Port (RJ45), also called LOM port. You can use this port to remotely monitor and manage the appliance independently of the Citrix ADC software. • One 10/100/1000Base-T copper Ethernet management port (RJ45), numbered 0/1. The manage- ment port is used to connect directly to the appliance for system administration functions.
-
Page 36: Citrix Adc Mpx 89Xx
• Non-maskable interrupt (NMI) button, which is used at the request of Technical Support to pro- duce a Citrix ADC core dump. You must use a pen, pencil, or other pointed object to press this red button, which is recessed to prevent unintentional activation. - Page 37 Citrix ADC MPX For information on the software releases supported on the Citrix ADC hardware platforms, see Hardware-Software Release Matrix. The following figure shows the front panel of the MPX 89xx series appliances. Figure 1. Citrix ADC MPX 89xx, front panel The Citrix ADC MPX 89xx series appliances have the following ports: •...
- Page 38 LOM GUI, in the Remote Control menu. For more information about the lights out manage- ment port of the appliance, see Lights out management port of the Citrix ADC MPX appliance. © 1999-2019 Citrix Systems, Inc. All rights reserved.
-
Page 39: Citrix Adc Mpx 9700, Mpx 10500, Mpx 12500, And Mpx 15500
Citrix ADC MPX 9700, MPX 10500, MPX 12500, and MPX 15500 February 25, 2019 The Citrix ADC MPX 9700/10500/12500/15500 are 2U appliances, each with 2 quad-core processors, and 16 gigabytes (GB) of memory. All these appliances are also available in a 10G model and a FIPS model. - Page 40 The following figure shows the back panel of the MPX 9700/10500/12500/15500 appliances, including the 10G model and FIPS model. Figure 4. Citrix ADC MPX 9700/10500/12500/15500, MPX 9700/10500/12500/15500 FIPS, and MPX 9700/10500/12500/15500 10G, back panel © 1999-2019 Citrix Systems, Inc. All rights reserved.
- Page 41 10G model and FIPS model: • Four GB removable CompactFlash Card that is used to store the Citrix ADC software. • Power Switch, which turns off power to the appliance, just as if you were to unplug the power supply.
-
Page 42: Citrix Adc Mpx 11500, Mpx 13500, Mpx 14500, Mpx 16500, Mpx 18500, And Mpx 20500
Citrix ADC MPX Citrix ADC MPX 11500, MPX 13500, MPX 14500, MPX 16500, MPX 18500, and MPX 20500 February 25, 2019 The Citrix ADC models MPX 11500/13500/14500/16500/18500/20500 are 2U appliances. Each model has two 6-core processors for a total of 12 physical cores (24 cores with hyper-threading), and 48 giga- bytes (GB) of memory. - Page 43 The following components are visible on the back panel of the MPX 11500/13500/14500/16500/18500/20500 appliance: • 160 GB removable solid-state drive that is used to store the Citrix ADC software. • USB port (reserved for a future release). • Power switch, which turns off power to the appliance, just as if you were to unplug the power supply.
-
Page 44: Citrix Adc Mpx 115Xx
• 10/100Base-T copper Ethernet Port (RJ45), also called LOM port. You can use this port to re- motely monitor and manage the appliance independently of the Citrix ADC software. Note: The LEDs on the LOM port are not operational by design. - Page 45 The following components are visible on the back panel of the MPX 11515/11520/11530/11540/11542 appliance: • 256 GB removable solid-state drive that is used to store the Citrix ADC software. • USB port (reserved for a future release). • Power switch, which turns off power to the appliance, just as if you were to unplug the power supply.
-
Page 46: Citrix Adc Mpx 14Xxx
The Citrix ADC MPX 14020/14030/14040/14060/14080/14100 are 2U appliances. Each model has two 6-core processors and 64 GB of memory and sixteen 10G SFP+ ports (16x10G SFP+). For information about the software releases supported on the Citrix ADC hardware platforms, see Cit- rix ADC hardware software support matrix. - Page 47 LOM GUI, in the Remote Control menu. For information about installing the rails, rack mounting the hardware, and connecting the cables, Installing the Hardware. For information about performing initial configuration of your appliance, see Initial Configuration. © 1999-2019 Citrix Systems, Inc. All rights reserved.
-
Page 48: Citrix Adc Mpx 14Xxx-40C
Citrix ADC MPX 14xxx-40C October 25, 2019 The Citrix ADC MPX 14xxx-40C are 2U appliances. Each model has 2 six-core processors, 64 GB of mem- ory, and sixteen 10G SFP+ ports. The following figure shows the front panel of the 14xxx-40C appliance. - Page 49 LOM GUI, in the Remote Control menu. For more information about lights out management port of the appliance, see Lights out management port of the Citrix ADC MPX ap- pliance. © 1999-2019 Citrix Systems, Inc. All rights reserved.
-
Page 50: Citrix Adc Mpx 14Xxx-40G
Citrix ADC MPX 14xxx-40G October 25, 2019 The Citrix ADC MPX 14020-40G, MPX 14040-40G, MPX 14060-40G, MPX 14080-40G, MPX 14100-40G are 2U appliances. Each model has two 6-core processors, 64 GB of memory, four 40G QSFP+ ports, and sixteen 10G SFP+ ports (4x40G QSFP+ + 16x10G SFP+). - Page 51 The NMI Button is also available remotely over the network in the LOM GUI, in the Remote Control menu. For more information about lights out management port of the appliance, see Lights out management port of the Citrix ADC MPX appliance topic.
-
Page 52: Citrix Adc Mpx 14Xxx-40S
Citrix ADC MPX 14xxx-40S October 25, 2019 The Citrix ADC MPX 14040-40S, MPX 14060-40S, MPX 14080-40S, MPX 14100-40S are 2U appliances. Each model has two 6-core processors, 64 GB of memory, four 40G QSFP+ ports, and eight 10G SFP+ ports. - Page 53 LOM GUI, in the Remote Control menu. For more information about lights out management port of the appliance, see Lights out management port of the Citrix ADC MPX ap- pliance. © 1999-2019 Citrix Systems, Inc. All rights reserved.
-
Page 54: Citrix Adc Mpx 14Xxx Fips
MPX 14000 FIPS appliance topic. The Citrix ADC models MPX 14030 FIPS, MPX 14060 FIPS, and MPX 14080 FIPS are 2U appliances. Each model has 2 quad-core processors, 64 GB of memory, sixteen 10G SFP+ ports (16x10G SFP+). - Page 55 LOM GUI, in the Remote Control menu. For more information about the lights out management port of the appliance, see Lights out management port of the Citrix ADC appliance. © 1999-2019 Citrix Systems, Inc. All rights reserved.
-
Page 56: Citrix Adc Mpx 15000
Citrix ADC MPX 15000 October 25, 2019 The Citrix ADC MPX 15000 appliance is a 2U appliance. This platform has two 8-core processors and 128 GB of memory. The appliance provides a total of 16 Ethernet 25G ports. For information on the software releases supported on the Citrix ADC hardware platforms, see Hardware-Software Release Matrix. -
Page 57: Citrix Adc Mpx 15000-50G
The NMI Button is also available remotely over the network in the LOM GUI, in the Remote Control menu. For more information about the lights out manage- ment port of the appliance, see Lights out management port of the Citrix ADC MPX appliance topic. Citrix ADC MPX 15000-50G October 25, 2019 ©... - Page 58 Citrix ADC MPX The Citrix ADC MPX 15000-50G appliance is a 2U appliance. This platform has two 8-core processors and 128 GB of memory. The MPX 15000-50G appliance provides a total of 12 network ports: • Eight 10G SFP+ Ethernet Ports •...
- Page 59 No power to any power supply on the appliance. Flashing RED No power to this power supply. Flashing GREEN Power supply is in standby mode. GREEN Power supply is functional. Power supply failure. © 1999-2019 Citrix Systems, Inc. All rights reserved.
-
Page 60: Citrix Adc Mpx 17500, Mpx 19500, And Mpx 21500
Citrix ADC MPX 17500, MPX 19500, and MPX 21500 February 25, 2019 The Citrix ADC models MPX 17500/19500/21500 are 2U appliances. Each model has two 6-core proces- sors and 48 gigabytes (GB) of memory. The following figure shows the front panel of the MPX 17500/19500/21500 appliance. - Page 61 Figure 2. Citrix ADC MPX 17500/19500/21500 appliance, back panel The following components are visible on the back panel of the MPX 17500/19500/21500 appliance: • 160 GB removable solid-state drive that is used to store the Citrix ADC software. • USB port (reserved for a future release).
-
Page 62: Citrix Adc Mpx 17550, Mpx 19550, Mpx 20550, And Mpx 21550
Citrix ADC MPX 17550, MPX 19550, MPX 20550, and MPX 21550 February 25, 2019 The Citrix ADC models MPX 17550, MPX 19550, MPX 20550, and MPX 21550 are 2U appliances. Each model has two 6-core processors for a total of 12 physical cores (24 cores with hyper-threading), and 96 gigabytes (GB) of memory. -
Page 63: Citrix Adc Mpx 22Xxx
The following components are visible on the back panel of the MPX 17550/19550/20550/21550 appli- ance: • 160 GB removable solid-state drive that is used to store the Citrix ADC software. • USB port (reserved for a future release). • Power switch, which turns off power to the appliance, just as if you were to unplug the power supply. - Page 64 The following figure shows the front panel of the MPX 22040/22060/22080/22100/22120 (12x1G SFP + 24x10G SFP+) appliance. Figure 1. Citrix ADC MPX 22040/22060/22080/22100/22120 (12x1G SFP + 24x10G SFP+), front panel The following figure shows the front panel of the MPX 22040/22060/22080/22100/22120 (24x10G SFP+) appliance.
- Page 65 • 10/100Base-T copper Ethernet Port (RJ45), also called the LOM port. You can use this port to remotely monitor and manage the appliance independently of the Citrix ADC software. • Two 10/100/1000Base-T copper Ethernet Management Ports (RJ45), numbered 0/1 and 0/2 from left to right.
-
Page 66: Citrix Adc Mpx 241Xx
Citrix ADC MPX 241xx February 25, 2019 The Citrix ADC MPX 24100/24150 are 2U appliances. Each model has two 8-core processors and 256 gigabytes (GB) of memory. The MPX 24100/24150 appliances are available in the twelve 1G SFP ports and twenty-four 10G SFP+ ports (12x1G SFP + 24x10G SFP+) configuration. - Page 67 • 10/100Base-T copper Ethernet Port (RJ45), also called the LOM port. You can use this port to remotely monitor and manage the appliance independently of the Citrix ADC software. • Two 10/100/1000Base-T copper Ethernet Management Ports (RJ45), numbered 0/1 and 0/2 from left to right.
-
Page 68: Citrix Adc Mpx 25Xxxa
Citrix ADC MPX 25xxxA October 25, 2019 The Citrix ADC MPX 25100A, MPX 25160A, and MPX 25200A are 2U appliances. Each model has two eight-core processors, 256 gigabytes (GB) of memory, eight 40G QSFP+ ports (8x40G QSFP+). The front panel of the MPX 25100A, MPX 25160A, and MPX 25200A appliances has a (8x40G QSFP+) port configuration. - Page 69 LOM GUI, in the Remote Control menu. For more information about the lights out management port of the appliance, see Lights out management port of the Citrix ADC appliance. © 1999-2019 Citrix Systems, Inc. All rights reserved.
-
Page 70: Citrix Adc Mpx 251Xxt
Citrix ADC MPX 251xxT July 2, 2019 The Citrix ADC MPX 25100T and 25160T are 2U appliances. Each model has two 10-core processors and 128 gigabytes (GB) of memory. The MPX 25100T/25160T appliances are available in the thirty-two 10G SFP+ ports ( 32x10G SFP+) configuration. - Page 71 LOM GUI, in the Remote Control menu. For more information on the Lights Out Management Port of the appliance, see Lights out management port of the Citrix ADC MPX appliance. For information about installing the rails, rack mounting the hardware, and connecting the cables, Installing the Hardware.
-
Page 72: Citrix Adc Mpx 25Xxxta
Citrix ADC MPX 25xxxTA October 25, 2019 The Citrix ADC MPX 25100TA, MPX 25160TA, and MPX 25200TA are 2U appliances. Each model has two 8-core processors, 128 GB of memory, 8X40GE (QSFP+) ports. The front panel of the MPX 25100TA, MPX 25160TA, and MPX 25200TA have (8X40GE QSFP+) ports. - Page 73 LOM GUI, in the Remote Control menu. For more information about the lights out manage- ment port of the appliance, see Lights out management port of the Citrix ADC MPX appliance. © 1999-2019 Citrix Systems, Inc. All rights reserved.
-
Page 74: Citrix Adc Mpx 25Xxx-40G
Citrix ADC MPX 25xxx-40G October 25, 2019 The Citrix ADC MPX 25100/25160/25200 40G are 2U appliances. Each model has two 10-core proces- sors, 256 GB of memory, four 40G QSFP+ ports, and sixteen 10G SFP+ ports (4x40G QSFP+ 16x10G SFP+). - Page 75 – One power supply is malfunctioning and you want to continue operating the appliance until it is repaired. For more information, see Lights out management port of the Citrix ADC MPX appliance topic. • Non-maskable interrupt (NMI) button This button is used at the request of Technical Support to initiate a core dump. To press this red button, which is recessed to prevent unintentional activation, use a pen, pencil, or other pointed object.
-
Page 76: Citrix Adc Mpx 26Xxx
Figure 2. Citrix ADC MPX 26xxx, back panel The following components are visible on the back panel of the Citrix ADC MPX 26xxx appliances: • Two 480 GB removable solid-state drive (SSD). These appliances have a redundant array of in- dependent disks (RAID) devices. -
Page 77: Citrix Adc Mpx 26Xxx-50S
The NMI Button is also available remotely over the network in the LOM GUI, in the Remote Control menu. For more information about the lights out manage- ment port of the appliance, see Lights out management port of the Citrix ADC MPX appliance. Citrix ADC MPX 26xxx-50S October 25, 2019 ©... - Page 78 Figure 2. Citrix ADC MPX 26xxx-50S, back panel The following components are visible on the back panel of the Citrix ADC MPX 26xxx-50S appliances: • Two 480 GB removable solid-state drive (SSD). These appliances have a redundant array of in- dependent disks (RAID) devices.
-
Page 79: Citrix Adc Mpx 26Xxx-100G
Citrix ADC MPX 26xxx-100G October 25, 2019 The Citrix ADC MPX 26000-100G and MPX 26000T-100G appliances are 2U appliance. These appliances have two 14-core processors and 256 GB of memory. The appliances provide a total of 8 network ports: Four cards with dual 100G SFP+ Ethernet Ports. - Page 80 Citrix ADC MPX The following figure shows the front panel of the Citrix ADC MPX 26000-100G and Citrix ADC MPX 26000T-100G appliances. Figure 1. Citrix ADC MPX 26000-100G and Citrix ADC MPX 26000T-100G, front panel The Citrix ADC MPX 26000-100G and Citrix ADC MPX 26000T-100G appliances have the following ports: •...
- Page 81 Citrix ADC MPX The following components are visible on the back panel of the Citrix ADC MPX 26000-100G and Citrix ADC MPX 26000T-100G appliances: • Two 480 GB removable solid-state drive (SSD). These appliances have a redundant array of in- dependent disks (RAID) devices.
-
Page 82: Citrix Adc T1010
Citrix ADC T1010 February 25, 2019 The Citrix ADC T1010 is a 1U appliance, with a single-core processor, and 32 GB of memory. The following figure shows the front panel of the T1010 appliance. Figure 1. Citrix ADC T1010 front panel The T1010 appliance has the following ports: •... -
Page 83: Citrix Adc T1100
• Non-maskable interrupt (NMI) button, which is used at the request of Technical Support to pro- duce a Citrix ADC core dump. You must use a pen, pencil, or other pointed object to press this red button, which is recessed to prevent unintentional activation. - Page 84 Citrix ADC MPX Figure 1. Citrix ADC T1100 (Gen1) and T1100 (16) front panels The T1100 appliance has the following ports: • Eight 10GBASE-X SFP+ data plane ports [T1100 (Gen1)] • 16 10GBASE-X SFP+ data plane ports [T1100 (16)] • Two 10/100/1000BASE-T, RJ45 management plane ports •...
-
Page 85: Citrix Adc T1120
Citrix ADC T1120 February 25, 2019 The Citrix ADC T1120 appliance is a 2U appliance, with a dual-core processor and 128 GB memory. The following figure shows the front panel of the T1120 appliance. Figure 1. Citrix ADC T1120 appliance front panel The T1120 appliance has the following ports: ©... -
Page 86: Citrix Adc T1200
For information about performing initial configuration of your appliance, see Initial Configuration. Citrix ADC T1200 February 25, 2019 The Citrix ADC T1200 is a 2U appliance, with a dual-core processor and 256 GB memory. © 1999-2019 Citrix Systems, Inc. All rights reserved. - Page 87 The extra power supplies act as backup. Each power supply has an LED that indicates the status of the power supply, as described in LCD Display and LED Status Indicators. © 1999-2019 Citrix Systems, Inc. All rights reserved.
-
Page 88: Citrix Adc T1300
Citrix ADC T1300 February 25, 2019 The Citrix ADC T1300 is a 2U appliance, with a dual-core processor and 128 GB memory. The following figure shows the front panels of the T1300-10GE and T1300-40GE appliances. Figure 1. Citrix ADC T1300-10GE and T1300-40GE front panels The T1300 appliance has the following ports: ©... -
Page 89: Citrix Adc T1310
Citrix ADC T1310 February 25, 2019 The Citrix ADC T1310 is a 2U appliance. It has two 10-core processors and 256 GB memory. The T1310 appliance is available in the eight 40G QSFP+ ports ( 8x40G QSFP+) configuration. © 1999-2019 Citrix Systems, Inc. All rights reserved. - Page 90 • 10/100Base-T copper Ethernet Port (RJ45), also called the LOM port. You can use this port to remotely monitor and manage the appliance independently of the Citrix ADC software. • Two 10/100/1000Base-T copper Ethernet Management Ports (RJ45), numbered 0/1 and 0/2 from left to right.
-
Page 91: Citrix Web App Firewall Platforms
LOM GUI, in the Remote Control menu. For more information on the Lights Out Management Port of the appliance, see Lights out management port of the Citrix ADC MPX appliance. For information about installing the rails, rack mounting the hardware, and connecting the cables, Installing the Hardware. -
Page 92: Field Replaceable Units
Citrix ADC field replaceable units (FRU) are ADC components that can be quickly and easily removed from the appliance and replaced by the user or a technician at the user’s site. The FRUs for a Citrix ADC appliance include DC or AC power supplies, solid-state or hard-disk drives, and a direct attach cable (DAC). - Page 93 Most Citrix ADC MPX platforms can accommodate two power supplies. Some platforms can accom- modate four power supplies. All Citrix ADC appliances function properly with a single power supply, except the appliances that can accommodate four power supplies. These appliances need two power supplies for proper operation.
- Page 94 Note: Citrix ADC appliances emit a high-pitched alert if one power supply fails or if you connect only one power cable to an appliance in which two power supplies are installed. To silence the alarm, press the small red button on the back panel of the appliance.
- Page 95 Note: Citrix ADC appliances emit a high-pitched alert if one power supply fails or if you connect only one power cable to an appliance in which two power supplies are installed. To silence the alarm, press the small red button on the back panel of the appliance.
- Page 96 The following output indicates SSD 2 has failed and should be replaced. Command: sh raid Output: RAID1 status: DEGRADED Drive: ONLINE MISSING Done Sometimes, the failed drive/SSD may not be reported. Command: © 1999-2019 Citrix Systems, Inc. All rights reserved.
- Page 97 From the shell, confirm that drive 1/SSD 2 has failed, RAID status reports DEGRADED and drive 1/SSD 2 reports MISSING, or not present in the output. 1. At the Citrix ADC command prompt, switch to the shell prompt. Type: shell 2.
- Page 98 Citrix ADC MPX 7. Verify that rebuild is successful. 8. Exit the bash shell and verify from Citrix ADC CLI. Example when SSD 2 fails In the following example, SSD 2/drive 1/ata3 has failed. 1. Detach a failed drive. root@ns# atacontrol detach ata3 2.
- Page 99 ONLINE ONLINE Note: After the rebuild operation completes, the subdisks status shows ONLINE and the RAID status shows READY. 9. Exit the shell and verify the status of the RAID array from the Citrix ADC CLI. root@ns# exit >sh raid...
- Page 100 ONLINE ONLINE Note: After the rebuild operation completes, the subdisks status shows ONLINE and the RAID status shows READY. 9. Exit the shell and verify the status of the RAID array from the Citrix ADC CLI. root@ns# exit >sh raid...
- Page 101 • /nsconfig/rc.netscaler: Customer-specific boot operations (optional). To replace a solid-state drive: 1. At the Citrix ADC command prompt, exit to the shell prompt. Type: shell 2. Shut down the Citrix ADC appliance by typing the following command at the shell prompt: shutdown p now ‒...
- Page 102 Important: When you insert the drive, make sure that the Citrix product label is at the top if the drive is inserted horizontally or at the right if the drive is inserted vertically.
- Page 103 Citrix ADC MPX pending on the Citrix ADC platform. Hard drives are used for storing files required at runtime. An HDD is mounted as /var. Replace a hard disk drive A hard disk drive (HDD) stores log files and other user files. Collection of new log files begins upon boot-up with the new HDD.
- Page 104 Citrix ADC MPX Figure 10. Insert the replacement hard disk drive 7. Turn on the Citrix ADC appliance. The appliance starts the Citrix ADC software and reads the configuration file from the CompactFlash card. Direct attach cable A direct attach cable (DAC) assembly is a high performance integrated duplex data link for bi- directional communication.
-
Page 105: Safety, Cautions, Warnings, And Other Information
February 25, 2019 Note: For the list of safety certifications, standards, and ROHS compliance for each model, see the datasheet. The datasheet is available on www.citrix.com. Hover your mouse pointer on Products, and in the Networking list, select Citrix ADC. - Page 106 • Use of controls or adjustments or performance of procedures other than those specified herein might result in hazardous radiation exposure. Danger: Some laser products contain an embedded Class 3A or Class 3B laser diode. Note the follow- ing: © 1999-2019 Citrix Systems, Inc. All rights reserved.
- Page 107 See the information that is provided with your device for electrical specifications. Statement 5 (applies to Citrix appliances with -48 VDC input): Caution: This equipment is designed to permit the connection of the earthed conductor of the DC sup- ply circuit to the earthing conductor at the equipment.
- Page 108 Avoid direct exposure to laser radiation. Do not stare into the beam, and do not view directly with optical instruments. Do not remove any protective shields on fiber optic transceiver modules. © 1999-2019 Citrix Systems, Inc. All rights reserved.
- Page 109 Always unplug any appliance before performing repairs or up- grades. • Do not overload the wiring in your server cabinet or on your server room rack. © 1999-2019 Citrix Systems, Inc. All rights reserved.
- Page 110 • The handles on the left and right of the front panel of the appliance should be used only for extending the appliance out of the rack. Do not use these handles for mounting the appliance on the rack. Use the rack-rail hardware, described later, instead. © 1999-2019 Citrix Systems, Inc. All rights reserved.
-
Page 111: Taiwan Bsmi Rohs Statement
Citrix ADC MPX Taiwan BSMI RoHS statement March 15, 2019 The following tables are a declaration of the presence condition of restricted substances in Citrix ADC MPX and SDX hardware appliances. © 1999-2019 Citrix Systems, Inc. All rights reserved. -
Page 112: Fcc Compliance Statement
FCC compliance statement May 3, 2019 Supplier’s declaration of conformity The FCC Compliance Statements listed on this page apply to all Citrix ADC MPX and SDX hardware models. Responsible Party – U.S. Contact Information: © 1999-2019 Citrix Systems, Inc. All rights reserved. -
Page 113: Prepare For Installation
Unpack the box that contains your new appliance on a sturdy table with plenty of space and inspect the contents. Verify that you received the cables, adapter, and rail kits specified for your appliance. © 1999-2019 Citrix Systems, Inc. All rights reserved. - Page 114 Note Make sure that a power outlet is available for each cable. If the kit that you received does not fit your rack, contact your Citrix sales representative to order the appropriate kit. Transceiver modules are sold separately. Contact your Citrix sales representative to order transceiver modules for your appliance.
-
Page 115: Install The Hardware
• Space requirements: One empty rack unit for the Citrix ADC MPX 5500, MPX 5550/5650, MPX 5901/5905/5910, MPX 7500/9500, T1010, MPX 8005/8015/8200/8400/8600/8800, and MPX 8905/8910/8920/8930 ap- pliances, and two consecutive empty rack units for all other appliance models. - Page 116 To complete the installation, you turn on the appliance. Be sure to observe the cautions and warnings listed with the installation instructions. Watch this quick video about How to rack mount a Citrix ADC hardware appliance. Mount the appliance on a rack Most appliances can be installed in standard server racks that conform to EIA-310-D specification.
- Page 117 With the screw securing the rail in place, you can optionally remove the latching spring. Figure 4. Install the rail assembly to the rack © 1999-2019 Citrix Systems, Inc. All rights reserved.
- Page 118 2. Slide the appliance into the rack rails, keeping the pressure even on both sides. 3. Verify that the appliance is locked in place by pulling it all the way out from the rack. Figure 5. Mount the appliance on a rack © 1999-2019 Citrix Systems, Inc. All rights reserved.
- Page 119 (AOC). Native 10G and 25G transceivers are supported on appliances that do not have 10G and 25G ports, but require the use of an SFP+ to QSFP+ adapter. Contact your Citrix representative to purchase this adapter.
- Page 120 5. Verify that the LED is green and blinks twice, which indicates that the transceiver is functioning correctly. 6. If you are using a fiber transceiver, do not remove the dust caps attached to the transceiver and the cable until you are ready to insert the cable. © 1999-2019 Citrix Systems, Inc. All rights reserved.
- Page 121 1. Insert the RJ-45 connector on the Ethernet cable into an appropriate port on the front panel of the appliance, as shown in the following figure. Figure 8. Insert an Ethernet cable © 1999-2019 Citrix Systems, Inc. All rights reserved.
- Page 122 To connect the console cable to a computer or terminal 1. Insert the DB-9 connector of the cable into the console port on the front panel of the appliance. Figure 9. Insert a console cable © 1999-2019 Citrix Systems, Inc. All rights reserved.
- Page 123 2. If your appliance has more than one power supply, repeat this process. The additional power supply is a redundant, hot-swappable power supply. 3. The Citrix logo and the LCD on the front of the appliance illuminate after the appliance starts, and the LCD indicates the operational status of the appliance.
-
Page 124: Initial Configuration
After you have installed your appliance in a rack, you are ready to perform the initial configuration. Once initial configuration is complete, refer to the specific configuration guides for the features you will be using. © 1999-2019 Citrix Systems, Inc. All rights reserved. - Page 125 You must assign a Citrix ADC IP (NSIP) address as the management IP address of your Citrix ADC appli- ance. This is the address at which you access the Citrix ADC for configuration, monitoring, and other management tasks.
- Page 126 Citrix ADC MPX Note: The Citrix ADC software is preconfigured with this default IP address. If you have already assigned as NSIP address, type that address in a web browser. 2. In User Name and Password, type the administrator credentials. The following screen appears.
- Page 127 The subnet mask is associated with both the NSIP and default gateway IP address. The NSIP is the IPv4 address of the Citrix ADC appliance. The default gateway is the IPv4 address for the router, which will handle external IP traffic that the Citrix ADC cannot otherwise route. The NSIP and the default gateway should be on the same subnet.
- Page 128 Note: To prevent an attacker from breaching your ability to send packets to the appliance, choose a non-routable IP address on your organization’s LAN as your appliance IP address. You can replace steps 5 and 6 with the following Citrix ADC commands. At the Citrix ADC com- mand prompt, type: set ns config -ipaddress<IPAddress>...
- Page 129 To use DHCP, you must first specify the appliance vendor class identifier on a DHCP server. Optionally, you can also specify the pool of IP addresses from which your Citrix ADC appliance can acquire an IP address. If a pool is not specified, the address is acquired from the general pool.
- Page 130 For the location, see the dhcpd man page of the DHCP server. 1. If you do not want Citrix ADC appliances to use IP addresses from the general pool, specify a pool of addresses for the appliance. You must include this pool declaration inside the subnet declaration.
- Page 131 1. Open Server Manager and make sure DHCP service is running. 2. Open DHCP Manager, click DHCP, and select IPv4. 3. To configure Vendor Class as “..citrix-Ns” right click on IPv4 and select Define Vendor Classes. Add a new class by specifying a display name, description, and “..citrix-NS” as the ASCII value .
- Page 132 Alternatively, restarting the appliance automatically releases the DHCP IP address back to the server pool. You can find out the SNIP address assigned to the appliance from the Citrix ADC console or from the DHCP server.
- Page 133 Using DHCP when a configuration file is present If you need to move a Citrix ADC appliance to a different subnet, such as from a testing environment to a production environment, you can use DHCP to access an appliance that already has a configura- tion file.
- Page 134 Access a Citrix ADC appliance by using SSH keys and no password If you administer a large number of Citrix ADC appliances, storing and looking up passwords for log- ging on to individual appliances can be cumbersome. To avoid being prompted for passwords, you can set up secure shell access with public key encryption on each appliance.
- Page 135 4. Press ENTER two times when prompted for a passphrase. Note: If the client is a Citrix ADC appliance, move the private key file to a persistent location such as sub-directories of the /flash and /var directories.
- Page 136 Optionally, remove the public key. root@ns## rm id_rsa.pub 7. On the client, verify that you can connect to the remote Citrix ADC appliance by using SSH, with- out entering the password. If using the default file name for the public-private key pair.
-
Page 137: Lights Out Management Port Of The Citrix Adc Mpx Appliance
Lights out management port of the Citrix ADC MPX appliance November 18, 2019 Some Citrix ADC appliances have an Intelligent Platform Management Interface (IPMI), also known as the lights out management (LOM) port, on the front panel of the appliance. You can use the LOM port to remotely monitor and manage the appliance, independently of the Citrix ADC software. -
Page 138: Configure The Network Settings On The Lom Port
Citrix ADC MPX and CloudBridge/SDX (dom0) appliances for initial LOM port network con- figuration. When using the shell, you can choose to use DHCP or static IP settings for initial network configuration. After configuring the network settings, you can use the... - Page 139 1. In a web browser, type http://192.168.1.3 and enter the default user credentials. Note: The Citrix ADC LOM port is preconfigured with IP address 192.168.1.3 and subnet mask 255.255.255.0. 2. On the Configuration tab, click Network and type new values for the following parameters: •...
- Page 140 ‒ Obtain health monitoring information There are two ADC MIBs: the Citrix ADC software management MIB and the ADC IPMI LOM hardware management MIB. The software management MIB is primarily used for monitoring the application software and the application software’s utilization of hardware resources, such as CPU % and mem- ory %.
- Page 141 LOM MIB monitors and reports the warnings. The LOM microcontroller operates independently of the Citrix ADC software. To monitor the hardware and software of the Citrix ADC appliance, you must use both the ADC MIB and the LOM MIB.
- Page 142 View utility starts receiving alerts from the LOM, reconfigure the destination IP address to point to your SNMP Network Management Software, such as HP OpenView. Set up SNMP alerts on the LOM by using the Citrix ADC shell To customize your filter and policy settings, see the IPMI Specification 2.0 rev. 1.1 documentation.
-
Page 143: Install A Certificate And Key On The Lom Gui
Install a certificate and key on the LOM GUI November 18, 2019 Citrix recommends using HTTPS to access the LOM GUI. To use HTTPS, you must replace the default SSL certificate with one from a trusted certificate authority and upload a private key to the LOM GUI. - Page 144 2. In the right pane, click the Choose File buttons to select a new SSL certificate and a new private key. 3. To verify that you have selected the correct certificate and private key, check the file names of the certificate and key, which appear next to the Choose File buttons. © 1999-2019 Citrix Systems, Inc. All rights reserved.
- Page 145 4. Click Upload. A message informs you that uploading a new SSL certificate replaces the existing (default) certificate. 5. Click OK. 6. When a message informs you that the certificate and key have been uploaded successfully, click OK to reset the device. © 1999-2019 Citrix Systems, Inc. All rights reserved.
- Page 146 Note: If the certificate or key is invalid, the BMC reboots, tries the new settings, and reverts to using the previous settings. 8. In the address bar, click the lock icon to display the connection tab, as shown in the following screenshot. © 1999-2019 Citrix Systems, Inc. All rights reserved.
- Page 147 Citrix ADC MPX 9. Click Certificate information to display details about the certificate that you uploaded. © 1999-2019 Citrix Systems, Inc. All rights reserved.
- Page 148 Citrix ADC MPX Note: Best practices for LOM and ADC security are covered in Citrix ADC Secure Deployment Guide. © 1999-2019 Citrix Systems, Inc. All rights reserved.
-
Page 149: Obtain The Mac Address, Serial Number, And Host Properties Of The Appliance
Auth Type Enable Callback MD2 MD5 OEM User MD2 MD5 OEM Operator MD2 MD5 OEM Admin MD2 MD5 OEM IP Address Source Static Address IP Address : 192.168.1.3 Subnet Mask : 255.255.255.0 © 1999-2019 Citrix Systems, Inc. All rights reserved. -
Page 150: Perform Power Control Operations By Using The Lom Port
The BMC does not reboot itself during this operation. • Power Off System – Immediate—Disconnect power to the appliance immediately, with- out gracefully shutting down the appliance. The BMC continues to operate normally in this © 1999-2019 Citrix Systems, Inc. All rights reserved. - Page 151 Perform a warm restart remotely from another computer on the network, type ipmitool <bmc_gui_username> <bmc_gui_password> H <bmc IP address> ‒ ‒ ‒ reset warm Perform a cold restart of the LOM from the appliance, type ipmitool mc reset cold © 1999-2019 Citrix Systems, Inc. All rights reserved.
-
Page 152: Restore The Bmc Configuration To Factory Defaults
Reset the configuration to factory defaults by using the GUI 1. Navigate to Maintenance > Factory Default. 2. Click Restore. Reset the configuration to factory defaults by using the shell At the shell prompt, type: ipmitool raw 0x30 0x40 © 1999-2019 Citrix Systems, Inc. All rights reserved. -
Page 153: Use The Bios Post Code To Detect Errors
Upgrade the LOM firmware on a Citrix ADC MPX appliance November 14, 2019 Citrix has automated the upgrade of LOM firmware within Citrix ADC MPX software. It is no longer necessary to know your hardware platform or download any LOM firmware. -
Page 154: Hardware Health Attributes
3. Log on to the new secondary (old primary) node and upgrade it as described in Upgrade a stan- dalone appliance. Hardware health attributes July 19, 2019 Operating ranges for Citrix ADC hardware platforms vary for different attributes. Note: Use the command to display the current values of the attributes. stat system -detail Health attributes for MPX 5500/7500/9700/9700 10G platform The following tables list the health attributes and their recommended value ranges. - Page 155 75.2–194° F 75.2–194° F 75.2–194° F Internal 19–50° C, 19–50° C, 19–50° C, 19–50° C, Temperature 66.2–122° F 66.2–122° F 66.2–122° F 66.2–122° F Power Supply Normal Normal Normal 1 Status supported © 1999-2019 Citrix Systems, Inc. All rights reserved.
- Page 156 - NA - (-10.80)–(- (-10.80)–(- Supply 13.20) 13.20) (Volts) Battery 2.85–3.37 3–3.5 2.8–3.5 > 2.5 > 2.5 (Volts) Intel CPU 1–1.2 1–1.2 1–1.2 - NA - - NA - Vtt Power (Volts) © 1999-2019 Citrix Systems, Inc. All rights reserved.
- Page 157 19–50° C, 19–50° C, < 55° C, < < 55° C, < Tempera- 66.2–122° F 66.2–122° F 66.2–122° F 131° F 131° F ture Power Normal Normal Normal Normal Normal Supply 1 Status © 1999-2019 Citrix Systems, Inc. All rights reserved.
- Page 158 1875 to 4200 CPU 0 Temperature (Celsius) 33 to 43 CPU 1 Temperature (Celsius) 35 to 45 Internal Temperature (Celsius) 28 to 38 Power Supply 1 Status NORMAL Power Supply 2 Status NORMAL © 1999-2019 Citrix Systems, Inc. All rights reserved.
- Page 159 - NA - 1980.000 - NA - - NA - - NA - - NA - FAN 7 - NA - 1980.000 - NA - - NA - - NA - - NA - © 1999-2019 Citrix Systems, Inc. All rights reserved.
- Page 160 0.480 0.512 0.544 1.488 1.520 1.552 Vcore CPU2 Volts 0.480 0.512 0.544 1.488 1.520 1.552 Vcore VDIMM Volts 1.104 1.152 1.200 1.648 1.696 1.744 VDIMM Volts 1.104 1.152 1.200 1.648 1.696 1.744 © 1999-2019 Citrix Systems, Inc. All rights reserved.
- Page 161 100.000 Temp FPC_Temp degrees C - NA - - NA - - NA - 66.000 70.000 75.000 FPC_Temp degrees C - NA - - NA - - NA - 72.000 76.000 82.000 © 1999-2019 Citrix Systems, Inc. All rights reserved.
- Page 162 - NA - - NA - - NA - - NA - Status PS_4 FAN - NA - - NA - - NA - - NA - - NA - - NA - © 1999-2019 Citrix Systems, Inc. All rights reserved.
- Page 163 The following table lists the health attributes for MPX 5900 platform. Health Attribute Recommended Range CPU 0 core (Volts) 1.77–1.81 Main 3.3 V Supply (Volts) 3.25–3.32 Standby 3.3 V Supply (Volts) 3.27–3.32 © 1999-2019 Citrix Systems, Inc. All rights reserved.
- Page 164 Standby 3.3 V Supply (Volts) 3.25–3.32 +5.0 V Supply (Volts) 4.84–4.95 +12.0 V Supply (Volts) 11.75–12.00 Battery (Volts) 3.02–3.13 5 V Standby (Volts) 5.05–5.16 CPU Fan 0 Speed (RPM) 6600–12600 CPU Fan 1 Speed (RPM) 6300–12200 © 1999-2019 Citrix Systems, Inc. All rights reserved.
-
Page 165: Wiping Your Data Before Sending The Adc Appliance To Citrix
Supported Platforms The script is supported on all Citrix ADC MPX appliances. The script is not supported on Citrix ADC SDX appliances. Delete the VPX instances before returning the SDX appliance. Required script files The following script files must be present in the /flash/.recovery directory. - Page 166 The following command is used to zero the flash once and zero the hard drive twice. sh rc.system_wipe_and_reset The following command is used to zero only the hard drive once. sh rc.system_wipe_and_reset Use any of the following commands to zero the flash four times. sh rc.system_wipe_and_reset © 1999-2019 Citrix Systems, Inc. All rights reserved.
- Page 167 If you are migrating to a new appliance, you must make some changes to the configuration (ns.conf file) of the old appliance before you copy the configuration to the new appliance. Note: The following procedure does not apply to Citrix ADC FIPS appliances. © 1999-2019 Citrix Systems, Inc. All rights reserved.
-
Page 168: Troubleshooting
8. Copy other relevant files, such as bookmarks, SSL certificates, and CRLs, to the new appliance. Return your feature license(s) to the Citrix licensing portal and reallocate it on the new appli- ance. For more info about returning your licenses, see http://support.citrix.com/article/CTX131110. - Page 169 LOM IP address, connect to the COM1 console port through a serial cable (the serial cable can be connected to a network serial terminal/console server for remote access), or try pinging the Citrix ADC IP address (NSIP). On the appliance, do the following: a) Verify that the appliance is receiving power.
-
Page 170: Hardware Faqs
Citrix ADC command line. Complete the Check Network Interfaces steps listed below to find a working interface on which to transfer the support bundle file. - Page 171 QSFP+ to four SFP+ Copper Breakout Cables: These cables connect to four SFP+ 10GE ports of a Citrix ADC appliance on one end and to a QSFP+ 40G port of a Cisco switch on the other end. Support for 40G connectivity: Citrix ADC models that have at least four 10G SFP+ ports connect to Cisco 40G interfaces by aggregating four of the 10G SFP+ ports to form a 40G link aggregation channel.
- Page 172 4x25G breakout connection, 2x50G breakout, or 1x100G depending on the transceiver used. Power supplies • Is the power supply on the Citrix ADC MPX 5500 and MPX 5550/5650 appliances field replace- able? No. The power supply on the Citrix ADC MPX 5500 and MPX 5550/5650 appliances is fixed.
- Page 173 23 inches to 33 inches. • How far can an appliance extend from the front post of the rack? The chassis can extend up to 1.25 inches from the front post for all Citrix ADC MPX and SDX ap- pliances.
- Page 174 • What is the recommended terminal emulator? PuTTY. • Which platforms support Pay-As-You-Grow licenses? Check the Citrix ADC datasheet for the updated list of platforms that support Pay-As-You-Grow licenses. Some of the platforms that support Pay-As-You-Grow licenses are listed here: –...
- Page 175 Only 50G/100G (QSFP28) and 40G (QSFP+) transceivers can be directly used on a QSFP28 interface. Use a QSA28 adapter on a QSFP28 interface to use 10G (SFP+) and 25G (SFP28) transceivers. The following diagram shows the transceiver compatibility. © 1999-2019 Citrix Systems, Inc. All rights reserved.
- Page 176 © 2019 Citrix Systems, Inc. All rights reserved. Citrix, the Citrix logo, and other marks appearing herein are property of Citrix Systems, Inc. and/or one or more of its subsidiaries, and may be registered with the U.S. Patent and Trademark Office and in other countries.
Need help?
Do you have a question about the ADC MPX Series and is the answer not in the manual?
Questions and answers