Mitsubishi Electric PZ-61DR-E Instruction Book
Lossnay remote controller
Hide thumbs
Also See for PZ-61DR-E:
- Manual (320 pages) ,
- Simple operation manual (84 pages) ,
- Manual (4 pages)
Table of Contents
Advertisement
Lossnay Remote Controller
MODEL
PZ-61DR-E
Instruction Book
Prior to use, thoroughly read the instructions in this manual to use the product correctly.
Retain for future reference.
Make sure that this CD-ROM and Installation Manual are passed on to any future users.
To ensure safety and proper operation of the remote controller, the remote controller should
only be installed by qualified personnel.
English
Deutsch
Français
Español
Italiano
Nederlands
Português
Türkçe
Magyar
Polski
Svenska
Hrvatski
Dansk
Advertisement
Table of Contents

Related Manuals for Mitsubishi Electric PZ-61DR-E


Summary of Contents for Mitsubishi Electric PZ-61DR-E
- Page 1 English Deutsch Lossnay Remote Controller Français MODEL PZ-61DR-E Español Instruction Book Italiano Nederlands Português Türkçe Magyar Polski Svenska Hrvatski Prior to use, thoroughly read the instructions in this manual to use the product correctly. Retain for future reference. Make sure that this CD-ROM and Installation Manual are passed on to any future users.
- Page 2 Product features Feature 1 Large, easy-to-see display Lossnay Full-dot LCD display with large characters for easy viewing Feature 2 Simple button arrangement Feature 3 Large, easy-to-press buttons Buttons are arranged according to usage to allow for intuitive navigation. Frequently used buttons are larger than other buttons to prevent unintended pressing of other buttons.
-
Page 3: Table Of Contents
Contents Safety precautions ........4 Names and functions of controller components ..6 Controller interface ............6 Display ...............8 Read before operating the controller ..10 Menu structure............10 Icon explanations............. 11 Basic operations .......... 12 Power ON/OFF ............12 Power ON/OFF during Night-purge operation ..12 Fan speed..............13 Ventilation mode ............13 Navigating through the menu ...... -
Page 4: Safety Precautions
Safety precautions Thoroughly read the following safety precautions before using the unit. Observe these precautions carefully to ensure safety. WARNING Indicates a risk of death or serious injury. CAUTION Indicates a risk of serious injury or structural damage. After reading this manual, pass it on to the end user to retain for future reference. Keep this manual for future reference and refer to it as necessary. - Page 5 This controller is designed for exclusive use with the Lossnay by Mitsubishi Electric. The use of this controller for other systems or for other purposes To avoid damage to the controller, provide protection may cause malfunctions.
-
Page 6: Names And Functions Of Controller Components
Names and functions of controller components Controller interface Function buttons... - Page 7 1 ON/OFF button The functions of the function buttons change depending on the screen. Press to turn ON/OFF the Lossnay unit. Refer to the button function guide that appears at the bottom of the LCD for the functions they serve on a given screen.
-
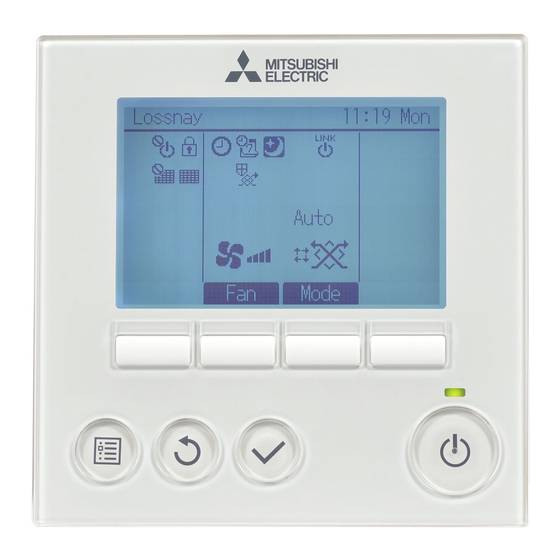
Page 8: Display
Names and functions of controller components Display * All icons are displayed for explanation. Lossnay 12:00 Sun Outdoor 0°C Return 20°C Auto Supply 15°C Mode... - Page 9 1 Remote controller name Page 12 Lossnay is always displayed. Appears when the night-purge function is available. 2 Clock Page 17 (See the Installation Manual.) Current time appears here. Appears when performing operation to protect the equipment. 3 Fan speed Page 13 Fan speed setting appears here.
-
Page 10: Read Before Operating The Controller
Read before operating the controller Menu structure Main menu Press the Timer MENU button. On/Off timer Page 18 Move the Auto-Off timer Page 20 cursor to the Weekly timer Page 22 desired item with the F1 , Restriction F2 , F3 ,and Operation lock Page 24 F4 buttons,... -
Page 11: Icon Explanations
Icon explanations Controller operation The table below Main summarizes the square Timer icons used in this manual. The administrator or maintenance user password must be entered Main on the password input screen to change settings. There is no settings that can skip this process. Timer F1 : Press to move the cursor left. -
Page 12: Basic Operations
Basic operations Power ON/OFF Button operation Press the ON/OFF button. The ON/OFF lamp will light up in green, and the operation will start. Press the ON/OFF button again. The ON/OFF lamp will go out, and the operation will stop. Power ON/OFF during Night-purge operation Button operation Press the ON/OFF button during the night- Lossnay... -
Page 13: Fan Speed
Fan speed Button operation Press the F2 button to go through the fan Lossnay 12:00 Sun speeds in the following order. Auto Mode Operation is not possible during external fan speed operation. A fan speed that is skipped because of a fan skip setting is not displayed (refer to page 24). -
Page 14: Navigating Through The Menu
Navigating through the menu Main menu list Setting and display Reference Setting details items page Timer On/Off Use to set the operation On/Off times. timer Time can be set in 5-minute increments. * Clock setting is required. Auto-Off Use to set the Auto-Off time. timer Time can be set to a value from 30 to 240 in 10-minute increments. -
Page 15: Navigating Through The Main Menu
Navigating through the Main menu Button operation Accessing the Main menu Main Main menu Press the MENU button. Timer Weekly timer Restriction Filter information The Main menu will appear. Error information Main display: Cursor Page Item selection Main Main menu Press F1 to move the cursor down. - Page 16 Navigating through the menu Saving the settings Initial setting menu Select the desired item, and press the SELECT Main/Sub Clock button. Main display Contrast Display details Main menu: The screen to set the selected item will appear. Cursor Page Exiting the Main menu screen Lossnay 12:00 Sun Press the RETURN button to exit the Main...
-
Page 17: Controller Operation-Function Settings
Controller operation-Function settings Clock Button operation Select “Initial setting” from the Main menu (refer Main Main menu Initial setting to page 15), and press the SELECT button. Service Main display: Cursor Page Clock setting is required before making the following settings. On/Off timer Weekly timer Move the cursor to the “Clock”... -
Page 18: Timer (On/Off Timer)
Controller operation-Function settings Main Timer On/Off timer Button operation Select “Timer” from the Main menu (refer to page Main Main menu Timer 15), and press the SELECT button. Weekly timer Restriction Filter information Error information Main display: Cursor Page The On/Off timer will not work in the following cases: when On/Off timer is disabled, during an error, during check (in the service menu), during remote controller diagnosis, when the clock is not... - Page 19 Change the setting with the F3 or F4 button. Timer On/Off timer No / On/Off timer: No (disable)/Yes (enable) On: Operation start time (settable in 5-minute increments) Repeat No / * Press and hold the button to rapidly advance Select: the numbers.
-
Page 20: Auto-Off Timer
Controller operation-Function settings Main Timer Auto-Off timer Button operation Bring up the Timer setting screen. Timer (Refer to page 18.) On/Off timer Repeat Select “Auto-Off”, and press the SELECT Auto-Off Stop in --- min button. Setting display: Cursor The Auto-Off timer will not work in the following cases: when Auto-Off timer is disabled, during an error, during check (in the service menu), during remote controller diagnosis, when the clock is not... - Page 21 Press the SELECT button to save the settings. Auto-Off timer Auto-Off Stop in Select: Cursor Time A confirmation screen will appear. Auto-Off timer Auto-Off Stop in Navigating through the screens Changes saved To go back to the Main menu ..MENU button Main menu: To return to the previous screen ..
-
Page 22: Weekly Timer
Controller operation-Function settings Main Weekly timer Button operation Select “Weekly timer” from the Main menu (refer Main Main menu Timer to page 15), and press the SELECT button. Weekly timer Restriction Filter information Error information Main display: The Weekly timer will not work in the following cases: Cursor Page when the On/Off timer is enabled, when the... - Page 23 The weekly timer setting screen will appear and Weekly timer Mon Tue Wed Thu Fri Sat Sun the current settings will be displayed. Up to eight operation patterns can be set for each day. Input display: Move the cursor to the desired day of the week Select Page with the F1 or F2 button, and press the...
-
Page 24: Restriction
Controller operation-Function settings Main Weekly timer Lossnay 12:00 Sun will appear on the Main display when the weekly timer setting for the current day exists. The icon will not appear while the On/Off timer is enabled or the system is under centralized Auto control (Timer operation from local remote controller is prohibited). - Page 25 The screen to make the settings for the operation Restriction Operation locked No / lock function will appear. On/Off Locked Locked Move the cursor to the desired item with the F1 Mode Locked or F2 button out of the following items Select: <page 1/2>...
-
Page 26: Contrast
Controller operation-Function settings Contrast Button operation Select “Initial setting” from the Main menu (refer Main Main menu Initial setting to page 15), and press the SELECT button. Service Main display: Cursor Page Move the cursor to the “Contrast” with the F1 or Initial setting menu F2 button, and press the SELECT button. -
Page 27: Language Selection
Language selection Function description The desired language can be set. The language options are English, French, German, Spanish, Italian, Portuguese, Swedish, and Russian. Button operation Select “Initial setting” from the Main menu (refer Main Main menu Initial setting to page 15), and press the SELECT button. Service Main display: Cursor... - Page 28 Controller operation-Function settings Language selection Move the cursor to the language you desire with Language selection the F1 through F4 buttons, and press the English Français Deutsch Español SELECT button to save the setting. Italiano Português Svenska Русский Select: Cursor Cursor When the power is on for the first time, the Language selection screen will be displayed.
-
Page 29: Initializing
Initializing Function description You can initialize the remote controller to restore it to the factory default state. The following are initialized. Timer, Weekly timer, Operation locked, Main/Sub, Clock, Contrast, Display details, Model name input, Serial No. input, Dealer information input, Error history, Administrator password, Maintenance password, Language selection If the remote controller is initialized, it reboot automatically. - Page 30 Controller operation-Function settings Initializing Select “OK” with the F4 button. Initializing Initialize remote controller? Reboot after initializing Cancel After initialization is executed, the remote Initializing controller reboots automatically. Under initializing Reboot after initializing...
-
Page 31: Function Setting
Function setting Function description Make the Lossnay units' function settings from the remote controller as necessary. Refer to the Lossnay unit Installation Manual for information about the factory settings of Lossnay units, function setting numbers, and setting values. When changing the Lossnay units' function settings, record all the changes made to keep track of the settings. - Page 32 Controller operation-Function settings Function setting The Function Setting screen will appear. Function setting Press the F1 or F2 button to move the cursor M-NET address Function No. to one of the following: M-NET address, function Data Function / Conf setting number, or setting value. Then, press the Select: F3 or F4 button to change the settings to the Cursor...
-
Page 33: Maintenance
Maintenance Filter information Lossnay 12:00 Sun will appear on the Main display when it is time to clean the filter and/or Lossnay core. Clean, or replace the filter and/or Lossnay core when this sign appears. Auto Refer to the Lossnay unit Instruction Manual for details. - Page 34 Maintenance Filter information Select “OK” with the F4 button. Filter information Filter Lossnay core Reset cleaning sign? Cancel A confirmation screen will appear. Filter information Cleaning sign reset Navigating through the screens To go back to the Main menu ..MENU button Main menu: To return to the previous screen ..
-
Page 35: Troubleshooting
Troubleshooting Error information When an error occurs, the following screen will appear. Check the error status, stop the operation, and consult your dealer. Button operation Error code, error unit, M-NET address, unit Error information Error code 5101 model name, and serial number will appear. LC ( Lossnay ) Error unit M-NET address 1... - Page 36 Troubleshooting Error information Press the F4 button or the ON/OFF button to Error information reset the error that is occurring. Error code 5101 LC ( Lossnay ) Error unit M-NET address 1 Model name LGH-100RVX-E Serial No. 01234567 Errors cannot be reset while the ON/OFF Reset error: Reset button operation is prohibited.
- Page 37 Checking the error information Main Main menu While no errors are occurring, page 2/2 of the Timer error information (refer to page 35) can be Weekly timer Restriction viewed by selecting “Error information” from the Filter information Error information Main menu (refer to page 15). Main display: Cursor Page...
-
Page 38: Specifications
Specifications Controller specifications Product size 120(W) x 120(H) x 19(D) mm (4 3/4 x 4 3/4 x 3/4 [in]) (not including the protruding part) Net weight 0.25 kg (9/16 lb.) Rated power supply voltage 12 VDC (supplied from Lossnay units) Power consumption 0.3 W Usage environment... - Page 39 HEAD OFFICE: TOKYO BLDG. , 2-7-3, MARUNOUCHI, CHIYODA-KU, TOKYO 100-8310, JAPAN Authorized representative in EU: MITSUBISHI ELECTRIC EUROPE B.V. HARMAN HOUSE, 1 GEORGE STREET, UXBRIDGE, MIDDLESEX UB8 1QQ, U.K. 1407875HK8601...
Need help?
Do you have a question about the PZ-61DR-E and is the answer not in the manual?
Questions and answers