Advertisement
Quick Links
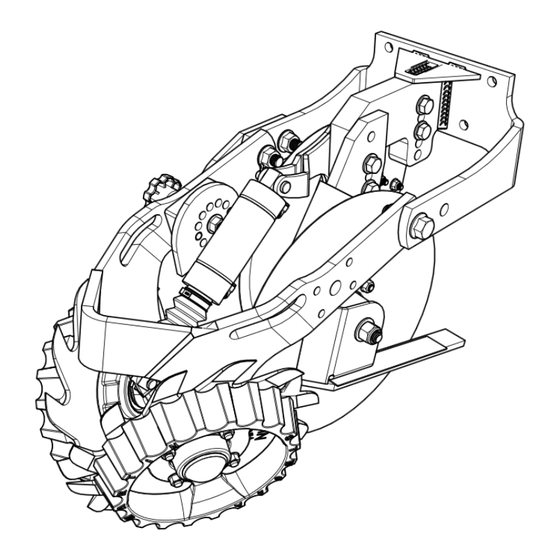
DUAL UMO-1360
1360 ROW CLEANER WITH TWO UNIT MOUNTED FERTILIZER OPENERS
INSTALLATION INSTRUCTIONS
SHOWN WITH DDU MOUNT AND OPTIONAL SMARTCLEAN CYLINDER
AND BRACKETS, RAZOR WHEEL(RTW1412.5) , SIDE TREADER WHEELS
STW-04 )
(CA03-D)
(
& CAM ADJUST
Martin Planter Attachments
Martin Industries LLC
206 Elk Fork Road
Elkton, KY 42220
Telephone: 270-265-5817
E-Mail: martin@martintill.com
www.martintill.com
VERSION 04 23 2018
Advertisement

Subscribe to Our Youtube Channel
Related Manuals for Martin-Till DUAL UMO-1360

Summary of Contents for Martin-Till DUAL UMO-1360
- Page 1 DUAL UMO-1360 1360 ROW CLEANER WITH TWO UNIT MOUNTED FERTILIZER OPENERS INSTALLATION INSTRUCTIONS SHOWN WITH DDU MOUNT AND OPTIONAL SMARTCLEAN CYLINDER AND BRACKETS, RAZOR WHEEL(RTW1412.5) , SIDE TREADER WHEELS STW-04 ) (CA03-D) & CAM ADJUST Martin Planter Attachments Martin Industries LLC...
-
Page 2: Important Notes
STEP 1 : ATTACH THE MOUNT TO THE PLANTER Use a square or a level tool to make sure that the planter base plate is set parallel to the Planter’s W-Bracket (The bracket that attaches the planter to the tool bar). Using four 1/2”... - Page 3 Position A 3/4” above seed depth Position B Even with seed depth (Recommended) Position C 3/4” below seed depth...
- Page 4 STEP 2B: INSTALLING THE LEFT UMO AND AIR CYLINDER TOP BRACKETS Attach the left UMO to the mount according to the picture using 1/2” X 2 1/2” bolts ( Or 1/2” X 3” bolts when optional cylinder top brackets are used) and tighten the flange nuts to 80 ft-lbs. Note : The optional cylinder top brackets are installed one hole down rather than beam’s holes in this unit.
- Page 5 IMPORTANT FLUSH THESE SURFACES BEFORE TIGHTENING THE BOLTS 5/8” X 2” 5/8” FLANGE LOCKNUT FLANGE BOLTS ( N58FLN) (B5F58NC2) BUSHINGS (BU7858) 5/8” X 2” FLANGE BOLTS 5/8” X 2 1/2” (B5F58NC2) FLANGE BOLTS (B5F58NC212) 5/8” Thin Nut ( N58CNLT) STOP ARM (STARM1360-5-8R) 5/8”...
- Page 6 STEP 4 : DETERMINE THE BEST WHEEL CONFIGURATION FOR YOUR SOIL CONDITIONS OPTION A: INTERSECTED (Both wheels in front hole) Both wheels forward provides maximum cleaning effect. The interlocked wheels till the middle of the seed row. OPTION B: OFFSET (Left wheel in front hole and right wheel in rear hole) The staggered configuration allows the wheels to turn more easily in loose soil.
- Page 7 STEP 5: INSTALL SMART CLEAN CYLINDER BOTTOM ANCHOR IMPORTANT: Skip to Step 6 if optional SmartClean System was not purchased If the optional SmartClean cylinder was purchased, install the SmartClean cylinder bottom anchor, before in- stalling the wheels, as shown below. Proper location of the bottom anchor mounting bolts is determined by the wheel configuration you’ve chosen.
- Page 8 STEP 6: INSTALL WHEEL ASSEMBLIES IMPORTANT: Skip to Step 6C if not using optional D-Lock Deflector (Scraper) NOTE: The D-Lock Deflector (Scraper) is recommended (in place of the standard D-Lock) when operating in wetter conditions, or damp stringy residue, to reduce wrapping. NOTE: Either the D-Lock deflector (illustrated below and on next page) or the D-Lock (illustrated on page 13) must be installed to allow the 5/8”...
- Page 9 STEP 6: INSTALL WHEEL ASSEMBLIES (CONT.) IMPORTANT: Skip to Step 6C if not using optional D-Lock Deflector (Scraper) STEP 6B: INSTALL WHEEL ASSEMBLIES USING OPTIONAL D-LOCK DEFLEC- TOR (SCRAPER) 1) Attach the D-lock deflector (DLD-02L) to the end of the hub axle, making sure it is flush with the end of the axle, before bolting the axle to the frame.
- Page 10 STEP 6: INSTALL WHEEL ASSEMBLIS (CONT.) STEP 6C: INSTALL WHEEL ASSEMBLIES USING STANDARD D-LOCK 1. Attach the D-lock to the end of the hub axle making sure it is flush with the end of the axle be- fore bolting the axle to the frame. 2.
- Page 11 STEP 7: INSTALLING THE OPTIONAL CAM ADJUSTMENT ASSEMBLY IMPORTANT NOTE: Cam installation as shown in the picture, is for the left UMO leading configuration . For a right UMO leading configuration, install the Cam assembly on the opposite side. 1. Mount the cam block to the frame using the four 3/8” button head bolts. 2.
- Page 13 PARTS LIST FOR UMO-100 UMO — 100R shown, UMO — 100L (not shown) is the opposite side (UMO-12) SPACER BAR 1/2” NUT (N12FLN) 5/16” X 1 1/2” FLANGE BOLTS (B5F516NC112) UMO BEAM (UMO-MSB01R) 1/2” X 3” FLANGE BOLT (B8F12NC3) 5/16” FLANGE NUT (N516FLN) (N516FLN) 5/16”...
- Page 14 FURROW CONTROL LEVER GROUND PRESSURE ADJUSTMENT SETTING #1: This configuration provides maximum ground pressure. SETTING #2: This configuration provides medium ground pressure. SETTING #3: This configuration provides the least ground pressure. NOTE: This is the default and recom- mended position.
-
Page 15: Maintenance Tips
MAINTENANCE TIPS 1360 Row Cleaner Hub Preventative Maintenance The 1360 Row Cleaner hub is designed to be “flushed out” with lubrication, without damaging the triple lip seal. To “flush” the hub, lubricate until fresh grease is visible around the seal. In most conditions annual lubrication of the 1360 Row Cleaner hub is sufficient •... - Page 16 The most trusted name in no-till Established 1991 Martin Industries LLC 206 Elk Fork Road Elkton, KY 42220 Telephone: 270-265-5817 E-Mail: martin@martintill.com...
Need help?
Do you have a question about the DUAL UMO-1360 and is the answer not in the manual?
Questions and answers