
Related Manuals for EM Phaser EA-D800


Summary of Contents for EM Phaser EA-D800
- Page 1 EA-D800 8-CH SMART DIGITAL AMPLIFIER INSTALLATION & OPERATING MANUAL EINBAU- & BEDIENUNGSANLEITUNG...
-
Page 2: Safety Instructions
Thank you for purchasing this EMPHASER amplifier! KEY FEATURES EA-D800 To maximize the performance of this amplifier and your complete car audio system install, ■ 8-channel Smart Digital Amplifier with iOS or Android App controlled audio DSP functions we recommend that you acquaint yourself thoroughly with all technical features and ■... -
Page 3: Bluetooth Antenna
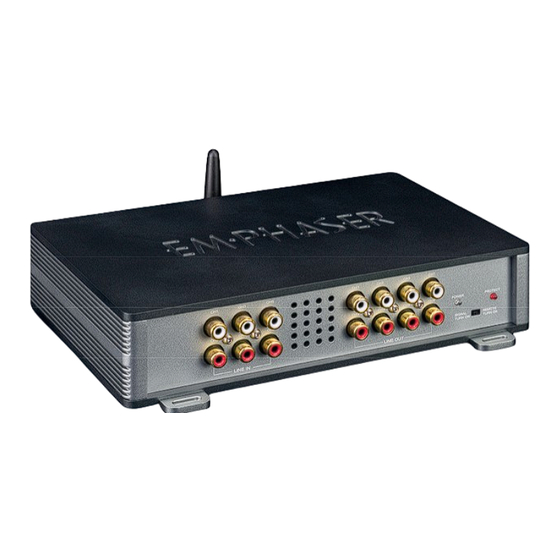
Side panels CONNECTIONS + CONTROLS EA-D800 INPUTS + OUTPUTS AUTO-TURN-ON OPERATION MODE To choose if the devise turns on by DC-offset signal (Signal Turn On) or by remote signal from head unit (Remote Turn On). When choosing “Signal Turn On” the remote wire need to be disconnected. -
Page 4: Speaker Impedance & Power Wire Info
Following these recommendations guarantees EA-D800 → CH 1/2 and 3/4 4 ohms stereo | CH 5/6 and 7/8 4/2 ohms stereo and 4 ohms a trouble-free operation of your amplifier, as well as full power output. -
Page 5: Loudspeaker Wires
LOUDSPEAKER WIRES For longer distances to the speakers, it is best to use 1.5 mm² or 2.5 mm² speaker cables to avoid a loss of power or risk degradation of the signal quality. Once the speaker cables have been routed, connect them to the dedicated connector. Maintain correct polarity („+“... -
Page 6: Bluetooth Audio Streaming
2. Install EA-D800_V1.0.apk to your Android smart phone. downloads the current settings from the amplifier. 3. Turn on Bluetooth on your mobile and search “EA-D800”, then connect to it with paring code 1234. 4. Open EA-D800 app and click the “Connect” button to connect your mobile to the amplifier. - Page 7 Output Settings Crossover This menu provides the substantial Input/ In this menu you can assign a frequency Output management. On the page main band to the connected speakers that cor- you determine the function of the respective responds to their recommended operat- channel.
- Page 8 Time Alignment Noise Gate The Noise Gate function is dedicated to Press the "Time Alignment" button to go reduce the back ground noise of the head to the menu. In this menu you can apply a unit. If back ground noise of the head unit time delay to the speaker signal to simu- is audible, increase the Noise Gate level late an ideal listening position.
- Page 9 In the line "f0" tap on the band you want to adjust. A pop-up window appears to enter Gain the value of the center frequency you want. Confirm with "OK" In this menu you can make the following In the line "Q" tap on the band you want to settings for each individual channel (from adjust.
- Page 10 Bluetooth Audio Streaming mit automatischer Quellenumschaltung Plug’N’Play Installation mit optionalen fahrzeugspezifischen Anschlusskabeln Auto-Turn-On Funktion SICHERHEITSHINWEISE TECHNISCHE SPEZIFIKATIONEN EA-D800 Bedienen Sie keine Funktion, die Sie während der Autofahrt ablenken könnte. Power Rating THD < 1.0 %, 14.4 V CH1 CH7 CH8 Funktionen, welche Ihre besondere Aufmerksamkeit erfordern, dürfen ausschliesslich...
- Page 11 ANSCHLÜSSE + BEDIENUNGSELEMENTE EA-D800 Side panels EINGÄNGE + AUSGÄNGE AUTO-TURN-ON WAHLSCHALTER Dieser Schalter legt den Betriebsmodus fest, auf welchem Weg das Gerät eingeschaltet wird: Bei „Signal Turn on“ wird das DC-Offset Signal des Radios verwendet. Bei „Remote Turn on“ schaltet das Gerät durch Verwendung des Remote-...
-
Page 12: Lautsprecher Impedanz & Kabelinfo
+12V und das Massekabel. Diese Empfehlung garantieren eine problemlose EA-D800 → CH 1/2 und CH 3/4 4 Ohm Stereo / CH 5/6 und CH 7/8 4/2 Ohm Stereo und Funktion des Verstärkers, sowie volle Leistungsabgabe ohne übermässige Erwärmung. -
Page 13: Wahl Des Betriebsmodus
LAUTSPRECHERKABEL Verwenden Sie qualitativ gutes Lautsprecherkabel mit einem minimalen Querschnitt von 1.5 mm² bis 2.5mm². Schliessen Sie nun die Lautsprecherkabel an den entsprechenden Eingangsstecker. Ent- fernen Sie ca. 6-8 mm der Isolierung des LS-Kabels und beachten Sie die richtige Polung der Lautsprecherkabel am Terminal ("+"... - Page 14 , um den Verstärker mit der App zu verbinden. Nur für iOS Smartphones: 1. Gehen Sie in den Apple AppStore, suchen Sie nach „EA-D800“ und laden Sie die App auf Ihr Smartphone. 2. Aktivieren Sie Bluetooth. 3. Öffnen Sie die EA-D800 App und berühren Sie den “Connect” Button , um den Verstärker mit der App zu verbinden.
- Page 15 Output Settings Crossover In diesem Menü befindet sich das umfan- In diesem Menü können Sie den ange- greiche Input/Output Management. Im schlossenen Lautsprechern ein Frequenz- Bereich Output Setting bestimmen Sie die band zuweisen, welches deren empfohle- Funktion des jeweiligen Kanals. Tippen Sie nen Einsatzbereich entspricht.
- Page 16 Time Alignment Noise Gate Noise Gate ist dazu gedacht, mögliches In diesem Menü sind Sie in der Lage, Grundrauschen des Radios zu reduzieren. das Signal der Lautsprecher zeitlich zu Falls ein Grundrauschen hörbar ist, schie- verzögern, um eine ideale Hörposition zu ben Sie den Regler nach links, bis es nicht simulieren.
- Page 17 Tippen Sie in der Zeile „f0“ auf das gewün- schte Band. Ein Pop-Up Fenster erscheint, Gain wo Sie den Wert der gewünschten Mit- tenfrequenz eintragen und mit „Ok“ In diesem Menü können für jeden einzelnen bestätigen. Kanal folgende Einstellungen vorgenom- Tippen Sie in der Zeile „Q“...
-
Page 18: Garantie-Bestimmungen + Einschränkungen
This EMPHASER amplifier is fully warranted against defective materials or workmanship for a period ❏ MODEL: EA-D800 of two years from date of purchase at retail to the original buyer. Warranty work will not be carried out Date of purchase: unless this warranty certificate is presented fully completed with serial number, purchaser‘s address,... - Page 19 Rev. B...
Need help?
Do you have a question about the EA-D800 and is the answer not in the manual?
Questions and answers