Table of Contents
Advertisement
Quick Links
Advertisement
Table of Contents

Subscribe to Our Youtube Channel
Related Manuals for Wacker Neuson BFS 1350AL


Summary of Contents for Wacker Neuson BFS 1350AL
- Page 1 0201438en 01.2011 Floor saw BFS 1350AL Operator´s manual...
- Page 2 Manufacturer Wacker Neuson SE Preußenstraße 41 80809 München www.wackerneuson.com Tel.: +49-(0)89-354 02-0 Fax: +49-(0)89-354 02-390 Translation of the original operator's manual in German...
-
Page 3: Table Of Contents
Table Of Contents Technical data Description Application ...................29 Maximum permissible tilt ..............29 Functional description .................30 General instructions for use for diamond-edged cutting blades ..31 Transport to the worksite Operation Adjusting the handle ................33 Adjusting / Aligning the guide wheel ............33 Cutting depth setting ................34 Water tank ...................35 Parking brake ..................36... - Page 4 Foreword This operator's manual contains information and procedures for the safe opera- tion and maintenance of your Wacker Neuson machine. In the interest of your own safety and to prevent accidents, you should carefully read through the safety information, familiarize yourself with it and observe it at all times.
- Page 5 2 Introduction Introduction Means of representation for this operator's manual Warning symbols This operator's manual contains safety information of the categories: DANGER, WARNING, CAUTION, NOTICE. They should be followed to prevent danger to life and limb of the operator or dam- age to equipment and exclude improper service.
- Page 6 This symbol is used for lists. Wacker Neuson representative Depending on your country, your Wacker Neuson representative is your Wacker Neuson service, your Wacker Neuson affiliate or your Wacker Neuson dealer. You can find the addresses in the Internet at www.wackerneuson.com.
- Page 7 2 Introduction Identification of the machine Nameplate data The nameplate lists information that uniquely identifies your machine. This infor- mation is needed to order spare parts and when requesting additional technical information. Enter the information of your machine into the following table: Item Designation Your information...
- Page 8 3 Safety Safety Principle State of the art This machine has been constructed with state-of-the-art technology according to the recognized rules of safety. Nevertheless, when used improperly, dangers to the life and limb of the operator or to third persons or damage to the machine or other materials cannot be excluded.
- Page 9 Installation of accessories which are not from Wacker Neuson. It is no problem to install spare parts from Wacker Neuson. It is no problem to install accessories that are available in the Wacker Neuson product range of your machine. Please refer to the installation regulations in this operator's manual.
- Page 10 Have damaged or defective components replaced immediately! For further information, refer to chapter Troubleshooting. Spare parts, accessories Use only spare parts from Wacker Neuson or such that are equivalent to the original parts in design and quality. Only use accessories from Wacker Neuson.
- Page 11 3 Safety Operator's controls Always keep the operator's controls of the machine dry, clean and free of oil or grease. Operating elements such as ON/OFF switch, throttle levers etc. may not be locked, manipulated or changed without authorization. Checking for signs of damage Inspect the machine when it is switched off for any signs of damage at least once per work shift.
- Page 12 You can find the exact value in the chapter Technical Data. When wearing ear protection while working, you must pay attention and exercise caution because your hearing is limited, e.g. in case someone screams or a signal tone sounds. Wacker Neuson recommends that you always wear ear protection.
- Page 13 Before you transport the machine, it must be switched off, and the engine must be given sufficient time to cool down. Emptying the tank Wacker Neuson recommends emptying the fuel tank before transport. Fuel could run out, e.g. if the machine is tilted. Observe the national safety guidelines and the hazardous materials regulations...
- Page 14 3 Safety Lifting When lifting the machine, observe the following instructions: Designate a skilled person to guide you for the lifting procedure. You must be able to see or hear this person. Use only suitable and certified hoisting gear, lifting tackle and load-bearing equipment with sufficient lifting capacities.
- Page 15 3 Safety Operating safety Explosible environment Never operate the machine in a potentially explosive environment. Work environment Familiarize yourself with your work environment before you start work. This includes e.g. the following items: Obstacles in the work and traffic area. Load-bearing capacity of the ground.
- Page 16 3 Safety Vertical stability Always ensure that the machine is vertically stable and cannot tip over, roll or slide away. Proper operator position Do not leave the proper operator position while operating the machine. The intended operator position is at the controls behind the machine. Caution with hot parts Do not touch the machine during or shortly after operation.
- Page 17 3 Safety Storage Store the machine securely so that it cannot tilt, fall or slip. Storage location After operation, allow the machine to cool and then store it in a sealed-off, clean and dry location protected against frost and inaccessible to children. Vibrations When manually operated machines are intensively used, long-term damage caused by vibrations cannot be precluded.
- Page 18 3 Safety Preventing fires Open flames and smoking are strictly prohibited in the immediate vicinity of the machine. Make sure that waste, such as paper, dry leaves or grass do not accumulate around the exhaust muffler. The waste materials may ignite. Safety precautions when refueling Please observe the following safety-relevant instructions when refueling: Do not refuel near open flames.
- Page 19 This machine is equipped with an EPA-certified engine. Modifying the engine speed influences the EPA certification and emission. The engine may only be set by a skilled technician. For more detailed information, contact your nearest engine or Wacker Neuson representative. Safety during floor saw operation...
- Page 20 3 Safety Wet-cutting Use a water sprayer when dust formation is excessive, e.g. when cutting concrete or stone. Only use cutting blades that are suitable for wet cutting. Before ending the wet cutting process, allow the cutting blade to run without the water sprayer until it is dry.
- Page 21 3 Safety Do not touch a rotating cutting blade Never touch a rotating cutting blade with your hand or any other body part. Danger of severe injury. Pay attention and exercise caution when working with ear protection When wearing ear protection you must pay attention and exercise caution because your hearing is limited, e.g.
- Page 22 Service and maintenance work must only be carried out to the extent described in these operating instructions. All other procedures must be performed by your Wacker Neuson representative. For further information, refer to chapter Maintenance. It is not permitted to tilt the machine for maintenance work.
- Page 23 If operating fluids escape from the machine, cease operation of the machine and have it repaired immediately by your Wacker Neuson representative. Assembling safety devices If it was necessary to dismantle safety devices, they must be reassembled and checked immediately after completing maintenance work.
- Page 24 3 Safety Safety devices WARNING Danger of injury due to open moving parts. Only operate the machine with properly installed and functioning safety devices. Do not modify or remove safety devices. Item Designation Cutting blade guard Cutting blade guard Never operate the machine without a cutting blade guard. The cutting blade guard performs the following functions: Protects the operator from the rotating cutting blade.
- Page 25 4 Safety and information labels Safety and information labels Your machine has adhesive labels containing the most important instructions and safety information. Make sure that all the labels are kept legible. Replace any missing or illegible labels. The item numbers for the labels are in the parts book.
- Page 26 4 Safety and information labels Item Label Description Caution, risk of injury Read the operator's manual. Wear a eye protection and ear protection! Machine may not be offset with the cutting blade rotating. Start-Stop. Schnellaushubhebel. Central suspension. Cutting depth setting. 360°...
-
Page 27: Technical Data
Technical data BFS 1350AL BFS 1350L 1350ALS 0008898 0008885 Item no. 0008936 0610398 0610399 Length x Width x Height mm (in): 1085 x 604 x 1052 (42.7 x 23.78 x 41.4) Weight kg (lb): 136 (300) 134 (295) 153 (337) - Page 28 BFS 1350AL BFS 1350L 1350ALS Spark plug Type: NGK BP6ES BPR6ES / BPR6ES / / Champion Denso Denso W20EPR-U W20EPR-U (*) In accordance with the installed useful outlet power according to Directive 2000/14/EG. Sound pressure level at operator’s 98 dB(A)
-
Page 29: Description
Description Description Application ∗ Cutting expansion joints in concrete and asphalt surfaces. ∗ Repair work on streets, e.g. cutting out damaged areas in asphalt and con- crete. ∗ Straightening blacktops and concrete surfaces. ∗ For demolition jobs and refurbishment of old buildings. ∗... -
Page 30: Functional Description
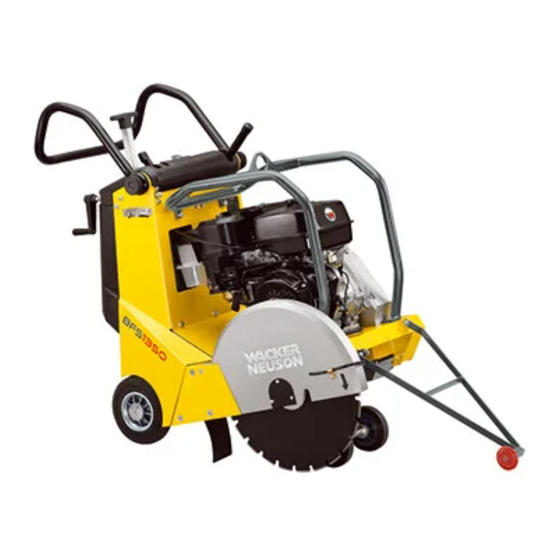
Description Functional description The floor saw must only be operated in a forward direction (see arrow). The drive motor (2) attached to the frame drives the cutting blade via the belt (7). The cutting blade can be infinitely adjusted by means of a crank handle (5), 1 turn corresponds to a cutting depth adjustment of 5 mm. -
Page 31: General Instructions For Use For Diamond-Edged Cutting Blades
∗ Never exceed the maximum speeds (imprinted on cutting blade)! ∗ Use a suitable diamond-edged cutting blade for the material to be cut (as- phalt, concrete ...). Wacker Neuson offers an extensive range of diamond- edged cutting blades in different qualities. -
Page 32: Transport To The Worksite
Transport to the worksite Transport to the worksite Requirements: ∗ When transporting the floor saw, use only suitable hoisting gear with a minimum load-bearing capacity of 200 kg. ∗ Always turn off the motor during transportation! ∗ Empty the water tank! ∗... -
Page 33: Operation
Operation Operation Adjusting the handle The width and height of the handles can be adjusted according to the use and the body height of the operator. To do this, release the clamping lever (11) and apply it in the new position. Adjusting / Aligning the guide wheel 3.2.1 Adjusting the guide wheel... -
Page 34: Cutting Depth Setting
Operation 3.2.2 Aligning the guide wheel To do this, make a cut of approx. 2 m length on a flat surface and with the minimum cutting depth. Then pull back the machine without lateral force. Then you can align the guide wheel exactly with the cut. Cutting depth setting Place the quick-lift lever in the forward lock-in position;... -
Page 35: Water Tank
Operation 3.3.2 To set the scale proceed as follows: 1. Push quick-lift lever (3) fully forwards. 2. Turn the cutting depth crank (5) until the cutting disc barely starts touching the floor. 3. Loosen the screws (14) and move the arrow until it coincides with the ”0”... -
Page 36: Parking Brake
Operation The adjustable hose coupling (19) can be used as a feeder point (1/2- inch) for an external hose connection. Parking brake To apply the parking brake (6) push bolt (21) towards the right until it locks in the spokes of the back wheel. Always place the machine on a flat, level and non-skid surface. -
Page 37: Assembling The Cutting Blade
Operation Assembling the cutting blade 3.6.1 Checking a new cutting blade: ∗ The blade type must be suitable for the material to be cut. Observe the peripheral speed, refer to the "Technical data"! ∗ The arbor diameter of the cutting blade must precisely fit the shaft to ensure smooth blade running. -
Page 38: Disassembling The Cutting Blade
Operation Place an intermediate layer (disc label) under each faceplate when using bakelite-bonded cutting discs. Attach cutting blade and spring washer on the shaft. Tighten the hexagonal bolt firmly. To do this, apply counter pressu- re on the spanner surfaces of the cutting shaft. Note: To assemble cutting disc on right side tighten nut in anti- clockwise direction (left-handed thread). -
Page 39: Right-Hand, Left-Hand Cutting Conversion
Operation Disconnect the water hose. Fold up the cutting blade guard (1). Loosen the tightening nut. Hold cutting shaft with spanner at span- ner surfaces. Fold down the cutting blade guard. Note: To disassemble cutting disc from right side loosen nut in clockwise direction (left-handed thread). -
Page 40: Checking The Motor Before Starting
Operation Note: Carry out the following additional conversions if needed: ∗ Loosen screws (27), turn guide wheel around and then reassemble screws (27). ∗ Loosen screws (28), turn around dirt catcher and then reassemble screws (28). Checking the motor before starting 3.9.1 Engine oil Switch off the engine. -
Page 41: 3.10 Starting The Engine
Operation 3.10 Starting the engine The cutting blade must not be in contact with the ground. Open the fuel tap. Move the choke lever to the CLOSE positio. Note: If the engine is warm or the air temperature is high, move the con- trol lever away from the Choke postion as soon as the engine starts. - Page 42 Operation Pull starter handle out slowly until a slight resistance is felt, then pull handle with strength. Caution: Do not allow the starter grip to snap back against the engine. Return it dently to grevent damage to the starter. T01136GB.fm...
-
Page 43: 3.11 Operation The Engine
Operation 3.11 Operation the engine As the engine warms up, gradually move the choke lever to the OPEN position. Set required engine speed with throttle lever (4) 3.11.1 Oil Alert system The Oil Alert system is designed to prevent engine damage caused by an insufficient amount of oil in the crankcase. -
Page 44: 3.12 Switch Off The Engine
Operation 3.12 Switch off the engine To turn off the engine in the event of an emergency, switch the main switch (1) to "0". Under normal circumstances, proceed as follows: Pull the throttle lever (4) all the way back to the stop position. Turn the main switch (23) to the position ”0”. -
Page 45: Maintenance
Check tension and wear – change, if necessary. Belt Spark plug Clean, set electrode gap 0.7-0.8 mm. Engine oil Change. 100 hours (monthly) Have this replaced by Wacker Neuson service. Fuel filter Spark protection Clean. 100 hours (twice a year) Filter cup Clean. -
Page 46: Checking Engine Oil Level
Maintenance Checking engine oil level ∗ Turn off the engine. ∗ Align the engine bolting level horizontally. ∗ Remove any dirt around the oil level dipstick. ∗ Remove the oil level dipstick and wipe it with a clean, lint-free cloth. ∗... -
Page 47: Cleaning The Air Cleaner
Maintenance Cleaning the air cleaner A dirty air cleaner obstructs the flow of air to the carburetor. To prevent carburetor malfunctions, clean the air cleaner on a regular basis. Clean the filter more frequently if the engine is operated in an extremely dusty environment. -
Page 48: Cleaning The Filter Cup
Maintenance Cleaning the filter cup Close the fuel tap. Remove the filter cup with the o-ring and wash it out with non-combustible and low-flammable solvent. Allow it to completely dry, then reinstall it and tighten it firmly. Open the fuel tap and check for leaks. -
Page 49: Tightening The Belt
Maintenance Tightening the belt Check the belt in the course of the weekly engine maintenance and retighten it as follows, if necessary:: 1. Remove V-belt guard. 2. Loosen counter nut (31). 3. Loosen the fastening screws (32) until the V-belt’s take-up can be shifted without play. -
Page 50: Changing The Belt
Maintenance Changing the belt 1. Disassemble V-belt guard (above and below) and cutting disc guard. 2. Take tension off V-belts. To do this loosen the counter nut (31), the tensioning nut (33) as well as the fastening screws (32). Only loosen the fastening screws so far that the V-belt’s take-up can be moved freely without play. -
Page 51: Checking The Spark Plug
Maintenance Checking the spark plug 0,7 - 0,8 mm ∗ Remove any soot deposits from the electrodes of the spark plug using a spark plug cleaner or a wire brush. ∗ Check the spark plug gap and set it to 0.7 - 0.8 mm, if necessary. ∗... - Page 52 1. Close the fuel tap. The en- main switch is defective. gine will switch off after a few seconds. 2. Have the machine repaired.* * Have these tasks carried out by the service department of your Wacker Neuson contact person.
- Page 53 6 Emission control systems information and warranty Emission control systems information and warranty The Emission Control Warranty and associated information is valid only for the U.S.A., its territories, and Canada. Emission control systems warranty statement See the engine owner’s manual for the applicable exhaust and evaporative emis- sion warranty statement.
- Page 54 Before using an oxygenated fuel, confirm the fuel's contents. Some states / Prov- inces require this information to be posted on the fuel pump. The following are Wacker Neuson approved percentages of oxygenates: Ethanol - (ethyl or grain alcohol) 10% by volume. You may use gasoline contain- ing up to 10% ethanol by volume (commonly referred to as E10).
- Page 55 EC Declaration of Conformity Manufacturer Wacker Neuson SE, Preußenstraße 41, 80809 München Product Type BFS 1345 BFS 1350 Product type Floor saw Item no. 0008764, 0610141, 0008885, 0008898 0610142, 0610242 Installed power output Measured sound power level dB(A) Guaranteed sound power level dB(A) Conformity assessment procedure acc.
Need help?
Do you have a question about the BFS 1350AL and is the answer not in the manual?
Questions and answers