Advertisement
Quick Links
WALK TESTING
1
2
MIN. SUN.
MANUAL OVERRIDE OPERATION
Activate Manual Override Operation
2 SEC
5
SEC
Lamp turn on
when reach Lux
OFF
ON
setting level.
ON
2 times within 2 seconds
SWITCHABLE LOAD
Max 2000W
Max 500W
Max 400W
TECHNICAL SPECIFICATIONS
Detection Range:
Up to 6 metres diameter (3m Radius)
at mounting height of 2.5m
Detection Angle:
360°
Power Supply:
220 ~ 240 VAC / 50 Hz
Maximum Switchable Load:
Max load current 6A
Incandescent / Halogen Max 2000W
Flourescent lamp (magnetic) Max 500W
Flourescent lamp (electronic ballast) Max 400W
Low energy (CFL) Max 120W
LED lamp Max 110W
Fan Max 75W
Time On Adjustment:
5 seconds - 15 minutes
Dusk Level Adjustment:
Day & night or night only operation
Operating temperature:
-20 to 40°C
Environment Protection:
For ceiling mount - IP44
For flush mount - IP44 (at sensor portion only)
- IP20 (ceiling board onwards)
3
warm up
20-50 SEC
Around
10 second
Deactivate Manual Override Operation
1
Manual deactivation before dawn
1 SEC
DUSK
5
SEC
Hrs
DAWN
ON
OFF
ON
1 time within 1 second
OR
2
Auto deactivation when
Lamp turn off when
dusk to dawn
dusk to dawn.
ON
Max 120W
Max 110W
Max 75W
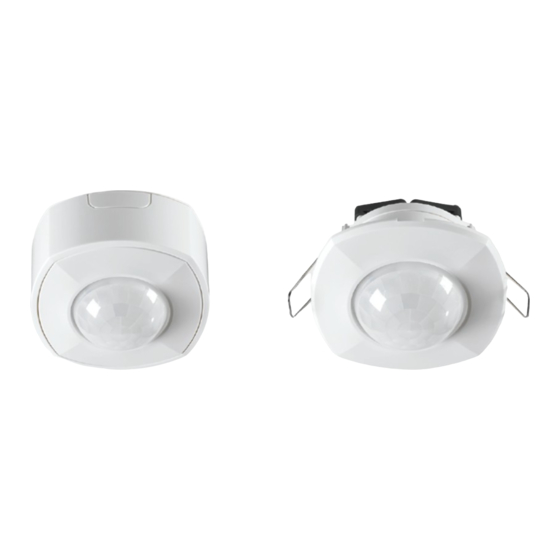
LS1000R LightSpot 360° Dual Mount PIR installation and operating instructions
! !
Only suitably qualified personnel should install this equipment
PACK CONTENTS
x1
REQUIRED
5mm
Auto Mode
x1
MOUNTING/ INSTALLATION STEPS
Surface Mount
1
Auto Mode
4
7
Cable entry
capability at
terminal block
1 x 2.5mm²
2 x 1.0mm²
2 x 1.5mm²
OR
9
Haydock Lane
Haydock
'CLICK'
Merseyside
WA11 9UJ
UK
www.ex-or.com
Technical Support
+44 (0)1942 719229
x1
x1
x1
No 2
Phillips
4mm
3mm
Ф75mm - 80mm
x1
x1
2
5
8
N
L
L2
L1
* Remark: L1 & L2 is relay output
IMPORTANT
Switch OFF the electricity at the fuse box by
removing the relevant fuse or switching off the circuit
breaker before proceeding with the installation.
OR
'CLICK'
M4 x 14mm
(For Euro conduit box
installation)
x2
M3 x 20mm
M3 x 15mm
(For ceiling mout
(For cable clamps
installation)
installation)
x2
x4
x2
x2
Hole saw size:
x1
x1
x1
3
230V
0FF
6
CAUTION:
Connection:
Connect the cable from the
( See connection diagram )
lighting load to the terminal block
Connect the mains supply
on the backplate as follows.
cable to the terminal block on
L
Live
Brown
the backplate as follows.
N
Blue
Neutral
L
Brown
Live
Earth
Green / Yellow
N
Neutral
Blue
L1 &
Relay contact
White
Earth
Green / Yellow
L2
for external load
L1
Switched Live
White
Option2
Wiring diagram
N L L2 L1
Option1
μ
N L
L2 L1
μ
N
L
L1
N
L2
L
Note: Remove the external link
between L and L2
'CLICK'
The device needs
20-50 seconds to
warm up.
Advertisement

Related Manuals for Ex-Or LS1000R


Summary of Contents for Ex-Or LS1000R
- Page 1 WALK TESTING LS1000R LightSpot 360° Dual Mount PIR installation and operating instructions Only suitably qualified personnel should install this equipment warm up PACK CONTENTS 20-50 SEC Around M4 x 14mm 10 second (For Euro conduit box installation) MIN. SUN. M3 x 20mm...
- Page 2 MOUNTING/ INSTALLATION STEPS MOTION SENSOR DETECTION Flush Mount When mounting at 2.5m height 230V 3 METRE 3 METRE Connection: Connect the cable from the Opening hole ( See connection diagram ) lighting load to the terminal block 75mm~80mm diameter Connect the mains supply on the backplate as follows.
Need help?
Do you have a question about the LS1000R and is the answer not in the manual?
Questions and answers