Table of Contents
Advertisement
Quick Links
Advertisement
Table of Contents

Subscribe to Our Youtube Channel
Related Manuals for Ametek Reichert PSL


Summary of Contents for Ametek Reichert PSL
- Page 1 Portable Slit Lamp User’s Guide...
- Page 2 ©2018 AMETEK, Inc. AMETEK is a registered trademark of AMETEK, Inc. Reichert and Reichert Technologies are registered trademarks of Reichert, Inc. The information contained in this document was accurate at time of publication. Specifications subject to change without notice. Reichert Technologies reserves the right to make changes in the product described in this manual without notice and without incorporating those changes in any products already sold.
-
Page 3: Table Of Contents
Table of Contents Warnings & Cautions ....................4 Symbol Information ..................... 8 Introduction ......................... 9 Indication for Use ..................... 9 Contraindications ..................... 9 Instrument Setup ...................... 10 Unpacking Instructions .................. 10 Parts Identification ..................11 Battery Installation ..................13 Eyepiece Check ..................... 13 Operating Instructions.................... -
Page 4: Warnings & Cautions
Warnings & Cautions (continued) Reichert Technologies (Reichert) is not responsible for the safety and reliability of this instru- ment when: • Assembly, disassembly, repair, or modification is made by unauthorized dealers or persons. • Instrument is not used in accordance with this User’s Guide. WARNING: AN INSTRUCTION THAT DRAWS ATTENTION TO RISK OF INJURY OR DEATH. - Page 5 Warnings & Cautions (continued) WARNING: DO NOT PLACE A SHORTING DEVICE BETWEEN THE BATTERY TERMINALS, OR ALLOW THE BATTERY TO BECOME WET. MISUSE OR IMPROPER DISPOSAL OF THIS BATTERY MAY CAUSE IT TO BECOME VERY HOT, IGNITE OR EXPLODE. DAMAGE TO THIS UNIT AND/OR SERIOUS PERSONAL INJURY MAY RESULT.
- Page 6 Warnings & Cautions (continued) WARNING: APPROPRIATE CLINICAL PERSONNEL ONLY SHOULD USE THIS DEVICE IN ORDER TO AVOID THE RISK OF DAMAGING A PATIENT’S EYESIGHT. WARNING: BECAUSE PROLONGED INTENSE LIGHT EXPOSURE CAN DAMAGE THE RETINA, THE USE OF THE DEVICE FOR OCULAR EXAMINATION SHOULD NOT BE UNNECESSARILY PROLONGED, AND THE BRIGHTNESS SETTING SHOULD NOT EXCEED WHAT IS NEEDED TO PROVIDE CLEAR VISUALIZATION OF THE TARGET STRUCTURES.
- Page 7 Warnings & Cautions (continued) CAUTION: ELECTROMAGNETIC INTERFERENCE FROM OTHER DEVICES MAY AFFECT THIS INSTRUMENT. IF INTERFERENCE IS PRESENT, TURN OFF OTHER ELECTRONIC DEVICES, OR REMOVE THEM FROM THE IMMEDIATE AREA WHILE OPERATING THIS INSTRUMENT. CAUTION: AVOID TOUCHING THE OPTICAL COMPONENTS OF THE DEVICE TO PREVENT REDUCED PERFORMANCE BY LEAVING BEHIND FINGERPRINTS OR OILS ON THE LENSES.
-
Page 8: Symbol Information
Symbol Information The following symbols appear on the instrument: CAUTION - Consult accompanying documents. Date of Manufacture YYYY-MM-DD Manufacturer Type B Product Classification. Class 1 Equipment, Continuous Operation. Waste of Electrical and Electronic Equipment Catalog Number. Serial Number. Consult Instructions for Use symbol indicating important operating and maintenance instructions that are included in this User’s Guide Authorized Representative in European Community. -
Page 9: Introduction
716-686-4500 Fax: 716-686-4555 E-mail: reichert.information@ametek.com Indications for Use A slit lamp biomicroscope is intended for use in eye examination of the anterior eye seg- ment, from the cornea epithelium to the posterior capsule. It is used to aid in the diagnosis of diseases or trauma which affect the structural properties of the anterior eye segment. -
Page 10: Instrument Setup
Instrument Setup Great care has been taken to deliver your new PSL to you safely. The container and pack- aging was specially designed to transport this unit. Please retain the packaging if future transportation is required. Unpacking Instructions The instrument is packaged to protect the instrument from damage during shipment. Please read the User’s Guide before operating the unit. -
Page 11: Parts Identification
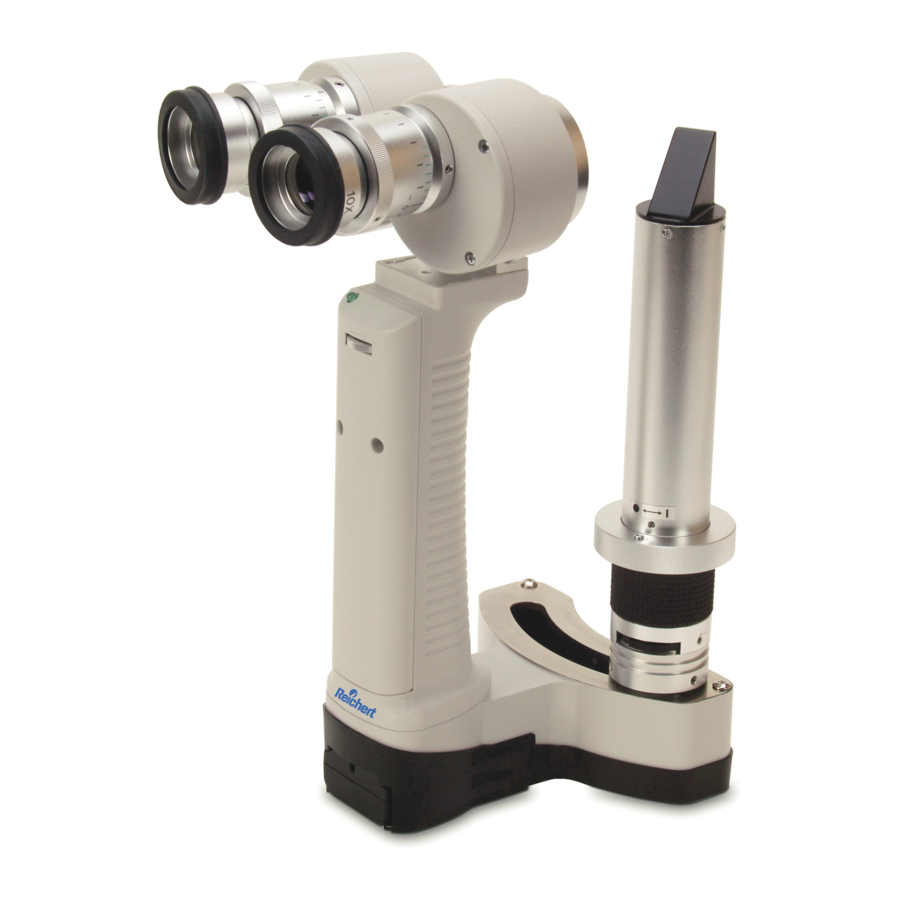
Instrument Setup (continued) Parts Identification Figure IS-01, PSL and Accessories 1. Carrying Case - This is a custom case 4. Diopter Adjustment Bar - This is used to designed to protect your PSL during ensure your PSL is functioning properly. transportation. - Page 12 Instrument Setup (continued) Parts Identification (continued) Focusing Bar/Forehead Support Screw Hole Left/Right Oculars Microscope Objective Illumination ON/OFF Switch Main Body Illumination Column Hand Grip Left/Right Eyepieces Battery Indicator LED Illumination Intensity Dial Slit Width Control Ring Filter Dial Battery Slot 15090-101 REV.
-
Page 13: Battery Installation
Instrument Setup (continued) Battery Installation Before using your PSL Portable Slit Lamp, it is important to fully charge each battery. Consult your Battery Charger Manual for instructions on how to charge your batteries. CAUTION: DO NOT OVERCHARGE YOUR BATTERIES. Place a charged battery into the battery slot at the bottom of the PSL. -
Page 14: Operating Instructions
Operating Instructions Focusing and Adjusting Interpupillary Distance (IPD) To focus the PSL and adjust the interpupillary distance the Screw Focusing Bar will need to be attached. Focusing Bar 1. Attach the Focusing Bar to the PSL by screwing it into the Focusing Bar Screw Hole located on top of the Microscope Objective. -
Page 15: Illumination Control
Operating Instructions (continued) Illumination Control The Illumination ON/OFF Switch is located on the hand grip of the PSL and works like a trigger. Refer to Figure OI-04. Squeezing the switch will turn the PSL illumination on. To maintain illumination, keep squeezing the switch. Illumination Release the switch to shut illumination off. ON/OFF Switch Note: The green battery indicator LED will light up when the PSL illumination is on. -
Page 16: Slit Width
Operating Instructions (continued) Slit Width The slit width can be adjusted by rotating the Slit Width Slit Width Control Ring. Rotate the ring clockwise to expand the slit Control Ring width and rotate the ring counterclockwise to decrease the slit width. Refer to Figure OI-07. Selecting A Filter The PSL filter is selected by rotating the Filter Dial either Figure OI-07, Adjust Width... -
Page 17: Magnification Change
Operating Instructions (continued) Magnification Change To change the magnification of the PSL, you must change the Eyepieces. The PSL comes with 10X and 16X Eyepieces. The 10X Eyepieces are pre-installed. Turn each Eyepiece counterclockwise to remove it from the PSL and carefully put them away in the Carrying Case. Screw the replacement Eyepieces into the open socket in each Ocular until the Eyepiece is no longer loose. -
Page 18: Cleaning & Maintenance
Cleaning & Maintenance Cleaning Use only lens paper or a lint-free, soft cloth to clean the lens cover glass, mirror, and eyepieces. To remove fingerprints, mist 90% Isopropyl Alcohol onto a lens paper or lint-free soft cloth and wipe-off carefully. Gently clean any dirt or contaminants off the housing using a lint-free cotton cloth lightly dampened with a mild cleaning solution that is safe for plastic. Be sure to wipe off any residual solution using a lint-free cotton cloth moistened with clean water. For hygienic reasons, wipe the forehead rest with an alcohol wipe after each patient. The rubber around the eyepiece’s should be wiped using a mild soap and water to remove oils and residue. -
Page 19: Troubleshooting
Troubleshooting Chart of Common Errors The following chart provides details of common problems and solutions for the PSL. Problem Probable Cause Solution Charge the battery. Battery is dead. Light not shining Replace the battery. when Illumination Switch is pressed. Adjust the Slit Width Control Ring so Slit width fully closed. -
Page 20: Specifications
Specifications Catalog Number 15090 Physical Dimensions (With Display Mounted) Size: Weight, unpacked: Height: 9.06 in. (23.0 cm) 1.5 lbs. (0.68 Kg) Width: 7.68 in. (19.5 cm) Depth: 4.13 in. (10.5 cm) Magnification 10X & 16X eyepieces included Diopter Adjustment ± 7D Visual Field Dia. -
Page 21: Disposal
Specifications (continued) Operational Conditions Environmental: The environmental conditions are as follows: Operating: Temperature: 10° to 35 °C (50° to 95 °F) 55° C Relative Air Humidity: 30% to 90% -10° C Atmospheric Pressure: 80 kPa (23.6 in. Hg) to 106 kPa (31.3 in. Hg) Transportation & Storage: 106 kPa Temperature: -10°... -
Page 22: Warranty
Warranty This product is warranted by Reichert Technologies (herein after referred to as Reichert) against defective material and workmanship under normal use for a period of one year from the date of invoice to the original purchaser. (An authorized dealer shall not be considered an original purchaser.) Under this warranty, Reichert’s sole obligation is to repair or replace the defective part or product at Reichert’s discretion. This warranty applies to new products and does not apply to a product that has been tampered with, altered in any way, misused, damaged by accident or negligence, or which has had the serial number removed, altered or effaced. Nor shall this warranty be extended to a product installed or operated in a manner not in accordance with the applicable Reichert... - Page 23 Notes 15090-101 REV. H...
- Page 24 Manufacturer Reichert, Inc. 3362 Walden Ave, Suite 100 Depew, NY 14043 Toll Free: 888-849-8955 Phone: 716-686-4500 Fax: 716-686-4545 Email: reichert.information@ametek.com www.reichert.com Authorized European Representative AMETEK GmbH Business Unit Reichert Carl-von-Linde-Strasse 42 85716 Unterschleissheim/Munich Germany Email: info.reichert-de@ametek.com Tel: +49 (89) 315 8911 0...
Need help?
Do you have a question about the Reichert PSL and is the answer not in the manual?
Questions and answers