Table of Contents
Advertisement
Advertisement
Table of Contents

Related Manuals for Cocoon Skyview HE170642


Summary of Contents for Cocoon Skyview HE170642
- Page 1 Model Number: HE170642 INSTRUCTION MANUAL VERSION 1.1...
- Page 2 Version 1.0 Date of Issue 23/08/18...
-
Page 3: Warranty Details
WARRANTY DETAILS SKYVIEW HD QUADCOPTER Warranty Details REGISTER YOUR PURCHASE AT www.aldi.com.au/en/about-aldi/product-registration/ TO KEEP UP-TO-DATE WITH IMPORTANT PRODUCT INFORMATION The product is guaranteed to be free from defects in workmanship and parts for a period of 12 months from the date of purchase. Defects that occur within this warranty period, under normal use and care, will be repaired, replaced or refunded at our discretion. -
Page 4: Safety Instructions
• Propellers are hazardous moving parts, when they are unlocked keep fingers and other body parts away from them. • Incorrect operation of the Cocoon Skyview HD Quadcopter may result in severe injury, loss of property or fines. Winplus Australasia does not take any responsibility if local rules and regulations are not followed. -
Page 5: Rules & Regulations
RULES & REGULATIONS The following regulations must be followed when operating a camera drone or quadcopter in Australia. • You must only operate this aircraft in your line-of-sight in daylight • You must not fly closer than 30 metres to vehicles, boats, buildings or people •... -
Page 6: Warranty Note
WARRANTY NOTE Getting the most out of your Skyview Read the manual carefully It will help you set up with ease Visit www.winplus.com.au We have additional support videos and guides Call After Sales Support - 1300 663 907 Available Monday - Friday, 8:30am - 6:00pm AEST Email customercare@winplus.com.au We’re always happy to help BATTERY NOTE... -
Page 7: Table Of Contents
1.1 Cocoon Skyview HD Quadcopter 1.2 Remote Control Installation 2.1 Installing the Control Batteries 2.2 Charging the Cocoon Skyview HD Quadcopter Battery 2.3 Installing the Landing Skids 2.4 Installing the Propeller Guards 2.5 Installing the Camera (optional) 2.6 Insert the Rechargeable Battery into the Skyview HD Quadcopter 2.7 Installing &... -
Page 8: Parts List
PARTS LIST • • 1 x Cocoon Skyview HD 4 x Propeller Guards • Quadcopter 4 x Landing Skids • • 1 x Remote Control 8 x Propellers (4 on • Skyview HD Quadcopter, 1 x Rechargeable Battery 4 spare) –... -
Page 9: Product Overview
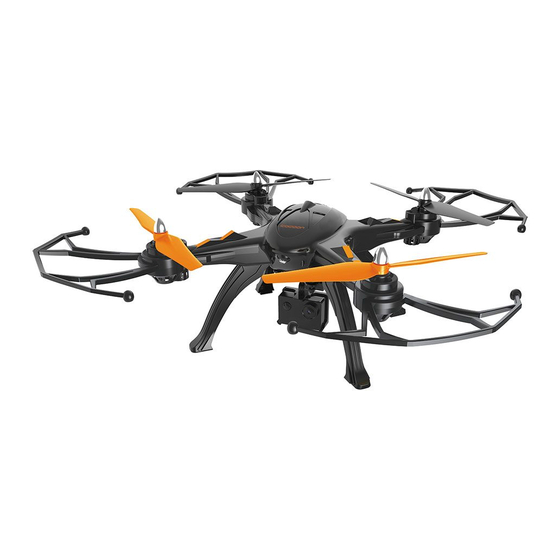
PRODUCT OVERVIEW 1.1 Cocoon Skyview HD Quadcopter Propeller Guards Camera Propellers Landing Gear Gimbal After Sales Support 1300 663 907 customercare@winplus.com.au Model Number HE170642... -
Page 10: Remote Control
PRODUCT OVERVIEW 1.2 Remote Control Photo/Video - Tap to take a photo, hold for 3 seconds to start recording video, tap again to stop recording High/Low Speed - Adjust the flight speed of the Quadcopter Left Stick - Ascend/descend, turn left/right Trim Camera Forward - Press to angle the camera forward Trim Rotate Left - Press to rotate the quadcopter to the left Emergency Stop - Stop all motors immediately, pull the left stick to the lowest position,... -
Page 11: Installation
Control, taking note of the polarity positions indicated Replace the cover and screw into place 2.2 Charging the Cocoon Skyview HD Quadcopter Battery Unscrew and open the Skyview HD Quadcopter battery cover and take the lithium battery out of the battery case Plug the charging adaptor into the power supply. -
Page 12: Installing The Camera (Optional)
2.5 Installing the Camera (optional) Insert the MicroSD card into the camera Insert the camera into the gimbal. The latch at the top of the camera mount will lock the camera in place Slide the gimbal into the base of the Skyview HD Quadcopter PLEASE NOTE: Camera needs to face the front of the Skyview HD Quadcopter Plug both data cables into the corresponding plugs near the Skyview HD Quadcopter’s on/off switch... -
Page 13: Installing & Replacing The Propellers
2.7 Installing & Replacing the Propellers Each propeller is marked with an arrow indicating the turning direction during flight. Each arm of the Skyview HD Quadcopter has a corresponding direction as indicated in the image. Always ensure the arrow direction on the propeller matches the direction on the arm, otherwise the quadcopter will not fly correctly. -
Page 14: My First Flight
MY FIRST FLIGHT • We recommend operating the drone in a large outdoor space such as a field to ensure you are familiar with all controls • Always use the provided propeller guards and ensure that you have plenty of open space to practice •... -
Page 15: Flying The Skyview
FLYING THE SKYVIEW 4.1 First Flight and Auto Hover After unlocking flight controls, push the left throttle up to increase the altitude to approximately 5m Release the throttle and the Skyview HD Quadcopter will hover at this height Use the left throttle to turn left or right as needed Use the right throttle to move left, right, forwards and backwards Use the forwards / backwards / left / right trim controls to fine tune hovering IMPORTANT NOTE: If you find your drone is veering in a certain direction, you will need to manually trim... -
Page 16: Flight Controls
FLYING THE SKYVIEW 4.3 Flight Controls Ascending and descending Push the throttle stick up (left stick) and the speed of the main blades will increase making the Skyview HD Quadcopter ascend Pull the throttle stick down, and the spinning speed of the main blades will decrease. The Skyview HD Quadcopter will begin to descend Turning Left and Right... -
Page 17: Other Functions
OTHER FUNCTIONS 5.1 Auto Trim Function Push both left and right throttles down towards the right at a 45-degree angle as indicated in the diagram for 5 seconds. When the lights of the Skyview HD Quadcopter are flashing rapidly, release the throttles and the light on the Skyview HD Quadcopter will remain lit, indicating auto trim is complete NOTE: •... - Page 18 5.5 Performing Tricks Once you are familiar with basic flight operations, you can: Fly the Skyview to a height of more than 3 metres Perform tricks such as flips with your Skyview, in any speed settings WARNING: • Make sure you allow enough space both above and below your Skyview before attempting to perform flips •...
-
Page 19: Taking Photos & Videos
TAKING PHOTOS & VIDEOS 6.1 Taking a Photo NOTE: Ensure you have inserted a MicroSD card into the camera and the data cable is plugged into the corresponding plug near the Skyview HD Quadcopter’s on/off switch To take a photo, press the photo button. The remote control will beep once, indicating a photo has been taken 6.2 Recording a Video NOTE: Ensure you have inserted a MicroSD card (Up to 32GB) into the camera and the data cable is... -
Page 20: Faqs
FAQS My Skyview HD Quadcopter didn’t pair with my remote control Check the Skyview is resting on a flat surface, powered on with LED lights flashing slowly, then turn the remote control off and on again My Skyview HD Quadcopter is not responding Check that the battery in the Skyview HD Quadcopter is still charged. -
Page 21: Disposal
DISPOSAL At the end of its working life, do not throw this product out with your household rubbish. Electrical and electronic products contain substances that can have a detrimental effect on the environment and human health if disposed of inappropriately Observe any local regulations regarding the disposal of electrical consumer goods and dispose of it appropriately for recycling. -
Page 22: Repair And Refurbished Goods Or Parts Notice
REPAIR AND REFURBISHED GOODS OR PARTS NOTICE SKYVIEW HD QUADCOPTER Repair and Refurbished Goods or Parts Notice Unfortunately, from time to time, faulty products are manufactured which need to be returned to the Supplier for repair. Please be aware that if your product is capable of retaining user-generated data (such as les stored on a computer hard drive, telephone numbers stored on a mobile telephone, songs stored on a portable media player, games saved on a games console or les stored on a USB memory stick) during the process of repair, some or all of your stored data may be lost.
Need help?
Do you have a question about the Skyview HE170642 and is the answer not in the manual?
Questions and answers