Table of Contents
Advertisement
Advertisement
Table of Contents

Related Manuals for Dinamica Generale DG500


Summary of Contents for Dinamica Generale DG500
- Page 1 DG500...
-
Page 3: Table Of Contents
General Information INDICATOR DG500 RevA7 INDEX INDEX ______________________________________________________________________________ 1 TECHNICAL DATA ____________________________________________________________________ 3 DIMENSIONS ________________________________________________________________________ 4 CONFIGURATION _____________________________________________________________________ 4 KEYBOARD __________________________________________________________________________ 5 CONNECTION SCHEME ________________________________________________________________ 7 UNIVERSAL BOX _________________________________________________________________ 7 SLIM BOX ______________________________________________________________________ 11 ... - Page 4 General information INDICATOR DG500 RevA7 SUPPLEMENTARY FUNCTIONS ________________________________________________________ 71 PROGRAM MANAGEMENT ____________________________________________________________ 73 HOW TO ENTER IN THE MAIN MENU TO MODIFY EACH SETTINGS ______________________73 EDITING MENU ______________________________________________________________________ 73 HOW TO PROGRAM THE COMPONENTS ____________________________________________73 ...
-
Page 5: Technical Data
General Information INDICATOR DG500 RevA7 TECHNICAL DATA 0 – 999.999 Range (f.s.): 1 - 2 - 5 - 10 - 20 - 50 Resolution: < +/- 0,015 % f.s. Accuracy: -30 / +65 °C (-22 / +150 °F) Operating temperature: (-45 °C /-49°F on request) -
Page 6: Dimensions
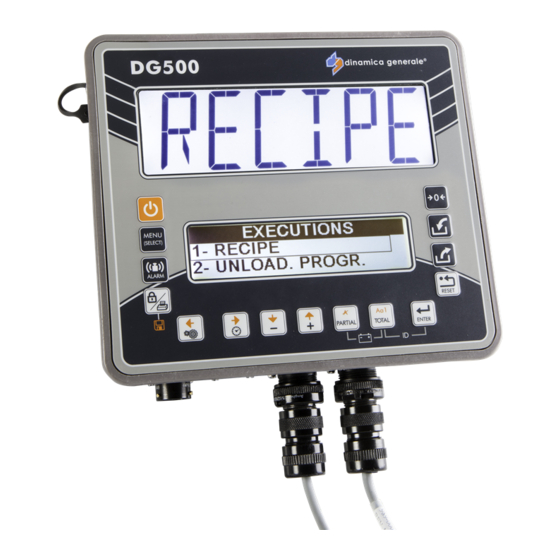
General information INDICATOR DG500 RevA7 DIMENSIONS CONFIGURATION ON/OFF key. Function and setting keys. Power, sensor and accessories connectors. Graphic Lower Display: number of digit variable in function of characters visualized on 3 rows. Upper Display: 6 digit LCD 45 mm to show the weight Back panel. -
Page 7: Keyboard
General Information INDICATOR DG500 RevA7 KEYBOARD ON – OFF Press this key in order to switching on / off the indicator Press this key in order to enter into the main menu that contains the MENU submenu: EDITING, EXECUTIONS, SETTINGS, ACCUMULATION,... - Page 8 General information INDICATOR DG500 RevA7 1- In the PARTIAL FUNCTION MODE, press this key in order to zeroed the weight that is visualized on the display 2- In the NET/GROSS MODE, press this key in order to memorize a tare...
-
Page 9: Connection Scheme
General Information INDICATOR DG500 RevA7 CONNECTION SCHEME UNIVERSAL BOX Power and sensor connection (system with junction box) If the load cells are not all connected to the indicator, it's necessary to close the connectors not used with the special cap. - Page 10 General information INDICATOR DG500 RevA7 Power and sensor connection (system without junction box)
- Page 11 General Information INDICATOR DG500 RevA7 Accessories connection (system with 1 sensor connector)
- Page 12 General information INDICATOR DG500 RevA7 Accessories connection (system with 4 sensor connectors)
-
Page 13: Slim Box
General Information INDICATOR DG500 RevA7 SLIM BOX Power and sensor connection (system with junction box) If the load cells are not all connected to the indicator, it's necessary to close the connectors not used with the special cap. - Page 14 General information INDICATOR DG500 RevA7 Accessories connection (system with connection box 2 accessories Hi-Tech)
- Page 15 General Information INDICATOR DG500 RevA7 Accessories connection (system without connection box 2 accessories Hi-Tech)
- Page 16 General information INDICATOR DG500 RevA7 Display connection (available for UNIVERSAL BOX and for SLIM BOX)
- Page 17 Configuration INDICATOR DG500 RevA7...
-
Page 18: Setting Of The Parameters
Configuration INDICATOR DG500 RevA7 SETTING OF THE PARAMETERS HOW TO ENTER INTO THE PASSWORD CONFIGURATION MENU Turn on by pushing Once the software revision has come up on the lower display the message “PLEASE WAIT”… will appear. Press the setting key in order to enter in the password configuration. - Page 19 Configuration INDICATOR DG500 RevA7 And afterwards “Set password -/+”. * Note 1 Release the key. It is possible increase or decrease the value by 100 units through the pressing at the same time of the following keys: a) BLOCK/PRINT and PLUS in order to increase by 100 units;...
-
Page 20: How To Exit The Password Configuration Menu
Configuration INDICATOR DG500 RevA7 HOW TO EXIT THE PASSWORD CONFIGURATION MENU There are two ways to exit the password configuration menu: Push the RESET key After the “PLEASE WAIT” message the indicator returns in the TOTAL WEIGHT mode and the weight will be seen on the display. -
Page 21: List Of Passwords That Can Be Selected
Configuration INDICATOR DG500 RevA7 After the message “PLEASE WAIT” the indicator returns in the TOTAL WEIGHT mode and the weight will be seen on the display. LIST OF PASSWORDS THAT CAN BE SELECTED Calibration Sequence of the settings = SETTINGS MENU... -
Page 22: Password 12: How To Set The Calibration Value
Configuration INDICATOR DG500 RevA7 PASSWORD 12: HOW TO SET THE CALIBRATION VALUE (Range: 1÷15000; Default: 2780) The value must be lower then what set in the 99 password. If there are problems in order to enter and save the calibration value, check the value set in the password... -
Page 23: Password 19: Sequence Of The Settings = Settings Menu
Configuration INDICATOR DG500 RevA7 The indicator will return to Set password -/+. PASSWORD 19: SEQUENCE OF THE SETTINGS = SETTINGS MENU It is possible enter into the SETTINGS MENU in this way: From the modality Set password -/+, select number 19 with the PLUS and MINUS keys. - Page 24 Configuration INDICATOR DG500 RevA7 Inside this menu you could set many values in this way: a) Press the ENTER key in order to select the parameter to modify. b) Modify the number of the parameter with the PLUS and MINUS keys.
- Page 25 Configuration INDICATOR DG500 RevA7 ALARM DELAY TIME (Range: 0-60; Default: 7) Programming of time of the acoustic alarm at the end of a loading/unloading. The number that is set corresponds to the alarm time, expressed in seconds, when the set value is reached.
- Page 26 Configuration INDICATOR DG500 RevA7 LANGUAGE (Default: English) Language selection used for the visualization of the messages. List of the available languages: English Italian Spanish German French Russian Czech Polish SET DEVICE ADDRESS (Range: 1-255; Default: 3) Identification code that allows the...
- Page 27 Configuration INDICATOR DG500 RevA7 STABILIZATION TIME (Default: 0) With the PLUS and MINUS keys, you can set the seconds that you have at your disposition when you load a component during the execution of the recipe. This function is normally used for those components that are loaded with the loader.
-
Page 28: Password 45: How To Set The Calibration With A Reference Weight
Configuration INDICATOR DG500 RevA7 With the PLUS and MINUS keys set “Data Trans: No” if you do not want to read the recipe directly from the Memory Card, but only save the executions on the internal memory of the indicator. - Page 29 Configuration INDICATOR DG500 RevA7 The message “Calibration“ will appear for 2 seconds, it means that the calibration is starting. The message “C1 Calib Step 1“ will appear for 2 seconds, it means that the first step of calibration is starting.
- Page 30 Configuration INDICATOR DG500 RevA7 Load the weight on the mixer and insert the value of the reference weight placed in the mixer (in Kg or Pounds) with PLUS and MINUS keys, then confirm with key. The value is only indicative The message “Please Wait”...
-
Page 31: Password 46 - Inverse Calibration With Sample Weight
Configuration INDICATOR DG500 RevA7 PASSWORD 46 – INVERSE CALIBRATION WITH SAMPLE WEIGHT This procedure allows to carry out the calibration of the weighing system on the basis of a known weight that must be appropriately weighed on the medium in which the weighing system is mounted. - Page 32 Configuration INDICATOR DG500 RevA7 Load the weight on the mixer and insert the value of the reference weight placed in the mixer (in Kg or Pounds) with PLUS and MINUS keys, then confirm with key. The value is only indicative The message “Please Wait”...
-
Page 33: Password 67: How To Modify In Percentage The Weight
Configuration INDICATOR DG500 RevA7 PASSWORD 67: HOW TO MODIFY IN PERCENTAGE THE WEIGHT (Range: -10.0% / +10.0%; Default: 0.0) From the modality Set password -/+ select the number 67, with the PLUS and MINUS keys. Confirm with the ENTER key. - Page 34 Configuration INDICATOR DG500 RevA7...
-
Page 35: Password 99: How To Set The Maximum Weight
Configuration INDICATOR DG500 RevA7 PASSWORD 99: HOW TO SET THE MAXIMUM WEIGHT (Range: 100-999999; Default: 15000) The value must be higher than what set in the password 12. From the modality Set password -/+ select number 99 with the PLUS and MINUS keys. - Page 36 Configuration INDICATOR DG500 RevA7...
-
Page 37: Password 155: Setting Of The Default Value
Configuration INDICATOR DG500 RevA7 PASSWORD 155: SETTING OF THE DEFAULT VALUE From the modality Set password -/+ select number 155 with the PLUS and MINUS keys. Confirm with the ENTER key. The message “Set Default Val?” is shown. Press the ENTER key if you wish restore the default values. -
Page 38: Password 258: Activation Of The Total Mixer On The Unloading Phase
Configuration INDICATOR DG500 RevA7 PASSWORD 258: ACTIVATION OF THE TOTAL MIXER ON THE UNLOADING PHASE (Default: No) From the modality Set password -/+ select number 258 with the PLUS and MINUS keys. Confirm with the ENTER key. The message “Total mixer” is shown. -
Page 39: Password 333: How To Set The Component Accumulation Mode
Configuration INDICATOR DG500 RevA7 PASSWORD 333: HOW TO SET THE COMPONENT ACCUMULATION MODE (Default: Yes) This function is used to save in the memory of the indicator the information about the total loaded of the single component during the executions of all the recipes. -
Page 40: Password 444: How To Set The Functioning Mode
Configuration INDICATOR DG500 RevA7 The indicator returns to Set password - PASSWORD 444: HOW TO SET THE FUNCTIONING MODE (Default: 1 - Partial/Total) From the modality PASSWORD select the number 444 with the PLUS and MINUS keys. Confirm with the ENTER key. - Page 41 Configuration INDICATOR DG500 RevA7 In order to always visualize the loaded weight in that precise moment, set the function PARTIAL/TOTAL by pressing the TOTAL key. With the PARTIAL key it is possible to carry out partial weighing by zeroing the display and verifying what is being loaded in that moment.
- Page 42 Configuration INDICATOR DG500 RevA7 By setting the function NET/GROSS, the PARTIAL key is used to memorize a tare, it zeroes the display and memorizes the weight loaded until that moment, considering it as a tare. The TOTAL key is used to visualize...
-
Page 43: Password 454: How To Set The Unit Of Measure
Configuration INDICATOR DG500 RevA7 PASSWORD 454: HOW TO SET THE UNIT OF MEASURE (Default: Kg) From the modality Set password -/+ select the number 454 with the PLUS and MINUS keys. Confirm with the ENTER key. Selection of the unit of measure in kg or pounds with the PLUS and MINUS keys. - Page 44 Configuration INDICATOR DG500 RevA7...
-
Page 45: Unloading Points
Configuration INDICATOR DG500 RevA7 PASSWORD 456: HOW TO ENABLE THE VARIATION OF THE COMPONENT NAME/ UNLOADING POINTS (Default: Yes) From the modality Set password -/+ select the number 456 with the PLUS and MINUS keys. Confirm with the ENTER key. -
Page 46: Password 500: How To Set The End Of The Load Execution Mode
Configuration INDICATOR DG500 RevA7 PASSWORD 500: HOW TO SET THE END OF THE LOAD EXECUTION MODE (Default: Total) From the modality Set password -/+ select the number 500 with the PLUS and MINUS keys. Confirm with the ENTER key. Press the PLUS and MINUS keys in order to modify the value (Total / Recipe / Menu). -
Page 47: Password 600: How To Set The Weight Repeater Function
Configuration INDICATOR DG500 RevA7 PASSWORD 600: HOW TO SET THE WEIGHT REPEATER FUNCTION (Default: Menu) From the modality Set password -/+ select the number 600 with the PLUS and MINUS keys. Confirm with the ENTER key. Select the function of the weight repeater with the PLUS and MINUS keys. -
Page 48: Password 603: How To Enable The Xl Display / Extra Display
Configuration INDICATOR DG500 RevA7 PASSWORD 603: HOW TO ENABLE THE XL DISPLAY / EXTRA DISPLAY (Default: Normal) From the modality Set password -/+ select the number 603 with the PLUS and MINUS keys. Confirm with the ENTER key. Communication authorization between the indicator and the XL Display / EXTRA Display with the PLUS and MINUS keys. - Page 49 Configuration INDICATOR DG500 RevA7 c) Select FULL if there is another device connected to the XL Display / EXTRA Display (ex.: Weight Repeater, Motor Control,…) and you want to use both. Press ENTER key in order to confirm the function mode and the indicator will automatically return to Set password -/+.
-
Page 50: Password 789: Clearing Of All Recipes And Unloading Programs
Configuration INDICATOR DG500 RevA7 PASSWORD 789: CLEARING OF ALL RECIPES AND UNLOADING PROGRAMS From the modality Set password -/+ select number 789 with the PLUS and MINUS keys. Confirm with the ENTER key. The message “Clear all recipes, u.prog.?” is shown. -
Page 51: Password 790: Clearing Of All Components And Unloading Points
Configuration INDICATOR DG500 RevA7 PASSWORD 790: CLEARING OF ALL COMPONENTS AND UNLOADING POINTS From the modality Set password -/+ select number 790 with the PLUS and MINUS keys. Confirm with the ENTER key. The message “Clear all comp. u.points?” is shown. -
Page 52: Points
Configuration INDICATOR DG500 RevA7 PASSWORD 791: LOADING OF THE NAMES FOR DEFAULT COMPONENTS AND UNLOADING POINTS From the modality Set password -/+ select number 791 with the PLUS and MINUS keys. Confirm with the ENTER key. The message “Set default comp. -
Page 53: Password 800: Clearing Of History
Configuration INDICATOR DG500 RevA7 PASSWORD 800: CLEARING OF HISTORY From the modality Set password -/+ select number 800 with the PLUS and MINUS keys. Confirm with the ENTER key. With the PLUS and MINUS keys, select the menus to zeroing: 1- N. - Page 54 Configuration INDICATOR DG500 RevA7...
-
Page 55: Password 880: How To Block The Weighing
Configuration INDICATOR DG500 RevA7 PASSWORD 880: HOW TO BLOCK THE WEIGHING (Default: DG) From the modality Set password -/+ select the number 880 with the PLUS and MINUS keys. Confirm with the ENTER key. Select the function of the BLOCK button with the PLUS and MINUS keys. -
Page 56: Password 888: Setting Archives And Inhibit Program
Configuration INDICATOR DG500 RevA7 PASSWORD 888: SETTING ARCHIVES AND INHIBIT PROGRAM (Default: Man+Load, FALSE, 5) From the modality Set password -/+ select number 888 with the PLUS and MINUS keys. Confirm with the ENTER key. The first parameter is shown: SET ARCHIVES. -
Page 57: Password 1357: Formatting Card
Configuration INDICATOR DG500 RevA7 To confirm and proceed on to the next parameter, press the ENTER key. The third parameter is shown: SET WARNING EXECUTION. This value corresponds to the number of execution that miss before the card is full. A message advises the operator that the card is almost full. - Page 58 Configuration INDICATOR DG500 RevA7 If the card is plugged, the message “FORMAT CARD?” appears. Press the ENTER key in order to delete all the datas inside of the card. The message “Formatting..” appears and then “Card Formatted”. Press the RESET key in order to return back without delete the datas.
-
Page 59: Password 9372: Setting Of Visualization On The Display
Configuration INDICATOR DG500 RevA7 PASSWORD 9372: SETTING OF VISUALIZATION ON THE DISPLAY (Default: Percentual) From the modality Set password -/+ select number 9372 with the PLUS and MINUS keys. It allows to decide if and in which mode visualize the name of the... - Page 60 Configuration INDICATOR DG500 RevA7 Time: the name of the component is visualized alternatively with the weight to load until the seconds finish as set in this password. Set the value of seconds with the PLUS and MINUS keys. The characters will be displayed on the upper display only with standard code ASCII characters.
-
Page 61: Setting Of The Customers "Id
Configuration INDICATOR DG500 RevA7 SETTING OF THE CUSTOMERS “ID” With this function it is possible to associate a customer “ID” with a recipe before it is carried out. Push simultaneously the TOTAL and ENTER keys. Set the value of the customer ID with the PLUS and MINUS keys. -
Page 62: Manual Use Of The Indicator
MANUAL USE OF THE INDICATOR TURNING ON a) After pushing the key, on the lower display you will see in sequence the messages “DG500”, the software revision number and “Please Wait”. b) Afterwards a weight value will appear on the upper display and the indication TOTAL WEIGHT on the lower display. -
Page 63: Partial/Total Function Mode
INDICATOR DG500 RevA7 PARTIAL/TOTAL FUNCTION MODE Selected by password 444 ZEROING a) Zero with the key. b) The message: “Set Tare” will appear; keep pushing the ZERO key until the message: “Setting Ok !” is visualized. c) The indicator will return to the TOTAL WEIGHT mode. -
Page 64: Net / Gross Mode
INDICATOR DG500 RevA7 NET / GROSS MODE Selected by password 444 ZEROING a) Carry out the zeroing by pushing the b) The message : “Set Tare” will appear keep pushing the ZERO key until the message: “Setting Ok !” is visualized. - Page 65 INDICATOR DG500 RevA7 NET/GROSS WEIGHT a) In this mode the PARTIAL key is used to memorize a tare. Push for 3 seconds and the following messages will appear: PRESS FOR 3 SECOND then SETTING TARE OK At this point the display will visualize...
- Page 66 INDICATOR DG500 RevA7 c) Confirm the set weight by pushing the PARTIAL key and proceed with the load / unload phase. The weight will be visualized decreasingly on the display independently from the fact that you are loading or unloading.
-
Page 67: Transfer Data Via Usb Key (Available Only In Some Versions)
INDICATOR DG500 RevA7 TRANSFER DATA VIA USB Key (available only in some versions) USB Port The USB port is available only in some part number. It allows to transfer data via USB Key. It is possible to connect or disconnect the USB Key at any time, without restarting the indicator. - Page 68 INDICATOR DG500 RevA7 If the USB key is not connected, the message “Please Wait” appears, followed by the message “USB Error”. The indicator returns to TOTAL WEIGHT MODE. EMPTY USB KEY If the USB Key is empty, the message “Please, Wait” followed by “card.bin not found”...
- Page 69 INDICATOR DG500 RevA7 USB KEY NOT FORMATTED If the USB Key is not formatted for this type of indicator, the message “USB key not Formatted!” appears. The message “Format USB Key?” appears. Press the ENTER key to confirm, otherwise press the RESET key to cancel the operation.
- Page 70 INDICATOR DG500 RevA7 PROGRAMMING DATA TRANSFER FROM PC (DTM) Connect a USB Key to the PC and program it with the DTM Software. Connect again the USB key to the indicator. Go to USB KEY Menu. The message “Please, Wait” appears on the screen followed by “No...
- Page 71 INDICATOR DG500 RevA7 Press the RESET key if you do not want to delete all the programs (Recipes/ Unloading Programs) on the indicator. The indicator returns to TOAL WEIGHT MODE. SAVING EXECUTION DATA ON THE USB KEY After the execution of recipes or unloading programs, it is possible to save the data entering in the “USB...
- Page 72 INDICATOR DG500 RevA7 If there aren’t any executions to download the message “No Executions to Download” appears. The percentage of the download appears. Please wait the complete download (100%) The message “Executions downloaded!” appears. Finally the message “Please, remove the USB key and close the connector”...
-
Page 73: Supplementary Functions
INDICATOR DG500 RevA7 SUPPLEMENTARY FUNCTIONS BATTERY CHECK By pushing simultaneously PARTIAL and TOTAL the battery voltage will be visualized. HOURS and MINUTES: VISUALIZATION By pushing key the date and time are visualized. PROGRAMMING a) Turn on and when the message... - Page 74 INDICATOR DG500 RevA7 Repeat the operation from point b) for each parameter. d) After the confirmation of the year with the ENTER key, the message PLEASE WAIT will appear and the indicator will return to TOTAL WEIGHT. PRINT a) In order to print the weight keep press...
-
Page 75: Program Management
INDICATOR DG500 RevA7 PROGRAM MANAGEMENT HOW TO ENTER IN THE MAIN MENU TO MODIFY EACH SETTINGS From the modality TOTAL WEIGHT press the key. The MAIN MENU contains the following voices: Press the key in order to enter in Press the key in order to the submenu. - Page 76 (for 3 sec) in order to save the name of component. The message “Changes Saved” appears. Before to save, press the key if you wish return back without change the value. dinamica generale® suggests to set all the components that will be used by inserting the name.
-
Page 77: How To Program The Recipes
INDICATOR DG500 RevA7 HOW TO PROGRAM THE RECIPES Enter in the EDITING MENU and select RECIPES with the ENTER key. If the recipe doesn’t exist the message “There are no Recipe” appears. Select the recipe number that has to be set with the PLUS and MINUS keys from Recipe 1 to 24. - Page 78 INDICATOR DG500 RevA7 The blinking letter indicates that it is possible to insert/change the name of the recipe. The complete list of characters will appears (editing mould). Press the ENTER key in order to move in the characters table. Use the RIGHT, LEFT, PLUS and MINUS keys to select the desired characters.
- Page 79 INDICATOR DG500 RevA7 If you choose RECIPE BY COWS you could pass automatically to mode where you can set the animals number (see the next paragraph: How to set the animals number). If you choose RECIPE BY TOTALS you could set the components of the recipe.
- Page 80 INDICATOR DG500 RevA7 If the total amount of components exceeds the set value in the password 99, after the error message (HHH), the indicator proposes the maximum number of animals for which that limit will not be exceeded. Press the key in order to visualize the Total Programmed.
-
Page 81: How To Set The Animals Number
The indicator, after visualizing the message CHANGES LOST, will return back. dinamica generale® suggests to set all the recipes that will be used by inserting the name. HOW TO SET THE ANIMALS NUMBER With the PLUS and MINUS keys set the animals number until a maximum of 30000 animals. - Page 82 INDICATOR DG500 RevA7 Now, it is possible set the component. Press the ENTER key in order to go in the COMPONENT LIST. Select the component with the PLUS and MINUS keys. Only in modify mode, push the PARTIAL key in order to delete the component.
- Page 83 INDICATOR DG500 RevA7 Press the key in order to visualize the Total Recipe. * The value is only indicative Press the ENTER key in order to continue and switch to Total Programmed. * The value is only indicative Press the ENTER key in order to continue and set the mixing time (value expressed in minutes).
- Page 84 INDICATOR DG500 RevA7 It is always possible to exit from the programming of the Recipe and return back by pressing the RESET key; in this case the message SAVE CHANGES? appears. Do you wish to save the settings that were programmed?
-
Page 85: How To Program The Unloading Points
INDICATOR DG500 RevA7 HOW TO PROGRAM THE UNLOADING POINTS Enter in the EDITING MENU and select UNLOADING POINTS with the ENTER key. Select the Unloading Points name that has to be set/modified with the PLUS and MINUS keys from Unloading Points 1 to... -
Page 86: How To Program The Unloading Programs
Unloading Points that will be used by inserting the name. HOW TO PROGRAM THE UNLOADING PROGRAMS Enter in the EDITING MENU and select UNLOADING PROGRAMS with the ENTER key up to 24 positions. - Page 87 INDICATOR DG500 RevA7 Select the Unloading Program name that has to be set with the PLUS and MINUS keys from Unloading Program 1 to 24. If the Unloading Program name already exists you could change it. The message “Modify Name” appears. Press the ENTER key in order to change it.
- Page 88 Unloading Programs but you want return back and select another one. dinamica generale® suggests to set all the Unloading Programs that will be used by inserting the name. Now, it is possible set the unloading points.
- Page 89 INDICATOR DG500 RevA7 Repeat the operation for all the 18 Unloading Points but without select the same value (in this case the message Warning appears). The maximum limit that can be set for each Unloading Point is 15000 kg/lb. The total amount for each program cannot exceed the value of the password 99, which has a limit of 999999.
- Page 90 INDICATOR DG500 RevA7 Confirm the end of the programming with the ENTER key. The indicator will return to EDIT U. PROGRAMS. It is always possible to exit from the programming of the Unloading Point and return to PROGRAM UNLOAD by pressing the RESET key;...
-
Page 91: Executions Menu
INDICATOR DG500 RevA7 EXECUTIONS MENU HOW TO CARRY OUT THE EXECUTION OF THE RECIPES Enter in the EXECUTIONS MENU and select RECIPE with the ENTER key in order to execute the recipe programmed. It is possible enter in this menu also by... - Page 92 INDICATOR DG500 RevA7 On the basis of the programming by cows or by totals it is possible distinguish: a) If the program is set by COWS, it is possible to modify the number with the PLUS and MINUS keys. When the modified number of cows is confirmed, the indicator recalculates the weight and checks that the total amount programmed does not exceed the value set in parameters menu, which has the limit of 999999 kg/lb.
- Page 93 INDICATOR DG500 RevA7 When the new value is confirmed, the indicator checks that the total amount programmed does not exceed the value set in parameters menu. If the total amount programmed exceeds the value set in the password 99, after the error message (HHH), the indicator proposes the max value that will coincide with the value of password 99.
- Page 94 INDICATOR DG500 RevA7 Repeat for all the components until the message TOTAL LOADED appears. Confirm with the ENTER key, the Executing Timer will start. It will go on for the time that you have set in editing phase of that recipe.
-
Page 95: How To Carry Out The Execution Of The Unloading Program
INDICATOR DG500 RevA7 HOW TO CARRY OUT THE EXECUTION OF THE UNLOADING PROGRAM Enter in the EXECUTIONS MENU and select UNLOADING PROGRAM with the ENTER key in order to execute the Unloading Program programmed. It is possible enter in this menu also by... - Page 96 In the moment that this operation resumes the indicator recalls the weight that was present at the time of the block. dinamica generale® suggests to always use this function when the mixer is moving.
- Page 97 INDICATOR DG500 RevA7 MANUAL MANAGEMENT OF THE RECIPE/UNLOADING PROGRAMS WITH THE ENTER KEY It is also possible to pass from one execution to the other by pressing the key; in this case the actual unloaded value will be memorized that can be the total of the amount programmed or only a part.
- Page 98 INDICATOR DG500 RevA7 HOW TO RETRIEVE THE EXECUTION FOLLOWING THE TURNING OFF OF THE INDICATOR If during an execution the indicator is turned off for power reasons or in any other case the load can be retrieved. Once the indicator is turned on the message RESTORE LOAD/UNLOAD? will be visualized on the lower display.
-
Page 99: Settings Menu
INDICATOR DG500 RevA7 SETTINGS MENU PARAMETERS SUBMENU All the parameters that you setting in this menu are the same described on the PASSWORD 19 SEQUENCE OF THE SETTINGS = SETTINGS MENU. CONTRAST SUBMENU From the SETTINGS MENU: a) Select the CONTRAST submenu and confirm with the ENTER key;... -
Page 100: Accumulation Menu
INDICATOR DG500 RevA7 ACCUMULATION MENU From the MAIN MENU, enter in the ACCUMULATION MENU with the ENTER key in order to manage the accumulations. COMPONENT ACCUMULATION It allows to visualize the list of each components with the relative weight. CLEAR COMPONENT... -
Page 101: Service Menu
INDICATOR DG500 RevA7 SERVICE MENU From the MAIN MENU, enter in the SERVICE MENU with the ENTER key in order to check the status of system. DIAGNOSTIC SUBMENU It allows checking all the functioning hardware of the indicator (display, combo, keyboard, date &... -
Page 102: Symbols
INDICATOR DG500 RevA7 SYMBOLS CONVENZIONAL SYMBOLS This manual adopts some conventional symbols in order to guide the user through important instructions and warnings regarding especially the programming of the system’s parameters and therefore it’s correct functioning. Please pay attention to the following graphical messages: Indicates explanatory and added information. -
Page 103: Optional Accessories
In order to advance of the paper by hand, press the Feed key on the printer panel. WiNET™ MODEM Compatible modem with all dinamica generale accessories and indicators, that is able to manage a wireless network between several devices without any interference issues. -
Page 104: Xl Display
Red, Green and Yellow "diodes LED" display. Metal watertight case protected against radio frequency noises. Simple and direct connection to all microcomputers dinamica generale with the WiNET™ interface. Connection to the indicator by wire. Number of display is unlimited and can be chosen based on specific customer request. -
Page 105: Dtm
Remote control in order to command the indicator all the way up to 25 meters (82 feet). With the WiNET Modem interface, the remote control can be used with all dinamica generale wireless accessories without any interference: all devices talk together in the same network. -
Page 106: Can Bus Connector
CAN BUS Connector The J1939 protocol available on the CAN BUS output is deeply described in a specific document, not part of this manual. Please contact the Dinamica Generale Customer Service or R&D office for more information. Cable color Signal... -
Page 107: Searching For Faults
Service INDICATOR DG500 RevA7 SEARCHING FOR FAULTS MOTION ALARM DISPLAY CAUSE SOLUTION Cause1 Solution1: The signal that comes from the sensors Do the TARE. presents sudden and important weight changes. DG500 Solution2: Carry out the calibration with Cause2 password 12 and then do the TARE. - Page 108 Service INDICATOR DG500 RevA7 OVERRANGE ALARM DISPLAY CAUSE SOLUTION Cause1 Solution1: The microcomputer is not able to read the signal from the load cells: the Do the TARE. connection cable is not working correctly. DG500 Solution2: Cause2 Carry out the calibration with A cable or a load cell is not working password 12 and then do the TARE.
-
Page 109: Check The Damaged Components
Service INDICATOR DG500 RevA7 CHECK THE DAMAGED COMPONENTS DEFINE THE TESTING PROCEDURE: DO YOU HAVE A DG WEIGHT SIMULATOR 979-0007? DO YOU HAVE A SYSTEM WITH A JUNCTION BOX? CARRY OUT CARRY OUT PROCEDURE 4 PROCEDURE 3 CARRY OUT DO YOU HAVE A... - Page 110 Service INDICATOR DG500 RevA7 PROCEDURE 1 Ref. YES/YES Check that the scale is working correctly a) Turn off the indicator. b) Disconnect the sensor cables that are found from the indicator to the junction box. c) Connect the WEIGHT SIMULATOR (979-0007), with the switch on the “Var” (variable) position, to the SENSOR connector of the indicator.
- Page 111 Service INDICATOR DG500 RevA7 RESULT CAUSE ACTION Zero is stable and is working Sensor cable and junction box Proceed with the following tests correctly are NOT damaged Try to dry out the junction box Functioning is not correct only The junction box is damaged or...
- Page 112 Service INDICATOR DG500 RevA7 PROCEDURE 2 Ref. YES/NO Check the functioning of the indicator a) Turn off the indicator. b) Disconnect all of the sensors. c) Connect the WEIGHT SIMULATOR with the switch on the “Var” (variable) position and one of the sensor connectors of the indicator.
- Page 113 Service INDICATOR DG500 RevA7 PROCEDURE 3 Ref. NO / YES Check the functioning of the SYSTEM and of the SENSORS a) Turn off the indicator. b) Open the JUNCTION BOX. c) Leave connected only one sensor and the cable that goes to the indicator (SENSOR CABLE).
-
Page 114: Error Codes
Service INDICATOR DG500 RevA7 PROCEDURE 4 Ref. NO / NO Verify the functioning of the SYSTEM and of the SENSORS a) Turn off the indicator. b) Leave connected only one sensor to the indicator. c) Turn on the indicator. d) Do the TARE (for the execution see the indicator user’s manual). - Page 115 Service INDICATOR DG500 RevA7 The data re garding the executio n of the loading recipe has NOT been save d neither o n Error 7 the Data Tra nsfer nor o n the internal memory. The re is no way to recu perate the data regarding this execution.
-
Page 116: Declaration Of Conformity
Rules INDICATOR DG500 RevA7 DICHIARAZIONE DI CONFORMITA’ ‐ DECLARATION OF CONFORMITY KONFORMITÄTSERKLÄRUNG ‐ DÉCLARATION DE CONFORMITÉ ‐ DECLARACION DE CONFORMIDAD ‐ ДЕКЛАРАЦИЯ О СООТВЕТСТВИИ Nr 28/16 IT Il sottoscritto, designato a legale rappresentante della Dinamica Generale s.p.a. , via Mondadori 15, Poggio Rusco (MN) ‐ Italy, dichiara che i prodotti sottoelencati: EN The undersigned, an authorised officer of Dinamica Generale s.p.a. , via Mondadori 15, Poggio Rusco (MN) ‐ Italy, hereby declares that the products listed hereunder: D Der Unterzeichner, rechtlicher Vertreter der Dinamica Generale s.p.a. , via Mondadori 15, Poggio Rusco (MN) – Italy, erklärt, daß die nachstehend beschriebenen Produkte: FR Je soussigné, représentant légal désigné de Dinamica Generale s.p.a. , via Mondadori 15, Poggio Rusco (MN) ‐ Italy, déclare que les produits énumérés ci‐après: ES El suscrito, nombrado representante legal de la Dinamica Generale s.p.a. , via Mondadori 15, Poggio Rusco (MN) ‐ Italy, declara que los productos indicatos a continuación: RU Нижеподписавшийся, являющийся законным представителем компании Dinamica Generale s.p.a., расположенной по адресу via Mondadori 15, Poggio Rusco (MN) – Italy, заявляет, что продукция ниже DG500 IT Sono conformi a quanto prescritto dalle seguenti direttive: 2014/30/EU EN Are in compliance with the following directives: D Mit den Vorschriften konform sind, die in den folgenden Richtlinien: ... -
Page 117: Warnings
Rules INDICATOR DG500 RevA7 WARNINGS The power cable has to be connected directly to the battery or to a regulated power source. If this is not the case DG does not respond to any eventual damage to the microcomputer. Disconnect the power cable from the microcomputer when the battery of the machine is being charged. -
Page 118: Guarantee
NOTE: dinamica generale® has the faculty to modify the content of this user’s manual due to hardware and software implementations in order to improve the products and therefore guarantee the best service to their users. - Page 119 This user’s manual intends to take you through the different performances of the weighing system in the easiest way possible and to show you some new functions as well. dinamica generale® did not forget to provide you with even the most basic information: the configuration, the use of different accessories at your disposal, the service of “searching for faults”...
- Page 120 ISO 14001:2004 ISO 13485:2012...
- Page 121 Cod. 985-0093 Rev. A7...
Need help?
Do you have a question about the DG500 and is the answer not in the manual?
Questions and answers
fonte de alimentação da DG500
The power supply for the Dinamica Generale DG500 requires a minimum of 9 Volts and 0.5 Amps.
This answer is automatically generated