Table of Contents
Advertisement
Advertisement
Table of Contents

Related Manuals for Dinamica Generale AgriNIR W


Summary of Contents for Dinamica Generale AgriNIR W
-
Page 3: Introduction
General Information AgriNIR™ Analyzer Rev. A11 INTRODUCTION Some images included in this manual may differ from the real ones due a recent product updates. The methods of use described are equally correct. AgriNIR™ by is a portable optical analyzer for fresh forages based on NIR technology in order to measure humidity (dry matter), crude protein, starch, ash, ADF and NDF of the analyzed materials. -
Page 4: Licence Agreement
Please carefully read the following terms and conditions before using or reselling the Purchased Product. 1. Limited License . Dinamica generale, an Italian company (“Owner”) is the owner of the following Patents related to NIR solutions EP 2 377 392 / US 8 651 730 (“Patents”). - Page 5 General Information AgriNIR™ Analyzer Rev. A11 PRODUCT. Customer agrees that Owner shall have no liability resulting from Customer’s use of the Purchased Product for any indirect damages including consequential, incidental or special damages for loss of profit, good will or otherwise. Customer shall indemnify and hold Owner harmless from any and all losses, expenses, damages, costs or expenses of any kind, including but not limited to reasonable attorneys’...
-
Page 6: Before Using
General Information AgriNIR™ Analyzer Rev. A11 BEFORE USING For a correct functioning of the device, it will be necessary to put the AgriNIR™ on a horizontal surface allowing the user to move easily the fodder box containing the sample to analyze. The AgriNIR™... -
Page 7: Notes For The User
General Information AgriNIR™ Analyzer Rev. A11 NOTES FOR THE USER After switching ON the AgriNIR™, recommends strongly to wait 15 minutes at least before executing the analysis. That will allow the optimization of the exercise temperature of the optoelectronic device. For a correct functioning of the optoelectronic device contained in the AgriNIR™, it’s better to monitor the temperature of the place where it is used. -
Page 8: Table Of Contents
Analysis printing on tickets ....................40 6.11 Analysis saving on USB pen drive ................... 42 6.12 Analysis History – available only for AgriNIR W .............. 44 6.13 Other Settings of AgriNIR™ System ................46 6.14 Calibration Updating of AgriNIR™ System ..............47 6.14.1 Update Calibrations for AgriNIR W .................. -
Page 9: Technical Data & Configuration
AgriNIR™ configurations Code Machine Features 999-0228 AgriNIR Analyzer standard machine 999-0565 AgriNIR W Analyzer Worldwide version 999-0347 AgriNIR Analyzer with GSM/GPRS with GSM/GPRS Quad-Band internal modem Accuracy [ see the tables at next page ] [Note 2. at next page] Working Temperature 0°... - Page 10 General Information AgriNIR™ Analyzer Rev. A11 NOTES. If AgriNIR™ machine has Hardware revision B3 or previous (the HW rev. is showed on yellow label together machine S/N), the maximum working temperature recommended is 35°C. For Hardware revision B4 or newer the maximum working temperature is 40°C. Please DO NOT exceed the limits of temperature, according to NOTES FOR THE USER points N°...
-
Page 11: Accessories Supplied
General Information AgriNIR™ Analyzer Rev. A11 ACCESSORIES SUPPLIED Accessory Description FODDER BOX Tray with glass for fodder samples and its pressure plate. Also it presents special housing for Check-Cell. PRESSOR The pressor with sponge is used for grains or dry and chopped matter. The pressor without sponge is used for forages of wet and voluminous type. - Page 12 General Information AgriNIR™ Analyzer Rev. A11 CHECK CELL Special sample cell acetyl resin for the optics testing of the machine. POWER SUPPLY AC input : 100-240V~2A, 50-60Hz DC output : 12V, max 8A AC power cable with SCHUKO plug IEC320 connector. Power cable for car lighter plug USB memory pen-drive...
-
Page 13: Electric Connections
Configuration AgriNIR™ Analyzer Rev. A11 ELECTRIC CONNECTIONS Supplying AgriNIR™ with the provided power supply Power Supply IN : 100-240VAC – 2A OUT : 12VDC – max 8A Power Connector AgriNIR™ Analyzer... -
Page 14: Supplying Agrinir™ With The Power Cable For Car Lighter Plug
Configuration AgriNIR™ Analyzer Rev. A11 Supplying AgriNIR™ with the power cable for car lighter plug Power cable for car lighter plug Power Connector AgriNIR™ Analyzer... -
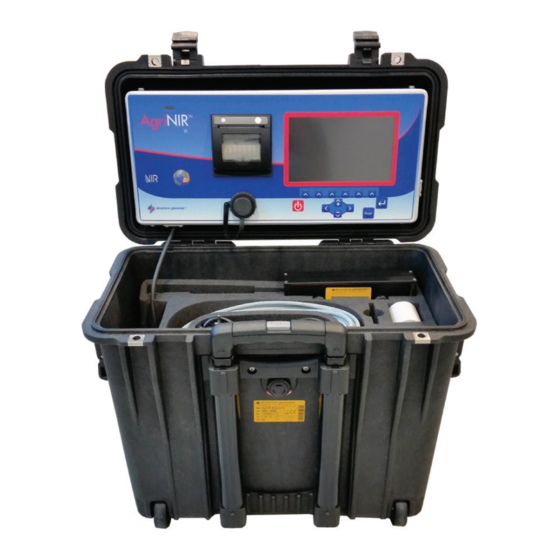
Page 15: Description Of The Portable Analyzer Agrinir
Configuration AgriNIR™ Analyzer Rev. A11 Description of the portable Analyzer AgriNIR™ In the following pictures it is explained how the system AgriNIR™ is composed: ELECTRONIC UNIT GSM/GPRS ON / OFF Screen and keypad modem led PROG / DATA connector for available only for USB plug Printer... - Page 16 Configuration AgriNIR™ Analyzer Rev. A11 The portable Analyzer AgriNIR™ is composed by: FODDER BOX → sampling box with screwed handles on presser, for the collection of the forage samples that has to be analyzed with AgriNIR™. NIR OPTICAL UNIT → optical unit for acquisition of light produced by the sample to be analyzed. This unit consists of: •...
- Page 17 Configuration AgriNIR™ Analyzer Rev. A11 For the setting of the feed components to analyze and the storage of the performed analysis on PC it is used the management program DGNirManager produced by This software product on PC allows the user to: •...
-
Page 18: Use Of The Portable Agrinir™ Analysis System
AgriNIR™ Analyzer Rev. A11 Use of the Portable AgriNIR™ Analysis System NIR Parameters and NIR Families In case of standard calibrations package, the portable analysis system AgriNIR™ can analyze till to a max of chemical parameters for a max of feed components categories of most common use in cattle breeding. - Page 19 AgriNIR™ Analyzer Rev. A11 • For every NIR family it is necessary to set the suitable Theoretical Reference Values for each NIR chemical parameter that can be analyzed (see table above). These reference values are normally the result of laboratory chemical analysis performed on different samples of the NIR family and allow to the AgriNIR™...
-
Page 20: Correct Use Of The Fodder Box For The Samples To Analyze
AgriNIR™ Analyzer Rev. A11 Correct Use of the Fodder Box for the Samples to Analyze Before going on with the real use of the Portable AgriNIR™ Analysis System, it is important to understand the correct use of the fodder box containing the sample to analyze. This fodder box (provided with the AgriNIR™) is composed by : •... - Page 21 AgriNIR™ Analyzer Rev. A11 • after the insertion of the metallic frame in the fodder for pressing the sample, it is necessary to check that its upper handles do not exceed the fodder profile: Upper handles are inside the fodder profile. Upper handles are over the fodder profile,...
- Page 22 AgriNIR™ Analyzer Rev. A11 Just started the analysis (after press <ENTER>), it is required to perform the following actions : • fodder has to be moved front and rear with a uniform speed spending about 2 seconds for a complete scanning cycle: 1 sec to front and 1 sec to rear; •...
-
Page 23: Turning On The Agrinir™ System
During this initialization the device loads all the settings requested from the customer and previously set. After, ONLY FOR AgriNIR W, a screenshot with an initialization time of 5 minutes appears. After all initialization phases, the system automatically proposes following screen, where it is possible to set the : ... - Page 24 PREVIOUS PAGE, to return to the previous set of function icons For example, if you press in the main screen you can access to the next 4 function icon : if you press you can return to the 6 previous function icon : ONLY FOR AgriNIR W:...
-
Page 25: States & Messaging Of Nir Analyzer Internal System
By the way, to help the user the AgriNIR™ system shows on the right top of the screen an icon referring to the contemporary state of the NIR system: AgriNIR AgriNIR W Description of the icon WARM-UP the internal NIR system is executing the initial warm-up phase to reach the target temperature of 32°C and to warm-up of the internal lamp. - Page 26 AgriNIR™ Analyzer Rev. A11 WARM-UP phase If you start the analysis execution during the , the AgriNIR™ system shows the following message: The status icon of the NIR system indicates WARM-UP phase. At the end of the calibration this message disappears AgriNIR™...
-
Page 27: Error Messaging Of Nir Analyzer Internal System
AgriNIR™ Analyzer Rev. A11 Error Messaging of NIR analyzer internal system After turning on the AgriNIR™, set the Customer Code to continue in the main screen, if appears (before start the WARM-UP phase) : Error State NIR system is in It’s NOT possible to detect the temperature of the internal NIR sensor... - Page 28 AgriNIR™ Analyzer Rev. A11 TROUBLESHOOTING Please check if the communication cable from Electronic Unit (front control panel) is connected to the NIR group inside the bottom box. Please check if the communication cable from Electronic Unit to NIR group is not damaged.
-
Page 29: Initial Optical Checking Of The Agrinir™ System
AgriNIR™ Analyzer Rev. A11 Initial Optical Checking of the AgriNIR™ system BEFORE Every day start using the AgriNIR™ analyzer, OPTICS TEST CHECK-CELL accessory recommend to execute the using the CHECK CELL special sample cell acetyl resin for the optics testing of the AgriNIR™ machine. OPTICAL TEST PROCEDURE Follow the procedure below to perform the Insert the CHECK-CELL in the dedicated seat on the upper edges of the fodder box, making sure the... - Page 30 AgriNIR™ Analyzer Rev. A11 CHECK-CELL with its glass-face side up Insert completely the fodder box and the , inside the AgriNIR™ box until the bottom : In the main screen, press to access to the next 4 function icon, then press to enter AGRINIR OPTICS TEST procedure :...
- Page 31 AgriNIR™ Analyzer Rev. A11 Press <ENTER> to start the automatic testing procedure : WARNING! DO NOT move the fodder box with the CHECK-CELL inside during testing execution. If you move the fodder box, the CHECK-CELL cannot be in front of the internal optical reading window (ReadNIR window, where is the lamp light);...
- Page 32 AgriNIR™ Analyzer Rev. A11 TROUBLESHOOTING Verify if the CHECK-CELL is properly inserted inside the fodder box. Please see the pictures at page 23 point 1. Verify if the fodder box with CHECK-CELL is properly inserted inside the AgriNIR™ analyzer box. Please see the pictures at page 24 point 2. Verify the cleaning of the CHECK-CELL glass or the ReadNIR glass inside the NIR group on the bottom side.
-
Page 33: Analysis Samples Identifying
AgriNIR™ Analyzer Rev. A11 Analysis Samples Identifying Before starting the analysis on the forage sample, it’s possible to set the following identifiers. If you press F-key it’s possible to set : SAMPLE ID , it allows to mark the parti-cular physical sample to analyze. - Page 34 AgriNIR™ Analyzer Rev. A11 If you press F-key it’s possible to set : CLIENT INFORMATION , it allows to give more details about the client who the physical sample belongs. COMPANY Only the name will be printed on the tickets at the end of analysis execution. CLIENT INFORMATIONs INFO.DAT file All the...
- Page 35 AgriNIR™ Analyzer Rev. A11 press to select capital letters / small letters, numbers, symbols; press to insert a character at the cursor position; press to delete a character at the cursor position; press to delete all characters from the cursor position to the end on the right; ...
-
Page 36: Analysis Execution With Agrinir™ System
AgriNIR™ Analyzer Rev. A11 Analysis Execution with AgriNIR™ System After turned ON the AgriNIR™ system and performed following phases : • WARM-UP (at least 15 minutes) and CALIBRATION please see at page 19 for more details; • please see at page 23 for more details; optics test with CHECK-CELL •... - Page 37 AgriNIR™ Analyzer Rev. A11 Examples : • Sample of HAY OF STEADY LAWN : sample must be taken by the Corer (or shredded), then put it in the fodder box; select the component (or NIR family) N° 2 HAY to execute the analysis. •...
- Page 38 AgriNIR™ Analyzer Rev. A11 The AgriNIR™ analyzer allows two analysis execution modes to satisfy following cases : INSTRUCTIONS FOR PROPER SELECTION OF ANALYSIS MODE Case of SAMPLES HOMOGENEOUS and LOW QUANTITY Examples : High Moisture Corn, Soybean Flour 1. If the sample is already grinded not more than 2/3 mm, it's possible to put directly the sample inside the fodder box.
- Page 39 AgriNIR™ Analyzer Rev. A11 MULTIPLE ANALYSIS In case of execution mode (<ENTER> the AgriNIR™ system requests the number of analysis to perform on the component in the fodder box : MAXIMUM 20 ANALYSIS WARNING! Please start IMMEDIATELY to move the fodder box as soon as you press <ENTER>...
- Page 40 AgriNIR™ Analyzer Rev. A11 At the end of the analysis executions (single or multiple) the AgriNIR™ system shows the results : MOISTURE (Humidity) value of the sample. DRY MATTER value of the sample : calculated as 100% - Moisture. Chemical Parameters on DM the chemical values expressed on the dry matter : calculated as Param...
-
Page 41: Case Of Incorrect Analysis
AgriNIR™ Analyzer Rev. A11 Case of incorrect analysis In case of analysis (single or repeated) that are NOT correct, the AgriNIR™ system shows the following error message : If you press <ENTER> the AgriNIR™ system proposes again to execute the analysis on the same component just selected. -
Page 42: Analysis Printing On Tickets
AgriNIR™ Analyzer Rev. A11 6.10 Analysis printing on tickets At the end of analysis execution, when the AgriNIR™ system shows the results table : PRINT ON A TICKET If you press the F-key you can the analysis results. PRINTOUT NUMBER If you press the F-key you can set the i.e. - Page 43 AgriNIR™ Analyzer Rev. A11 The printout of the ticket after the analysis performed on a sample is : Printer Header [ see at page 48 how to set ] Customer Code and Company Name who the particular sample belongs Identifier Number of the Analyzed Physical Sample NIR Family Identifier Number Kind of Analyzed Component (NIR Family Name) Analysis Results of Chemical Parameters...
-
Page 44: Analysis Saving On Usb Pen Drive
AgriNIR™ Analyzer Rev. A11 6.11 Analysis saving on USB pen drive At the end of analysis execution, when the AgriNIR™ system shows the results table, you can store the results on the USB memory key : Press F-key to SAVE THE DATA ON USB PEN DRIVE (on USB memory key). On USB memory key a file folder is created with naming convention <... - Page 45 AgriNIR™ Analyzer Rev. A11 the file INFO.DAT containing the Client’s Data set on AgriNIR™ by Client Information windows (see at page 30) : the file with naming convention < DATE&TIME > containing the analysis results (show on display at the end of analysis execution) : Sample ID NIR family...
-
Page 46: 6.12 Analysis History - Available Only For Agrinir W
Error message in Fig. 2 the USB Key (Pen Drive) has been disconnected from USB port or It’s necessary to erase a part of data stored on USB Key. 6.12 Analysis History – available only for AgriNIR W The AgriNIR™ W save automatically the last 100 analysis executed inside an archive. - Page 47 AgriNIR™ Analyzer Rev. A11 Press the key in order to copy the datas of analysis on the usb memory card. Press the key in order to delete the archive relative to the analysis.
-
Page 48: Other Settings Of Agrinir™ System
AgriNIR™ Analyzer Rev. A11 6.13 Other Settings of AgriNIR™ System In the main two screens, the AgriNIR™ system allows other simple setting commands : buttons to go to the NEXT and PREVIOUS screen. B&W DISPLAY INVERSION with this command you can invert the display from white background to black background and vice versa. -
Page 49: Calibration Updating Of Agrinir™ System
AgriNIR™ Analyzer Rev. A11 6.14 Calibration Updating of AgriNIR™ System In the second main component selection screen, the AgriNIR™ system offers the following setting commands : CALIBRATION CURVES UPDATING With this command you can update the calibration curves of the NIR families (available on the main screen list) that can be analyzed by the AgriNIR™... -
Page 50: Update Calibrations For Agrinir W
AgriNIR™ Analyzer Rev. A11 6.14.1 Update Calibrations for AgriNIR W Switch ON the AgriNIR-W machine keeping pressed both the buttons until the BOOTLOADER screen appears. Press the F5 button to start loading the AgriNIR-W calibration upgrade. - Page 51 AgriNIR™ Analyzer Rev. A11 Press the F1 button to continue the AgriNIR-W calibration upgrade. Wait the calibration loading (few seconds) until the GREEN SCREEN will appear. Press the button to switch OFF the AgriNIR-W machine.
-
Page 52: Loading Of New Nir Data Structure (Nirdata.bin File)
For NIR Data Structure upgrading is necessary to reload the configuration file nirdata.bin (provided by dinamica generale or created by DGNirManager program). Please follow the steps below. 1. Copy nirdata.bin file into the USB key : please, don’t use any other existing folders! 2. - Page 53 AgriNIR™ Analyzer Rev. A11 4. DO NOT remove the USB memory key while the file is being loaded! 5. Verify the new NIR Families list just loaded on the AgriNIR™ machine. 6. Execute an analysis to check the new Chemical Parameters now available on the AgriNIR™ machine.
-
Page 54: Deleting Analysis On Internal Memory
AgriNIR™ Analyzer Rev. A11 6.16 Deleting Analysis on internal memory DELETING ANALYSIS DATA FROM INTERNAL MEMORY With this command you can permanently delete the data from the internal memory concerning the analysis performed (either valid or wrong) and relevant optical spectra acquired from the analyzed samples. -
Page 55: Deleting The Initial Message Of Full Memory
AgriNIR™ Analyzer Rev. A11 6.17 Deleting the initial message of FULL MEMORY After a certain number of analysis (approx. 60-70) performed with the AgriNIR™ system, the following message may appear when switching the system on : When switching the system on, this message is displayed to warn that the space of the internal memory for the Analysis Execution Log is reaching its full capacity. - Page 56 AgriNIR™ Analyzer Rev. A11 1334 Enter the password to access the deleting procedure of the Analysis Execution Log in the internal memory of the AgriNIR™ system. Press <ENTER> confirm deleting procedure of the Analysis Execution Log. After a few seconds you get the message informing that the deleting procedure of the Analysis Execution Log was successful! At the end you return to the main screen of SYSTEM CONFIGURATION :...
-
Page 57: Printer Header Settings
AgriNIR™ Analyzer Rev. A11 6.18 Printer Header Settings It is possible to set the Printer Header on tickets printed by the AgriNIR™ system, with your preferred data : Printer Header To set your Printer Header on the tickets, follow this procedure : When switching the system on, when the message “System Initialization”... - Page 58 AgriNIR™ Analyzer Rev. A11 press buttons to select data to modify; press to recall the default printer header (“Dinamica Generale …”). press <ENTER> to edit the new data value press buttons to insert a character; ...
-
Page 59: Cleaning The Device
Service AgriNIR™ Analyzer Rev. A11 CLEANING THE DEVICE It is important to clean thoroughly and periodically the AgriNIR™ system, especially the lower metal body where the sample fodder box and the Read NIR module are positioned. To clean the system correctly going on as follows: •... -
Page 60: Device Servicing
Service AgriNIR™ Analyzer Rev. A11 DEVICE SERVICING Verification and Servicing of the Optical Group a) Remove the NIR Group from the metal support in the bottom of the case. To do this : • open the NIR Group (as indicated in section 6 pict. 6A and 6B); •... -
Page 61: Replacement Of The Printer's Paper
Service AgriNIR™ Analyzer Rev. A11 e) Verify the state of the linear actuator: if during the checks listed in step C the linear actuator has not moved the calibration door, check the actuator’s connection to the Read NIR’s electronic board (open the door on the side of the head unscrewing the 4 M4 self-locking nuts and check the 4-wired- connector). -
Page 62: Responsibilities
Rules AgriNIR™ Analyzer Rev. A11 RESPONSIBILITIES The AgriNIR™ system is an analysis device that needs moving material in front of the optical reading head Read NIR, to have a good scan of the sample in the fodder box and obtain therefore a prediction in line with the expectations. We remind that the AgriNIR™... -
Page 63: 10 Ce Conformity Declaration
EN 61000-4-4 (96) – A1 (01) – A2 (01) EN 61000-4-5 – (1997) EN 61000-4-6 (97) – A1 (01) EN 61000-4-8 (97) – A1 (01) POGGIO RUSCO, 28/08/2006 This document is an exclusive property of Dinamica Generale spa Even partial re production is forbidden. -
Page 64: 11 Warranty
Rules AgriNIR™ Analyzer Rev. A11 11 WARRANTY The supplier guarantees, for 24 months from the delivery date, the good quality of materials used, the excellent construction and the steady functioning of the instrument they have manufactured and that bears the trademark or the production serial number. During the warranty period the supplier undertakes to repair or replace, free supplier’s head office, faulty parts due to poor materials or faulty construction, provided that such parts are delivered free port supplier’s head office. - Page 65 Now there is nothing left for us to do but wish you a work well done! The team of dinamica generale®...
- Page 67 ISO 14001:2004 ISO 13485:2012...
- Page 68 Cod. 985-0039 Rev. A11...
Need help?
Do you have a question about the AgriNIR W and is the answer not in the manual?
Questions and answers