Table of Contents
Advertisement
Quick Links
Advertisement
Table of Contents

Related Manuals for PS Audio Stellar


Summary of Contents for PS Audio Stellar
- Page 1 Owner’s Reference Stellar Phono Preamplifier ™ ®...
-
Page 2: Table Of Contents
Table of Contents Stellar Phono Preamplifier ® Safety Information Introduction Thank You Contact Information A Message From The Design Engineer Getting Started Symbols Found on the Phono Included With The Phono The Remote Front Panel View Rear Panel View Installation Considerations... -
Page 3: Safety Information
® Do not remove or bypass the ground pin on the end of the AC cord. All PS Audio products ship with a grounding-type plug. If the provided plug does not fit into your outlet, consult an electrician for replacement of the obsolete outlet. -
Page 4: Introduction
Preamplifier’s functions and capabilities. It is our intention to provide you with full details about the Stellar Phono Preamplifier and to answer any and all questions you may have. If you have additional questions or concerns that are not addressed in this guide, please contact us and we will be happy to assist you. -
Page 5: Getting Started
Getting Started Stellar Phono Preamplifier ® Symbols Found Indicates compliance with European Union Legislation for relevant safety (Low Voltage Directive 2006/95/EC) and EMC (EMC Directive 2004/108/EC) On The Stellar requirements. Phono Is intended to tell the user that parts inside the product are a risk of electric shock to persons. -
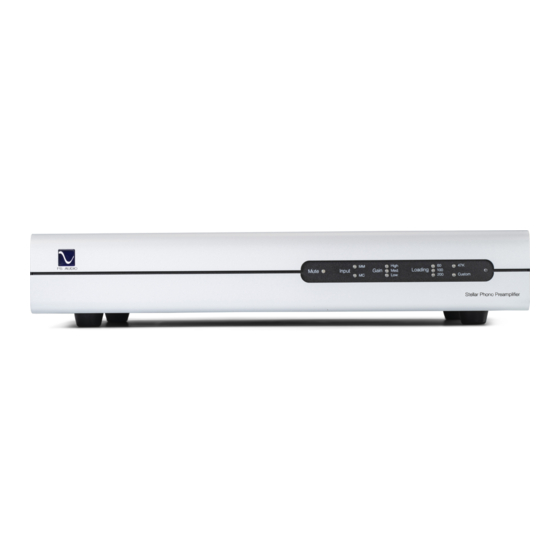
Page 6: Front Panel View
Getting Started Stellar Phono Preamplifier ® Front Panel View PS Audio Logo LED Button Mute LED Indicator Input LED Indicators Gain LED Indicators Loading LED Indicators Infrared Remote Sensor... -
Page 7: Rear Panel View
Getting Started Stellar Phono Preamplifier ® Rear Panel View Master Power Switch Balanced Left Output IEC AC Power Inlet Moving Magnet Right Input Fuse Socket Moving Magnet Left Input 5 Volt -12 Volt Trigger Input Ground Binding Post 5 Volt - 12 Volt Trigger Output... -
Page 8: Installation Considerations
Mounting The Stellar Phono Preamplifier should be placed with consideration of providing air circulation to the unit. If you wish to install the Stellar Phono into your component rack, the purchase of an aftermarket, custom-designed shelf may be necessary. If your equipment is located a long distance from the Stellar Phono, it is preferable to use a long, heavy gauge shielded power cable between the AC receptacle in the wall and the Stellar Phono, rather than long individual cables between the connected components. -
Page 9: Plugging In Your Equipment
Once the unit is connected to power, flip the master power switch on the rear panel to Your Stellar Phono the on position. The PS Audio Logo LED button on the front panel will glow blue when the unit is powered on and ready for use. -
Page 10: Operation Guide
Stellar Phono Preamplifier ® Front Panel Mute - When the Mute LED is illuminated red, the Stellar Phono Preamplifier is muted. LEDs You can activate/deactivate mute by using the remote control or holding in the front panel PS Audio logo LED button for 3 seconds. -
Page 11: Front Panel Leds
100pF loading, but you may try different cables if you wish to change the capacitive loading of the Stellar Phono. It’s always best to talk to the manufacturer of your cartridge to see what they recommend. -
Page 12: Moving Magnet
This is a good starting position, but we encourage trying different loadings to see what sounds best. The phono cartridge cannot be damaged by loading it incorrectly. CAUTION: Mute your Stellar Phono Preamplifier before changing the custom loading setting using the rear panel potentiometers. -
Page 13: Troubleshooting
If you can hear a hum or buzzing noise coming from your speakers and it goes away from Speakers when muting your Stellar Phono, verify that you have selected the proper gain setting for your cartridge. High noise could be a sign of the gain being set too high. Also, make sure that the grounding wire from your turntable (if it has one) is connected to the binding post on the rear panel of the Stellar Phono. -
Page 14: Specifications
Specifications Stellar Phono Preamplifier ®... - Page 15 Specifications Stellar Phono Preamplifier ®...
-
Page 16: Warranty
3 years from the date the unit was first purchased from PS Audio or its dealers and agents. If you do not register your product within 30 days of service, a copy of your purchase receipt from an authorized PS Audio dealer may be used as proof of purchase to establish the warranty start date. -
Page 17: Limitations Under This Warranty
Stellar Phono Preamplifier ® Limitations Under In no event will PS Audio’s liability to you exceed the origianl purchase price of your unit. This Warranty This warranty does not cover the cost of custom installation, customer instruction, setup adjustments, or signal reception problems. Consequential and incidental damages are not covered under this warranty. -
Page 18: Service Information
Authorization Number (RMA#) prior to returning any item. Please contact PS Audio or an authorized PS Audio repair center to receive an RMA#. The RMA# must be on all returned items. If it is not clearly marked, PS Audio will return the package back to you, freight collect. -
Page 19: Your Product
Your Product Stellar Phono Preamplifier ® Your Serial Your Purchase Date of Purchase...
Need help?
Do you have a question about the Stellar and is the answer not in the manual?
Questions and answers