Table of Contents
Advertisement
Advertisement
Table of Contents

Related Manuals for ASPERA F40


Summary of Contents for ASPERA F40
-
Page 2: Table Of Contents
Contents General Information..................................... 4 Getting to know your Aspera F40................................7 What’s in the Box......................................9 Getting Started......................................10 Removing back of the phone................................10 Inserting SIM card....................................10 Inserting SD card....................................11 Inserting Battery....................................11 Basic Operations......................................11 Powering the device....................................11 Charging the device.................................... 11 PIN/SIM/PUK Codes.................................. - Page 3 Importing/Exporting Contacts................................16 Adding Contacts....................................17 Editing Contacts....................................17 Removing Contacts.................................... 18 Messages........................................18 Writing Messages....................................18 Reading Messages....................................19 Deleting Messages....................................20 Call Logs/History....................................... 20 Missed Calls/Dialled Calls/Answered Calls............................21 Clearing All Call Logs/History................................21 Applications and Tools....................................21 Alarm........................................21 Calendar......................................22 Camera........................................23 Viewing Pictures and Videos................................24 Music Player.......................................
- Page 4 Mobile Data......................................28 Sound and Audio....................................28 Hotspot and Tethering..................................30 Bluetooth......................................31 Display........................................31 Security.......................................32 Basic Troubleshooting....................................33...
-
Page 5: General Information
Profile Please read this manual carefully to help you make the most of your phone. Aspera Mobile may change features of this mobile phone without prior written notice and reserves the final right to interpret the performance of this mobile phone. - Page 6 The Aspera F40 box will come with an Aspera charger and battery. The recommended charging time for the Aspera F40 is three to four hours when the battery is low or depleted. We recommend to not leave it charging overnight, as this may damage or deteriorate the battery over time.
- Page 7 Headset earphones The Aspera F40 box will include a pair of earphones. Ensure that the earphones are plugged into the jack correctly to ensure clarity in the audio, and that the audio jack is clear of any obstructions or material.
-
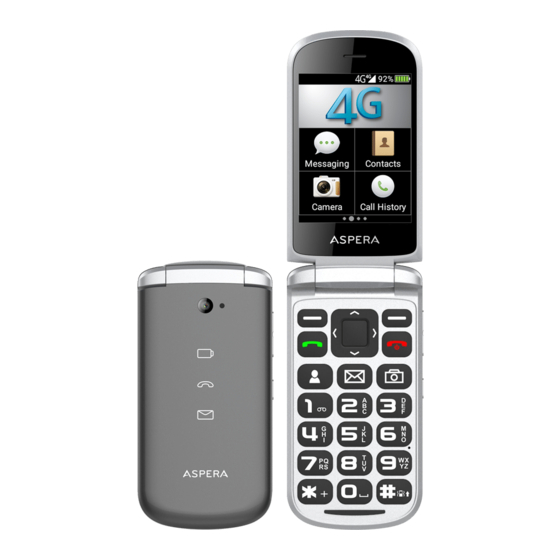
Page 8: Getting To Know Your Aspera F40
Do not throw, knock or shock the mobile phone, as that may cause damage to the internal circuits and high-precision components of the mobile phone. Getting to know your Aspera F40 1. In ear speaker 2. Screen 3. Green “Answer” key/button 4. - Page 9 1. 3.5mm audio jack 2. Micro-USB charging port 3. Camera 4. Flashlight 5. Charging Indicator 6. Phone Indicator 7. Message Indicator 1. External Speaker 2. SOS button 3. Volume Up Key 4. Volume Down Key 5. Flashlight/Torch Key...
-
Page 10: What's In The Box
The Aspera F40 comes with the handset, battery, earphones, USB cable, wall plug, user guide, and warranty information. Earphones – Our Aspera F40 has a standard 3.5mm head jack, allowing for audio functions including music, videos and calls. The earphones also have a built-in microphone, and can be used for calls USB cable –... -
Page 11: Getting Started
Apply firm but gentle pressure to remove the cover. Inserting SIM card The Aspera F40 takes a nano-SIM, please see the diagram below for sizing information. Unlock the SIM holder by sliding it to the right. Lift it and leave it to the right. -
Page 12: Inserting Sd Card
Powering the device Hold the red hang-up/power button for five seconds. Once the screen lights up with the Aspera logo, let go of the button. The phone may take some time to initialise. This is normal and you may need to wait for a while. -
Page 13: Keypad Functionality
SIM card and may have been transferred from a previous device. If you enter the incorrect PIN code three times, it will lock the SIM and ask for a PUK code. This PUK code can be retrieved from your telecom provider. Instructions to enable the PIN code can be found in the “Security”... -
Page 14: Screens And Menus
Screens and Menus When opening the phone, the Landing screen of the Aspera F40 is the menu. There are multiple pages of the menu, each filled with various applications for different utility and design. You can use the arrow keys on the device to navigate between these different menu screens and applications. -
Page 15: Quick Settings And Notifications
Quick Settings and Notifications You can quickly access common settings such as Wi-Fi, Bluetooth, Flashlight, and Mobile Data by holding down the top left-hand context key for three seconds. You can also see your notifications and access these from this screen. -
Page 16: Receiving A Call
Use the arrow keys to hover over the contact you wish to dial Press the green “Dial” button To disconnect from a call, you can either close the lid or press the red “Hang-up” button. Receiving a call If the phone lid is closed: Open the phone normally. -
Page 17: Call Volume
You will see three different volumes for Media, Alarms and Ringtones. Use the down arrow to highlight and select “Ringtones”. You can then use the left and right keypad to adjust the volume. When moving the slider to the left, this ... -
Page 18: Adding Contacts
by the green button on the right side of the name. Press the top left-hand key, which is labelled as “Next”. On this next screen, you can choose where you wish to export the contacts to. Hover over the option you wish to choose and press the Select key, then press the top left-hand key labelled ... -
Page 19: Removing Contacts
Use the arrow keys and the Select key to select “Edit”. You can change the information fields now. If you need assistance, please refer to the “Adding Contacts” section in how to move between fields, and how to save this information. Removing Contacts Ensure you have opened the Contacts application as per instructions above. -
Page 20: Reading Messages
Select “New message” You will land onto a new screen, with your cursor highlighted over the Name/Number input field for the contact. There are multiple methods to choose a contact: If you do not have the contact saved, you can enter in the number using the “123” input method. Once this ... -
Page 21: Deleting Messages
Once you are in the message, you will have the option to respond or the read the entire conversation thread. To read the conversation thread, press the up arrow once, and you are now able to scroll with the arrow keys to read the rest of the conversation. -
Page 22: Missed Calls/Dialled Calls/Answered Calls
History”. Missed Calls/Dialled Calls/Answered Calls Ensure you have opened the Call History application as per instructions above. Select the relevant option you are looking for with the arrow and Select keys. You can use the arrow keys to select between missed calls and use the Options key to interact with the particular ... -
Page 23: Calendar
To change the time of the alarm, use the down and up arrow keys to modify the time setting which is highlighted. To change between the hours, minutes and AM/PM, use the right and left arrow keys. To save the changes, press the Select key. -
Page 24: Camera
When in the Calendar application, press the top left-hand button labelled “Options”. Select the “New Event” option. Use the arrow keys to change between the different fields. You will either need to use the select key to enter into ... -
Page 25: Viewing Pictures And Videos
In Videos, you can use the arrow keys to navigate around the screen and use the select key to enter folders. You can also use the select key to open up and view highlighted videos. Music Player You can transfer music files to the Aspera F40 through the computer or SD card. To access and play these music... -
Page 26: Fm Radio
Once inside, you can use the arrow and Select keys to select and start playing a song. FM Radio To connect and use the FM radio on the Aspera F40, you will need to connect a pair of earphones to work as an antenna. -
Page 27: Torch
Use the Select key to enter into the Contact Field and enter the number you wish to message and dial if the button is held down. You can select a contact by using the arrow keys to highlight the icon of the person located to the right of the ... -
Page 28: Internet
This will launch into the torch application immediately and turn the torch on. Internet The Aspera F40 features an internet browser which can use either Wi-Fi or Mobile Data to access numerous websites across the internet. To enter into the Browser: Open the phone to the landing page ... -
Page 29: Wi-Fi
Wi-Fi When inside settings, select Network. When Wi-Fi is highlighted, use the select key to enter into Wi-Fi options. If switched off, use the select key to enable Wi-Fi to see all the networks around you. Use the arrow key to navigate to the wireless network you wish to connect to. Press the Select key once on it to ... - Page 30 Media is for the volume of videos and music that would be playing through your device. Alarm is for the volume of any alarms set on your device. Ring is for the volume for the ringtone to notify you of incoming calls and messages. ...
-
Page 31: Hotspot And Tethering
Hotspot and Tethering The Aspera F40 can be used as a portable hotspot to connect other devices to the internet, using the mobile data on the SIM card you currently have in the F40. Please note that when other devices connect to your hotspot, this will consume mobile data on your SIM plan so charges may occur when utilising mobile data services. -
Page 32: Bluetooth
tethering successfully. Once this has been set, press the top right-hand context key, labelled “back”. After this, navigate to Settings and select Connectivity. Use the arrow keys to go down and press the select key on “USB tethering”. ... -
Page 33: Security
Security The Aspera F40 has the ability to set a phone lock and a SIM card lock on system start-up. There is no functionality for a password for when the phone lid is closed. The phone lock is a password used to enter the phone during system start-up. To set this up: Access the Settings applications, located on the second landing screen ... -
Page 34: Basic Troubleshooting
PUK code to be able to unlock the SIM. To retrieve the PUK code, you will need to contact your SIM provider as Aspera Mobile do not carry these PUK codes. - Page 35 My battery is not lasting very long: The expected battery life on a full charge of the Aspera F40 is three days standby, or a day with moderate usage of the phone. Heavy use may mean you need to charge the battery in the same day.
Need help?
Do you have a question about the F40 and is the answer not in the manual?
Questions and answers