
Related Manuals for Technotherm TPF-EcoRF

Summary of Contents for Technotherm TPF-EcoRF
- Page 1 Thermostat programmable radio Wireless programmable thermostat Programmierbarer Funkthermostat Draadloos programmeerbare thermostaat...
-
Page 2: Table Of Contents
Contents 1. Installation ................33 2. Description ................34 3. Wireless association ............35 4. Configuration ................ 36 CF01 - Correcting the temperature measured ......36 CF02 - Temperature displayed in AUTO mode ......37 CF04 - Control type ..............37 CF05 - Energy saving mode ............ - Page 3 Contents 6. Setting the temperatures (settings) ........44 6.1 Defining the comfort setting ..........44 6.2 Defining the Economy setting ..........44 6.3 Defining the Frost protection setting ........44 6.4 Behavioural indicator ............45 7. Programming ................ 46 8. AUTO mode ................48 9.
-
Page 4: Installation
1. Installation Mini 20 cm Place the thermostat: - in the main room (e.g. living room/dining room) or in the centre of your home, - wall-mounted or placed on a piece of accessible furniture at a height of 1.50 m - away from heat sources (fi replaces, sunlight) and draughts (windows, doors) IMPORTANT: Do not install the thermostat on a wall in contact... -
Page 5: Description
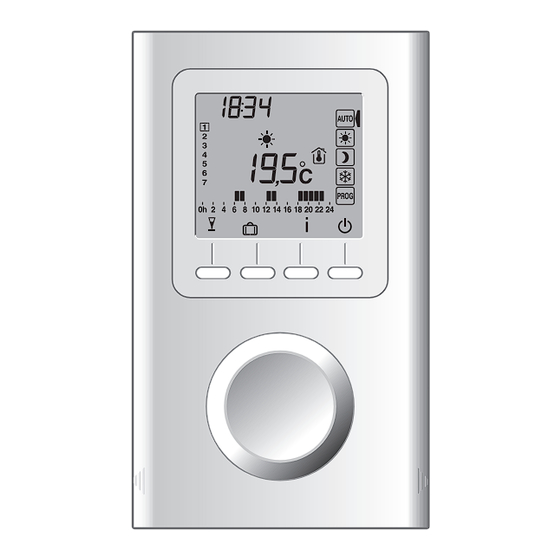
2. Description ❶ AUTO mode ❷ Comfort mode ❸ Economy mode Temperature ❹ Frost protection setting mode ❺ Date and time setting/ Programming ❶ Time ❷ Day ❸ Temperature measured or setting ❹ Active setting ❺ Wireless transmission ❻ "Party" mode ❼... -
Page 6: Wireless Association
3. Wireless association >3s ..>5s >5s ❶ Set the receiver(s) to association mode (refer to receiver guide), ❷ The thermostat must be in shutdown mode. Press and hold the 2nd button from the left for 5 seconds. The screen displays the thermostat version. -
Page 7: Configuration
4. Configuration >5s - 5°C -> + 5°C The thermostat must be in shutdown mode. ❶ Press and hold the 2nd button from the left for 5 seconds. The screen displays the thermostat version. ❷ Press OK. The screen displays the CF01 menu. ❸... -
Page 8: Cf02 - Temperature Displayed In Auto Mode
EXIT CF02 - Temperature displayed in AUTO mode Temperature setting Temperature measured CF04 - Control type Chrono-proportional (PI) control ON/OFF control CF05 - Energy saving mode Display switches off after 10 seconds if nothing is pressed Display switches off between midnight and 5am Display always on - 37 - - 37 -... -
Page 9: Cf06 - On/Off Button Display In Standby Mode
4. Configuration CF06 - ON/OFF button display in standby mode Symbol not displayed in standby mode Symbol displayed in standby mode CF07 - Backlighting Disabled Enabled (switches off after timer) CF08 - Opening detection function Disabled Enabled If a door/window magnetic contact (e.g. window) is associated with the receiver, the heating will switch to Frost protection when the window is opened. -
Page 10: Cf09 - Presence Detection Function
CF09 - Presence detection function Disabled Enabled If a motion detector is associated with the receiver, the temperature will be lowered automatically in the event of an extended absence: • 1.5 h -> Active setting -1.5°C • 3.5 h -> Active setting -3.5°C •... -
Page 11: Cf12 - Time Display Format
4. Configuration CF12 - Time display format 12 (AM/PM) CF13 - Automatic change to summer/winter time Disabled Enabled If CF13 = 0, the date setting will not be proposed. CF15 - Display of the symbol Symbol always steady even for a presence detection event Symbol flashes if there is a presence detection event If CF08 = 1:... -
Page 12: Cf17 - Display Of The Symbol
CF17 - Display of the symbol Symbol steady if there is a presence detection event Symbol flashes if there is a presence detection event CF18 - Display of the consumption Disabled Enabled If the display of the consumption is enabled, specify the power of the heating elements ❶... -
Page 13: Cf28 - Anticipation Function
4. Configuration CF28 - Anticipation function The anticipation function enables the required Comfort tempera- ture to be obtained at the programmed time. Deactivated Activated Press + or - to activate or deactivate. Press OK to confirm. Change to the CF29 menu. CF29 - Anticipation sensitivity settings The slope setting depends on the heating system. -
Page 14: Setting The Clock
5. Setting the clock ❶ Turn the selector knob to PROG. ❸ Enter the min- ❷ Enter the hour ❹ Enter the day utes and confirm and confirm with and confirm with with OK. 2015... ❼ Turn the ❺ Enter the month ❻... -
Page 15: Setting The Temperatures (Settings)
6. Setting the temperatures (settings) If you remain in one of these modes, the thermostat will operate permanently in relation to this setting (no programming) 6.1 Defining the comfort setting ❶ Turn the selector knob to ❷ Set the Comfort temperature (5°C to max. -
Page 16: Behavioural Indicator
6.4 Behavioural indicator When the settings are adjusted, depending on the thermostat model, the colour of the screen changes or an indicator is dis- played according to the selected temperature. Green up to 19°C (reduced consumption) Orange from19.5°C to 24°C (average consumption) Red from 24.5°C to max. -
Page 17: Programming
7. Programming Turn the selector knob to PROG. ❶ Upon activation, the programming for each day is a comfort period from 6am to 11pm. You can create your different Economy and Comfort periods using buttons. Example: Comfort from 6am to 8am and 5pm to 11pm ❷... - Page 18 Setting assigned to the period Programmable period ❼ Press OK to validate and go to the ❻ Press ❺ Press next day. to 00:00 up to 23:00 ❼ Pressing OK for 3 seconds confirms the pro- gram and copies it over to the next day (COPY function).
-
Page 19: Auto Mode
8. AUTO mode In AUTO mode, the thermostat follows the programme of the day. symbol indicate a heating request (configuration CF16). The automatic programme can be temporarily suspended by: - a "Party Mode" override ( - an Absence mode ( - a window magnetic contact (symbol if the function is activated (configuration CF08). -
Page 20: Party" Mode
9. "Party" mode The "Party" mode can temporarily suspend the automatic programme by applying a temperature setting chosen for a programmed duration (from 30 minutes to 12 hours). 5°C-> Confort max. From the AUTO mode Set the required tempera- ❶ ❷... -
Page 21: Absence Mode
10. Absence mode This mode protects your home from frost if you are absent for several days. Example: Leave on Friday 10 - Scheduled return on Sunday 19, programme 9 days absence. VEN 10 DIM 19 1-> 365 Turn the selector knob on ❶... -
Page 22: External Override
11. External override The external override is used to suspend the automatic operation of the thermostat from another wireless transmitter allowing this function. For an external override, the symbol and the new override value are displayed. Thermostat follows the parameters demanded by the external transmitter. -
Page 23: Information Button
13. Information button ) enables the following the information to The Information button ( be known: - actual temperature setting or temperature measured (according to configuration), - outside temperature (if the receiver is associated with an outdoor sensor), - the total consumption of the associated heating elements (configuration CF18). -
Page 24: Locking Access To The Settings
14. Locking access to the settings From the AUTO, modes. Press and hold the button for 5 seconds. symbol appears. In locked mode, only the On/Off ( ) and Information ( buttons are accessible. To enable the beeps again, press button for 5 seconds. -
Page 25: Return To Initial Settings
16. Return to initial settings 16.1 Automatic reset of parameters to factory setting From the shutdown mode ( ). ❶ Press the left button and the button simultaneously for 10 seconds until "Init" is displayed. >10s ❷ Press and hold the OK button for 3 seconds. The "Init"... -
Page 26: Initialisation Of All The Parameters
16.2 Initialisation of all the parameters This mode resets all the configuration parameters, settings, and programming. Only the date and time are kept. From the shutdown mode ( ). ❶ Press the left button and the button simultaneously for 20 seconds. After 10 seconds, the screen displays "Init", keep pressing until "ALL"... -
Page 27: Remove The Wireless Association
17. Remove the wireless association. >5s >5s ❶ The thermostat must be in shutdown mode. Press and hold the 2nd button from the left for 5 seconds. The screen displays the thermostat version. ❷ Press and hold the 2nd button from the left for 5 seconds again. -
Page 28: Changing The Batteries
18. Changing the batteries From the moment the symbol is displayed on the screen, you have 3 months to change the batteries (see technical characteristics). 19. Troubleshooting • The screen displays the symbol. The batteries are spent. Replace the batteries •... -
Page 29: Technical Characteristics
20. Technical characteristics • Power according to model: - Two 1.5 V LR03/AAA alkaline batteries (supplied), 5-year life under normal use (CF05=0), - Two 1.5 V, 1.5 Ah LR03/AAA lithium batteries (supplied), 10-year life under normal use (CF05=0), • Class III insulation •...
Need help?
Do you have a question about the TPF-EcoRF and is the answer not in the manual?
Questions and answers