
Subscribe to Our Youtube Channel
Related Manuals for Triumph NTO-10A


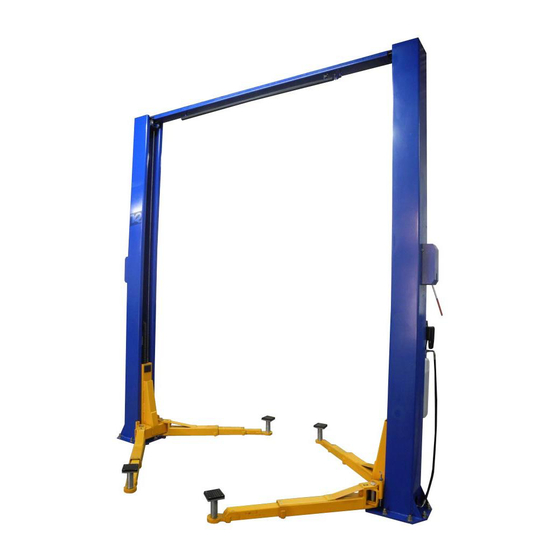
Summary of Contents for Triumph NTO-10A
- Page 1 OVERHEAD TWO POST LIFT FOR MODELS: NTO-9A - NTO-10A - NTO-9AE DATE INSTALLED: ____________ SERIAL NUMBER _____________ Page 1 of 20...
-
Page 2: Lift Specifications
Personal injury and property damage incurred due to non-compliance this these safety instructions are not covered by warranty. LIFT SPECIFICATIONS 9,000 Pound (NTO-9AE & NTO09A) 10,000 Pound (NTO-10A) Max Capacity Two Post Overhead Verisymmetric ... - Page 3 Page 3 of 20...
-
Page 4: Symbols In This Manual
BOLT BOX CONTENTS Cable 33’7” Long 7.25” (thread and blank) 4 5/8 Thread Cable 5/16 ½ Stud Threaded Hole for cable is 5/8 (so can’t use 3/8” Cables) 2 nuts 2 washers TOOLS TO INSTALL ... -
Page 5: Shippin G An D Delivery
SHIPPIN G AN D DELIVERY If not picked up at our location, your freight will be delivered in a semi-truck and box trailer. Please be sure that a truck this large can access your delivery location. If the truck cannot gain access, you will have to make other arrangements with the freight company. -
Page 6: Anchoring Tips
Our freight carriers assume that when a customer provides a business name, the business is open from 8AM-5PM Monday-Friday, the business is located at a commercial address, and that the business does not have a home or any other living residences on the property. We will not be responsible for redelivery charges to businesses that are not open during the above mentioned hours when the first delivery attempt was made. -
Page 7: Installation
9. Let the drill do the work. Do not apply excessive pressure. Lift the drill up and down occasionally to remove residue to reduce binding. 10. Drill the hole to depth equal to the length of anchor. You can drill completely through the floor so that when you remove the lift at a later date you can hammer them down instead of just cutting off with a saw. - Page 8 6. Using a ¾” concrete drill, drill the anchor holes in the offside (not power unit) column, installing anchors as you go. Use a block of wood or rubber mallet to drive anchor bolts in. drill to a minimum depth of 4” to insure maximum holding power. Drilling through concrete recommended) will allow the anchors to be driven through the bottom if ever the anchor needs to be replaced later.
- Page 9 11. After fastening the cross beam, check and confirm that the remaining column is plumb. (Making sure the power column on left and offside column are plumb. Critical.) 12. Secure the power column, and make plumb. In same fashion as the first column. 13.
- Page 10 c. Adjust cables to same tightness. This will allow them to keep the carriages level as the lift rises. d. Adjust the carriage cable tension. This is accomplished by tightening the carriage adjustment nut on top of each carriage. The rear carriage adjustment nut adjust the opposite post carriage height.
- Page 11 18. Install all swing arms, make sure that gear rack are engaging the moon gear on the arms properly. There are two triple and a two double stage arms. The triple arms should be toward the front of the car as you are sitting in it, two stage arms will hold up the rear of the vehicle.
- Page 12 23. Install hydraulic hoses a. Connect the hydraulic hoses. Make sure all guides are in place on top of the top rail for pulling the hoses through. 24. Operate the lift and apply pressure to the safety cut off to insure motor shuts off prioe to any part of vehicle coming in contact with cut off bar.
- Page 13 FOR SINGLE POINT RELEASE LIFTS ONLY (NTO-9A & NTO-10A) For lifts equipt with a single point lock releae (a leaver that release both sides simultaneously) will require these additional steps. 1. Route cable up the column, over the release pulleys and back down to the second lock release.
-
Page 14: Daily Pre-Operation Check
MAINTENANCE The following is the suggested maintenance schedule for this lift. If you hear or see any sign of impending failure, cease operation immediately and inspect, correct and replace failed or failing parts. USERS SHOULD ALWAYS INSPECT LIFTING EQUIPMENT AT THE START OF EVERY SHIFT. -
Page 15: Operation
d. The following items should only be performed by trained maintenance expert i. Replace hydraulic hoses. ii. Replace chains and rollers. iii. Replace cables and sheaves. iv. Replace or rebuild air and hydraulic cylinders. v. Replace or rebuild power units vi. -
Page 16: Lowering Vehicle
NTO-9AE Max Load 9,000lbs NTO-9A Max Load 9,000lbs NTO-10A Max Load 10,000lbs 2. In principle, the lift is designed for both approach directions. For long service life, use the short (Two Section) support arms for engaging the engine side of the vehicle. - Page 17 b. Lift should only be operated by fully trained personnel. c. Keep the lift and lift area clean and free of tools, parts, debris, etc. d. Once the disk adaptors contact the lift points, check arm restraint mechanisms on each arm for engagement. e.
-
Page 18: Troubleshooting
TROUBLESHOOTING PROBLEM POSIBLE CAUSES SOLUTIONS Motor Not Running Breaker or fuse blown Call Electrician Motor thermal overload tripped Wait for overload to cool Faulty wiring connections Call electrician Defective button Call electrician for checking Motor runs but lift does A piece of trash is under check Push handle down and push the up not rise valve... - Page 19 PURCHASE TERMS AND WARRANTY DAMAGE/MISSING PARTS POLICIES: All parts you find defective must be returned for inspection before a replacement is shipped. All parts will be inspected and if found to be defective a replacement and/or repair to parts will be sent.
- Page 20 power units and/or motors. If any disputes arise, the supplier requires a copy of the invoice from the certified electrician with an itemized report of the work done. The lift is warranted by our supplier for one year. Auto Lifts carry a 2 year structural warranty if installed indoors.
Need help?
Do you have a question about the NTO-10A and is the answer not in the manual?
Questions and answers