Table of Contents
Advertisement
Quick Links
HPE OfficeConnect 1850 Switch
Series Installation and Getting
Started Guide
Abstract
Use this guide to assist in installing the following HPE OfficeConnect 1850 switches:
HPE OfficeConnect 1850 6XGT 2XGT/SFP+ Switch (JL169A)
HPE OfficeConnect 1850 24G 2XGT Switch (JL170A)
HPE OfficeConnect 1850 48G 4XGT Switch (JL171A)
HPE OfficeConnect 1850 24G 2XGT PoE+ 185W Switch (JL172A)
HPE OfficeConnect 1850 48G 4XGT PoE+ 370W Switch (JL173A)
Part Number: 5200-0094
Published: September 2016
Edition: 1
Advertisement
Table of Contents
Troubleshooting

Related Manuals for Hewlett Packard Enterprise OfficeConnect 1850 Series


Summary of Contents for Hewlett Packard Enterprise OfficeConnect 1850 Series
- Page 1 HPE OfficeConnect 1850 Switch Series Installation and Getting Started Guide Abstract Use this guide to assist in installing the following HPE OfficeConnect 1850 switches: HPE OfficeConnect 1850 6XGT 2XGT/SFP+ Switch (JL169A) HPE OfficeConnect 1850 24G 2XGT Switch (JL170A) HPE OfficeConnect 1850 48G 4XGT Switch (JL171A) HPE OfficeConnect 1850 24G 2XGT PoE+ 185W Switch (JL172A) HPE OfficeConnect 1850 48G 4XGT PoE+ 370W Switch (JL173A) Part Number: 5200-0094...
- Page 2 © Copyright 2016 by Hewlett Packard Enterprise Development LP The information contained herein is subject to change without notice. The only warranties for Hewlett Packard Enterprise products and services are set forth in the express warranty statements accompanying such products and services.
-
Page 3: Table Of Contents
Contents 1. Switch Overview ........................1-1 Switch Hardware Features ............................1-1 Network Ports..............................1-3 LEDs .................................. 1-4 Mode Button............................... 1-5 Reset Button ..............................1-5 Power Connector..............................1-6 Switch Features............................... 1-6 2. Installing the Switch ....................... 2-1 Included Parts ................................. 2-1 Installation Precautions ............................2-3 Installation Procedure.............................. - Page 4 Testing the Switch by Rebooting It.......................... 4-3 Restoring to Factory Defaults..........................4-3 Hewlett Packard Enterprise Customer Support Services..................4-3 Before Calling Support ............................4-4 A. Specifications........................A-1 Switch Specifications............................... A-1 Physical................................A-1 Electrical................................A-1 Environmental ..............................A-2 Acoustics................................A-2 Safety ................................. A-2 EMC ...................................
- Page 5 D. Warranty Information......................D-1...
-
Page 7: Switch Overview
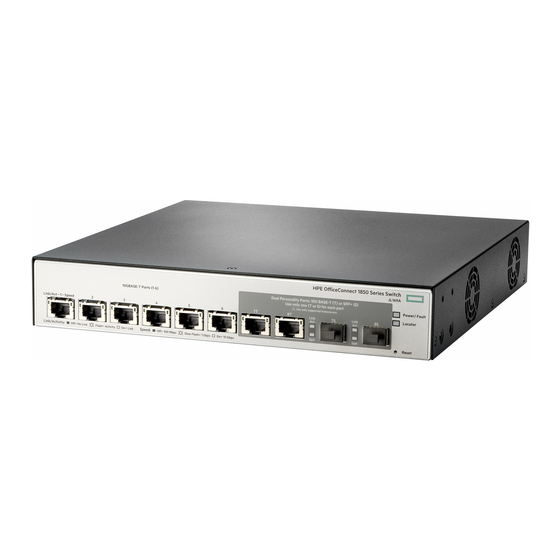
Switch Hardware Features 1. Switch Overview The Hewlett Packard Enterprise 1850 OfficeConnect Switch Series are multiport switches that can be used to build high-performance switched workgroup networks. These switches are store-and-forward devices that offer low latency for high-speed networking. Two of the switches also support the IEEE 802.3af/at standards for providing PoE+ power to connected devices. - Page 8 Switch Overview Switch Hardware Features Number Description Number Description Dual Personality 100/1000/10000Mbps 100/1000/10000Mbps RJ45 ports (1-6) RJ45/SFP+ ports/slots (7-8) HPE OfficeConnect 1850 24G 2XGT Switch (JL170A) Number Description Number Description Link/Act and Speed LEDs Power/Fault LED Locator LEDs Reset button 100/1000/10000Mbps RJ45 ports (25-26) 10/100/1000Mbps RJ45 ports (1-24) HPE OfficeConnect 1850 48G 4XGT Switch (JL171A)
-
Page 9: Network Ports
Switch Overview Switch Hardware Features HPE OfficeConnect 1850 24G 2XGT PoE+ 185W Switch (JL172A) Number Description Number Description Link/Act and Mode LEDs Power/Fault LED Locator LEDs Mode button Reset button 100/1000/10000Mbps RJ45 ports (25-26) 10/100/1000Mbps RJ45 ports (13-24) 10/100/1000Mbps RJ45 PoE+ ports (1-12) HPE OfficeConnect 1850 48G 4XGT PoE+ 370W Switch (JL173A) Number Description... -
Page 10: Leds
● Some ports provide Power-over-Ethernet or PoE ports. The Hewlett Packard Enterprise 1850 OfficeConnect PoE+ switches support the IEEE 802.3af/at standards, which allows IP telephones, wireless LAN Access Points, and other appliances to receive power as well as data over existing LAN cabling. For further information regarding PoE power, see the Hewlett Packard Enterprise Power over Ethernet (PoE/PoE+) Planning and Implementation Guide, which is on the Hewlett Packard Enterprise website at www.hpe.com/support/hpesc. -
Page 11: Mode Button
Slow Flashing: LED on for 800ms, then off for 800ms. Repeat until change of state. Fast Flashing: LED on for 400ms, then off for 400ms. Repeat until change of state. ‡ (Hewlett Packard Enterprise 1850 PoE+ switches only) Press the Mode button in for PoE mode, leave the Mode button out for Speed mode. -
Page 12: Power Connector
Power Connector Power Connector The Hewlett Packard Enterprise 1850 OfficeConnect Switch Series do not have a power switch, they are powered on when connected to an active AC power source. The switches automatically adjust to any voltage between 100-127 and 200-240 volts and either 50 or 60 Hz. There are no voltage range settings required. - Page 13 Switch Overview Switch Features ○ Web browser interface — an easy to use built-in graphical interface that can be accessed from common Web browsers. ○ Intelligent Management Center (iMC) — allows network administrators to discover and map the switches within their network and launch the built-in graphical interface from within iMC to configure the switches.
- Page 14 Switch Overview Switch Features...
-
Page 15: Installing The Switch
Included Parts 2. Installing the Switch The Hewlett Packard Enterprise 1850 OfficeConnect Switches are easy to install. They come with an accessory kit that includes the brackets for mounting the switches in a standard 19-inch telco rack, in an equipment cabinet, and with rubber feet that can be attached so the switches can be securely located on a horizontal surface. - Page 16 8121-1511 Thailand 8121-0734 8121-1485 United Kingdom/Hong Kong/Singapore/ 8121-0739 8121-1475 Malaysia United States/Canada/Mexico 8121-1141 8121-0914 The cord for the Hewlett Packard Enterprise 1850 48G 4XGT PoE+ 370W Switch supports a higher amperage and uses a C16 connector. JAPAN POWER CORD WARNING:...
-
Page 17: Installation Precautions
Use only the AC/DC power adapter and power cord (if applicable), supplied with the switch. Use of other adapters or power cords, including those that came with other Hewlett Packard Enterprise Networking products, may result in damage to the equipment. -
Page 18: Prepare The Installation Site
Before mounting the switch, verify it is working properly by plugging it into a power source and confirming that it passes self test. For the Hewlett Packard Enterprise 1850 OfficeConnect switches, connect the power cord supplied with the switch to the power connector on the back of the switch, and then into a properly grounded electrical... -
Page 19: Self Test Led Behavior
NOTE: The Hewlett Packard Enterprise 1850 OfficeConnect switches do not have a power switch. They are powered on when the power cord is connected to the switch and to a power source. For safety, the power outlet should be located near the switch installation. -
Page 20: Mount The Switch
Installing the Switch Installation Procedure 3. Mount the Switch The switch can be mounted in these ways: ● on a horizontal surface. ● on a wall. ● under a table. ● in a rack or cabinet. Rack or Cabinet Mounting The switches are designed to be mounted in any EIA-standard 19-inch telco rack or communication equipment cabinet. - Page 21 Installing the Switch Installation Procedure HPE 1850 24G 2XGT Switch HPE 1850 48G 4XGT Switch HPE 1850 24G 2XGT PoE+ 185W Switch HPE 1850 48G 4XGT PoE+ 370W Switch NOTE: The mounting brackets have multiple mounting holes and can be rotated allowing for a wide variety of mounting options.
- Page 22 Installing the Switch Installation Procedure HPE 1850 6XGT 2XGT/SFP+ Switch HPE 1850 24G 2XGT Switch HPE 1850 48G 4XGT Switch HPE 1850 24G 2XGT PoE+ 185W Switch HPE 1850 48G 4XGT PoE+ 370W Switch...
-
Page 23: Wall Or Under-Table Mounting
Installing the Switch Installation Procedure Wall or Under-Table Mounting You can mount the Hewlett Packard Enterprise 1850 OfficeConnect switches on a wall with either the front or rear panel facing up. WARNING: For safe operation, please read the “Installation Precautions” on page 2-4 before mounting the switch. -
Page 24: Using A Kensington Security Cable
4. Connect the Switch to a Power Source For the Hewlett Packard Enterprise 1850 OfficeConnect switches, plug the included power cord into the switch’s power connector and into a nearby AC power source. -
Page 25: Connect The Network Cables
Installing the Switch Installation Procedure Re-check the LEDs during self test. See “Self Test LED Behavior” on page 2-5. 5. Connect the Network Cables Connect the network cables, from the network devices or your patch panels, to the fixed RJ45 ports on the switch or to any SFP+ transceivers you have installed in the switch. -
Page 26: Installing Or Removing Sfp+ Transceivers
Ensure the network cable is NOT connected when you install or remove an SFP+ transceiver. CAUTION: Use only supported genuine Hewlett Packard Enterprise SFP+ transceivers with your switch. Non-HPE SFP+ transceivers are not supported, and their use may result in product malfunction. Should you require additional Hewlett Packard Enterprise SFP+ transceivers, contact your Hewlett Packard Enterprise Networking Sales and Service Office or authorized dealer. -
Page 27: Removing The Sfp+ Transceivers
You should disconnect the network cable from the SFP+ transceiver before removing it from the switch. Depending on when you purchased your Hewlett Packard Enterprise SFP+ transceiver, it may have either of three different release mechanisms: a plastic tab on the bottom of the SFP+ transceiver, a plastic collar around the SFP+ transceiver, or a wire bail. - Page 28 Installing the Switch Installation Procedure 2-14...
-
Page 29: Configuring The Switch
3. Configuring the Switch Initial Configuration The Hewlett Packard Enterprise 1850 OfficeConnect Switch Series can be managed through a Web-browser interface that you can access from any PC or workstation connected to the switch. To access the Web interface, you must have the switch’s Internet Protocol (IP) address. In the factory default configuration, the IP address is automatically acquired from a Dynamic Host Configuration Protocol (DHCP) service that is available on your network or from your Internet Service Provider (ISP). -
Page 30: Using The Ip Address
Click Apply to implement the new password, and then click Save Configuration at the top of the browser configuration screen to save your settings and retain them when the switch is rebooted. See the Hewlett Packard Enterprise 1850 OfficeConnect Switch Series Management and Configuration Guide for more switch configuration information. -
Page 31: Where To Go From Here
For more information on the Web browser interface and all the features that can be configured on the Hewlett Packard Enterprise 1850 OfficeConnect Switch Series, see the Hewlett Packard Enterprise 1850 OfficeConnect Switch Series Management and Configuration Guide, which is available on the Hewlett... - Page 32 Configuring the Switch Where to Go From Here...
-
Page 33: Troubleshooting
4. Troubleshooting This section describes how to troubleshoot the switch. For more information, see the chapter “Troubleshooting” in the Hewlett Packard Enterprise 1850 OfficeConnect Switch Series Management and Configuration Guide, available on the Hewlett Packard Enterprise website, www.hpe.com/support/hpesc. This chapter describes the following: ●... -
Page 34: Diagnostic Tips
If the power source and power cord are OK and this condition persists, the switch (PSE). power supply may have failed. Call your Hewlett Packard Enterprise authorized network reseller, or use the electronic support services from Hewlett Packard Enterprise to get assistance. -
Page 35: Diagnostic Tips
After completing this procedure, there will be no password, the IP address will be returned to the default 192.168.1.1, and all configuration settings will be returned to factory defaults. Hewlett Packard Enterprise Customer Support Services If you are still having trouble with your switch, Hewlett-Packard offers support through the use of a number of... -
Page 36: Before Calling Support
Hewlett Packard Enterprise. Before Calling Support Before calling your networking dealer or Hewlett Packard Enterprise Support, to make the support process most efficient, you first should have retrieved the following information:... -
Page 37: Specifications
Specifications Switch Specifications A. Specifications Switch Specifications Physical Switch Width Depth Height Weight 1850 6XGT 2XGT/SFP+ (JL169A) 25.3 cm 26.07 cm 4.4 cm 1.74 kg 9.96 in 10.26 in 1.73 in 3.84 lb 1850 24G 2XGT (JL170A) 44.25 cm 24.64 cm 4.4 cm 2.66 kg 17.42 in... -
Page 38: Environmental
Specifications Switch Specifications Environmental Operating Non-Operating Temperature 0°C to 40°C (32°F to 104°F) -40°C to 70°C (-40°F to 158°F) Relative humidity (non-condensing) 15% to 95% at 40°C (104°F) 15% to 95% at 65°C (149°F) Maximum altitude 3.0 km (10,000 ft) * 4.57 km (15,000 ft) * The operating maximum altitude should not exceed that of any accessory being connected to any 1850 Switch. -
Page 39: Standards
Specifications Standards Standards Compatible with these IEEE EN/IEC standard SFP+ Lasers Safety Technology standards compliance Information 10-T IEEE 802.3 10BASE-T 100-TX IEEE 802.3u 100BASE-TX IEEE 802.3ab 1000BASE-T 1000-SX IEEE 802.3z 1000BASE-SX EN/IEC 60825 Class 1 Laser Product Laser Klasse 1 1000-LX IEEE 802.3z 1000BASE-LX EN/IEC 60825... -
Page 40: Cabling And Technology Information Specifications
Specifications Cabling and Technology Information Specifications Cabling and Technology Information Specifications Cable Medium Operation Speed Cabling and Technology Information Specifications Twisted-pair copper 10 Mbps Operation Category 3, 4 or 5, 100-ohm unshielded twisted-pair (UTP) or shielded twisted-pair (STP) cable, complying with IEEE 802.3 10BASE-T specifications. -
Page 41: Technology Distance Specifications
Specifications Mode Conditioning Patch Cord Technology Distance Specifications Technology Supported cable type Multimode fiber modal bandwidth Supported distances 1000-T twisted-pair copper up to 100 meters 1000-SX multimode fiber 160 MHz*km 2 - 220 meters 200 MHz*km 2 - 275 meters 400 MHz*km 2 - 500 meters 500 MHz*km... -
Page 42: Installing The Patch Cord
Specifications Mode Conditioning Patch Cord NOTE: Most of the time, if you are using good quality graded-index multimode fiber cable that adheres to the standards listed in this appendix, there should not be a need to use mode conditioning patch cords in your network. -
Page 43: Twisted-Pair Cable/Connector Pin-Outs
Specifications Twisted-Pair Cable/Connector Pin-Outs Twisted-Pair Cable/Connector Pin-Outs The Auto-MDIX Feature: In the default configuration, “Auto”, the fixed 10/100/1000BASE-T ports on the switches all automatically detect the type of port on the connected device and operate as either an MDI or MDI-X port, whichever is appropriate. -
Page 44: Straight-Through Twisted-Pair Cable For 10/100 Mbps Network Connections
Specifications Twisted-Pair Cable/Connector Pin-Outs Straight-through Twisted-Pair Cable for 10/100 Mbps Network Connections Because of the Auto-MDIX operation of the 10/100 ports on the switch, for all network connections, to PCs, servers or other end nodes, or to hubs or other switches, you can use straight-through cables. If any of these ports are given a fixed configuration, for example 100 Mbps/Full Duplex, the ports operate as MDI-X ports, and straight-through cables must be then used for connections to PC NICs and other MDI ports. -
Page 45: Pin Assignments
Specifications Twisted-Pair Cable/Connector Pin-Outs Pin Assignments Computer, Transceiver, Switch End (MDI-X) or Other End Signal Pins Pins Signal receive + transmit + receive - transmit - transmit + receive + transmit - receive - Crossover Twisted-Pair Cable for 10/100 Mbps Network Connections The Auto-MDIX operation of the 10/100 ports on the switch also allows you to use crossover cables for all network connections, to PCs, servers or other end nodes, or to hubs or other switches. -
Page 46: Pin Assignments
Specifications Twisted-Pair Cable/Connector Pin-Outs NOTE: Pins 1 and 2 on connector “A” must be wired as a twisted pair to pins 3 and 6 on connector “B”. Pins 3 and 6 on connector “A” must be wired as a twisted pair to pins 1 and 2 on connector “B”. Pins 4, 5, 7, and 8 are not used in this application, although they may be wired in the cable. - Page 47 Specifications Twisted-Pair Cable/Connector Pin-Outs Cable Diagram NOTE: Pins 1 and 2 on connector “A” must be wired as a twisted pair to pins 1 and 2 on connector “B”. Pins 3 and 6 on connector “A” must be wired as a twisted pair to pins 3 and 6 on connector “B”. Pins 4 and 5 on connector “A”...
- Page 48 Specifications Twisted-Pair Cable/Connector Pin-Outs A-12...
-
Page 49: Safety And Regulatory Information For The Officeconnect 1850 Switch Series
For safety and regulatory information for your OfficeConnect 1850 switch, see the HPE OfficeConnect 1850 Switch Series Quick Setup Guide and Safety/Regulatory Information document shipped with your switch. This document is also available on the Hewlett Packard Enterprise Information Library at www.hpe.com/... - Page 50 Safety and Regulatory Information for the OfficeConnect 1850 Switch Series...
-
Page 51: Support And Other Resources
Accessing Hewlett Packard Enterprise Support ● For live assistance, go to the Contact Hewlett Packard Enterprise Worldwide website: www.hpe.com/assistance ● To access documentation and support services, go to the Hewlett Packard Enterprise Support Center website: www.hpe.com/support/hpesc Information to collect ●... -
Page 52: Registering For Software Technical Support And Update Service
Customer self repair Hewlett Packard Enterprise customer self repair (CSR) programs allow you to repair your product. If a CSR part needs to be replaced, it will be shipped directly to you so that you can install it at your convenience. Some parts do not qualify for CSR. -
Page 53: Remote Support
It provides intelligent event diagnosis, and automatic, secure submission of hardware event notifications to Hewlett Packard Enterprise, which will initiate a fast and accurate resolution based on your product’s service level. Hewlett Packard Enterprise strongly recommends that you register your device for remote support. - Page 54 Support and Other Resources Documentation feedback...
- Page 55 Warranty Information D. Warranty Information For important safety, environmental, and regulatory information, see Safety and Compliance Information for Server, Storage, Power, Networking, and Rack Products, available at www.hpe.com/support/Safety-Compliance-EnterpriseProducts. HPE ProLiant and x86 Servers and Options www.hpe.com/support/ProLiantServers-Warranties HPE Enterprise Servers www.hpe.com/support/EnterpriseServers-Warranties HPE Storage Products www.hpe.com/support/Storage-Warranties HPE Networking Products...
- Page 56 Warranty Information...
Need help?
Do you have a question about the OfficeConnect 1850 Series and is the answer not in the manual?
Questions and answers