Advertisement
Quick Links
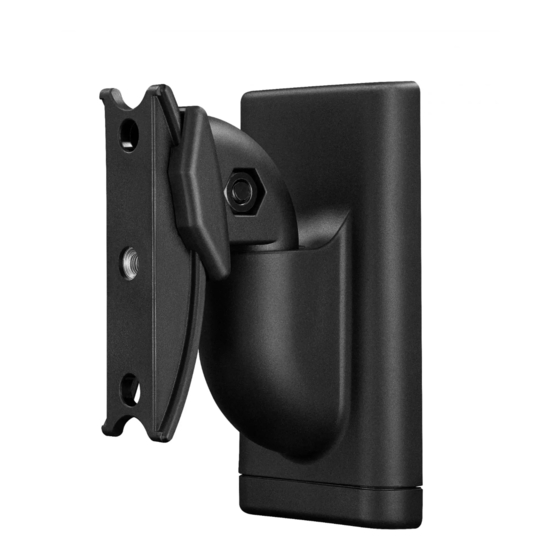
Multi-Directional
Speaker Mount
RF-HSWM1A18 / RF-HSWM1A18W / RF-HSWM1A18-C /
RF-HSWM1A18W-C
For wood-stud, drywall, and concrete wall
installations
Before using your new product, please read these instructions to prevent any damage.
Safety information and specifications................................. 2
Tools needed ................................................................................ 3
Package contents: parts ........................................................... 4
Package contents: hardware................................................... 4
Installation instructions............................................................ 5
ASSEMBLY GUIDE
Advertisement

Related Manuals for RocketFish RF-HSWM1A18


Summary of Contents for RocketFish RF-HSWM1A18
-
Page 1: Table Of Contents
Multi-Directional Speaker Mount RF-HSWM1A18 / RF-HSWM1A18W / RF-HSWM1A18-C / RF-HSWM1A18W-C Safety information and specifications......... 2 Tools needed ................3 Package contents: parts ............4 Package contents: hardware........... 4 For wood-stud, drywall, and concrete wall Installation instructions............5 installations ASSEMBLY GUIDE... -
Page 2: Safety Information And Specifications
Safety information and specifications IMPORTANT Compatible speakers: Sonos PLAY: 1 or SAFETY PLAY 3, and other wireless speakers INSTRUCTIONS - SAVE THESE Maximum speaker weight: 10 lbs. (4.5 kg) INSTRUCTIONS Overall dimensions (H × W × D): Check your speaker’s user 3.83 x 2 in. -
Page 3: Tools Needed
RF-HSWM1A18 / RF-HSWM1A18W / RF-HSWM1A18-C / RF-HSWM1A18W-C Tools needed You will need the following tools to assemble your new speaker mount: Level Phillips screwdriver Tape Pencil Drill Wood stud installation Edge-to-edge 1/8” (3 mm) wood stud finder drill bit Concrete installation 1/4”... -
Page 4: Package Contents: Parts
Package contents: parts Make sure that you have all the parts necessary to assemble your new speaker mount: The mount (A), cap (B), and wall plate (C) come already assembled. Push the cap off the mount, then slide the wall plate out to disassemble. -
Page 5: Installation Instructions
RF-HSWM1A18 / RF-HSWM1A18W / RF-HSWM1A18-C / RF-HSWM1A18W-C Installation instructions STEP 1 - Select a mounting option You can mount your speaker to three wall types: • Option A: To mount to a wood stud wall, see “STEP 2 - Option A: Installing on a wood stud wall”... - Page 6 STEP 2 - Option A: Installing on a wood stud wall CAUTION • Drywall covering the wall must not exceed 5/8" (16 mm). • The wood stud must not be smaller than a nominal 2 x 4 in. (51 x 102 mm) actual 1-1/2 x 3-1/2 in. (38 x 89 mm) •...
- Page 7 RF-HSWM1A18 / RF-HSWM1A18W / RF-HSWM1A18-C / RF-HSWM1A18W-C Drill pilot holes to a depth of 1-3/4 in. (45 mm) using a 1/8 in. (3 mm) diameter drill bit. Make sure that you drill into the center of the stud. Attach the wall plate with the two wall plate screws (F). Tighten the screws only until they are flush against the wall plate.
- Page 8 STEP 2 - Option B: Installing on drywall CAUTION Drywall covering the wall, must not be less than 1/2 in. (12.7 mm) Make sure that the placement of the wall plate (C) is not on a stud. Position the wall plate at your desired height and level the wall plate, then mark the hole locations.
- Page 9 RF-HSWM1A18 / RF-HSWM1A18W / RF-HSWM1A18-C / RF-HSWM1A18W-C Install two anchors (H) into the holes making sure that they are flush with the drywall. Install the wall plate with the two wall plate screws. If needed, you can make small level adjustments to the wall plate, by loosening the bottom screw and shifting the wall plate until it is level.
- Page 10 STEP 2 - Option C: Installing on a solid concrete or concrete block wall CAUTION • Mount the wall plate directly onto the concrete surface (no wall covering). • Minimum solid concrete thickness: 8 in. (203 mm) • Minimum concrete block size: 8 x 8 x 16 in. (203 x 203 x 406 mm) Postion the wall plate (C) on the wall at your desired height.
- Page 11 RF-HSWM1A18 / RF-HSWM1A18W / RF-HSWM1A18-C / RF-HSWM1A18W-C Insert two anchors (H). CAUTION Be sure the anchors are seated flush with the concrete surface. Install the wall plate using two screws (F). Tighten the screws only until they are flush against the wall plate.
- Page 12 STEP 3 - Option A: Attach your Sonos PLAY:1 or other wireless speaker In addition to the Sonos PLAY:1 and PLAY:3, your speaker mount is compatible with other wireless speakers that use 1/4”-20 screws. Note: You can install your speaker right-side-up or up-side-down. •...
- Page 13 RF-HSWM1A18 / RF-HSWM1A18W / RF-HSWM1A18-C / RF-HSWM1A18W-C STEP 3 - Option B: Attach your Sonos PLAY:3 speaker Note: You can mount your speaker vertically or horizontally. Attach the interface bracket (D) to the mount (A) with the Play:3 interface screw (E).
- Page 14 Secure the assembly to your Play:3 speaker with the Play:1/Play:3 speaker screw (G). Vertical Horizontal You’ll need Phillips screwdriver (G) Play:1 / Play:3 screw (E) Play:3 interface screw (A) Mount (D) Bracket Need help? Call 1-800-620-2790 (U.S. and Canada) or 01-800-926-3010 (Mexico)
- Page 15 RF-HSWM1A18 / RF-HSWM1A18W / RF-HSWM1A18-C / RF-HSWM1A18W-C Step 4 - Mount the assembly to the wall plate Slide the speaker/wall mount assembly onto the wall plate (C). Slide the cap (B) onto the mount (A). You’ll need (B) Cap (A) Mount Need help? Call 1-800-620-2790 (U.S.
- Page 16 STEP 5- Adjusting the angle • You can rotate your mount left or right and tilt it up or down by hand to adjust the angle. Sonos Play:1 or other speakers 9° 66° 132° 27° Sonos Play:3 9° 30° 35° 70°...
- Page 17 RF-HSWM1A18 / RF-HSWM1A18W / RF-HSWM1A18-C / RF-HSWM1A18W-C Removing the speaker Use a small screwdriver to loosen the cap (B) and slide it off the mount. Slide the speaker/wall mount assembly (A) up and off the wall plate (C). Remove the Play:1/Play:3 speaker screw (G) to remove the mount (A) from your speaker.
- Page 18 Products and parts replaced under this warranty become the property of Rocketfish and are not returned to you. If service of Products or parts are required after the Warranty Period expires, you must pay all labor and parts charges.
- Page 19 • Damage due to incorrect operation or maintenance • Connection to an incorrect voltage or power supply • Attempted repair by any person not authorized by Rocketfish to service the Product • Products sold “as is” or “with all faults”...
- Page 20 REPAIR OR REPLACEMENT AS PROVIDED UNDER THIS WARRANTY IS YOUR EXCLUSIVE REMEDY FOR BREACH OF WARRANTY. ROCKETFISH SHALL NOT BE LIABLE FOR ANY INCIDENTAL OR CONSEQUENTIAL DAMAGES FOR THE BREACH OF ANY EXPRESS OR IMPLIED WARRANTY ON THIS PRODUCT, INCLUDING, BUT NOT LIMITED TO, LOST DATA, LOSS OF USE OF YOUR PRODUCT, LOST BUSINESS OR LOST PROFITS.
- Page 21 Part # 6907-302006 www.rocketfishproducts.com (800) 620-2790 (U.S. and Canada) or 01-800-926-3010 (México) ROCKETFISH is a trademark of Best Buy and its affiliated companies. Registered in some countries. Distributed by Best Buy Purchasing, LLC 7601 Penn Ave South, Richfield, MN 55423 U.S.A.
Need help?
Do you have a question about the RF-HSWM1A18 and is the answer not in the manual?
Questions and answers