
Related Manuals for Sony CMT-SP55TC


Summary of Contents for Sony CMT-SP55TC
- Page 1 4-230-235-11(1) Micro Hi-Fi Component System Operating Instructions CMT-SP55TC ©2000 Sony Corporation...
- Page 2 Do not install the appliance in a confined space, such as a bookcase or built-in cabinet. This appliance is classified as a CLASS 1 LASER product. The CLASS 1 LASER PRODUCT MARKING is located on the rear exterior. This system is equipped with the Dolby* B-type noise reduction system.
-
Page 3: Table Of Contents
Table of Contents Getting Started Step 1: Hooking up the system ... 4 Step 2: Setting the time ... 8 The CD Player Playing a CD ... 9 Playing CD tracks in random order — Shuffle Play ... 10 Programming CD tracks —... -
Page 4: Getting Started
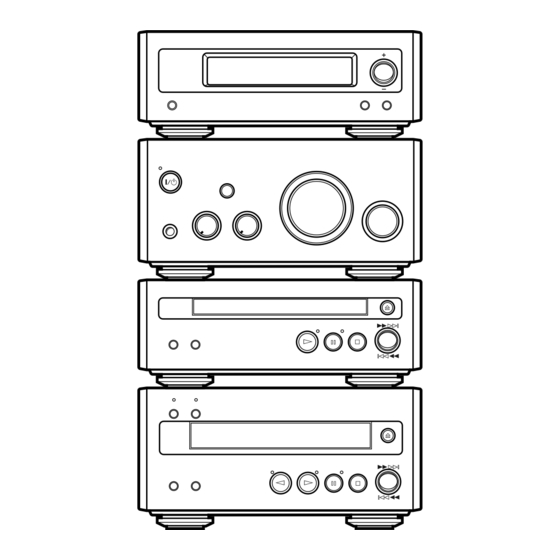
Be sure to hook up the system with the mains lead unplugged from the mains. Hooking up the system with the mains lead plugged in may cause the system to malfunction. Right speaker FM aerial CMT-SP55TC rear panel AM loop aerial Tuner... - Page 5 Preparation Stack the components vertically in the order shown in the illustration below. Connect the system cables to the SYSTEM CONTROL connectors on each component. Connect the tuner and amplifier Connect the system cable on the amplifier to the SYSTEM CONTROL 1 (white) connector on the tuner.
- Page 6 Step 1: Hooking up the system (continued) The supplied speakers can be used as either the left or right speakers. Place the speaker connected to the SPEAKER R terminals on the right side, and the speaker connected to the SPEAKER L terminals on the left side of the system.
-
Page 7: Adjusting The Brightness Of The Display Back Light
Arranging the components side by side Once you have finished the connections, you can rearrange the components as desired. Inserting two R6 (size AA) batteries into the remote With normal use, the batteries should last for about six months. When the remote no longer operates the system, replace both batteries with new ones. -
Page 8: Step 2: Setting The Time
Step 2: Setting the time You must set the time beforehand to use the timer functions. The clock is on a 24-hour system for the European model, and a 12-hour system for other models. The 24-hour system is used for illustration purposes. -
Page 9: The Cd Player
The CD Player Playing a CD To turn on the system, press ?/1 (power). ?/1 (power) Press A on the CD player and place a CD on the disc tray. With the label side up. When you play a CD single (8 cm CD), place it on the inner circle of the tray. -
Page 10: Playing Cd Tracks In Random Order
Playing CD tracks in random order You can play all the tracks on a CD in random order. Press CD to switch the function to CD. Press PLAY MODE repeatedly until “SHUFFLE” appears. Press N. Shuffle Play starts. To cancel Shuffle Play Press PLAY MODE repeatedly until “SHUFFLE”... -
Page 11: Programming Cd Tracks
Programming CD tracks — Programme Play You can make a programme of up to 25 tracks in the order you want them to be played. You can also make a Synchro Recording of the programme on the tape (see page 20). Press CD to switch the function to CD. -
Page 12: Playing Cd Tracks Repeatedly
Programming CD tracks (continued) Tips • You can select the desired track using . or > in step 3. Press . or > repeatedly until the desired track number appears, then press ENTER/YES. • The programme you made remains after Programme Play finishes. -
Page 13: Using The Cd Display
Using the CD display You can check the total number of tracks, the total playing time, and the remaining time on the track or on the CD. When a CD TEXT disc is loaded, you can check the information recorded on the disc, such as the titles or artist names. -
Page 14: Labelling A Cd
Labelling a CD You can label up to 50 CDs with titles of up to 20 symbols and characters. Whenever you load a labelled CD, the title appears in the display. Notes • You cannot label a CD for which “CD-TEXT” appears in the display. -
Page 15: Erasing A Disc Title
Press CURSORt. The character you selected in step 4 stops flashing and the cursor shifts to the right. Cursor Repeat steps 3 to 5 to complete the entire title. If you made a mistake Press CURSORT or t until the character you want to change flashes, then repeat steps 3 to 5. -
Page 16: Checking Disc Memo Information
Checking Disc Memo information Checking a disc title Press CD to switch the function to CD. Press MENU/NO in stop mode. To cancel checking Press x. CD TEXT information is copied to MD in some cases. Press . or > repeatedly until “Name Check?”... -
Page 17: The Tape Deck
The Tape Deck Recording a CD on a tape — CD-TAPE Synchro Recording You can make an analogue recording of a CD on a tape. You can use TYPE I (normal) or TYPE II (CrO ) tape. The recording level is automatically adjusted. -
Page 18: Playing A Tape
Recording a CD on a tape (continued) Press S on the tape deck. Recording starts. When the recording is completed, the CD player and the tape deck stop automatically. Do this Press s on the tape deck or CD Stop recording player. - Page 19 Press A on the tape deck to open the cassette tray and insert a recorded tape. With the side you want to play facing up. Press A again to close the cassette tray. Turn FUNCTION until “TAPE” appears. Press DIRECTION repeatedly until g appears to play one side or h (or j*) to play both sides.
-
Page 20: Recording Your Favourite Cd Tracks On A Tape
Recording your favourite CD tracks on a tape — CD-TAPE Synchro Recording You can select your favourite CD tracks with the Programme Play feature, then record the programme on a tape using the Synchro Recording feature. This lets you rearrange the track order while making sure the playback time fits on each side of the tape. -
Page 21: Recording Your Favourite Portions
Press H on the tape deck to record starting from the front side. To record from the reverse side, press h on the tape deck. Press DIRECTION repeatedly until g appears to record on one side or h (or j) to record on both sides. If you select both sides recording and the tape reaches the end of the front side part- way through a track, the entire track is... -
Page 22: Recording From The Radio
Recording your favourite portions on a tape (continued) Press REC z. The tape deck stands by for recording. Press H on the tape deck to record starting from the front side. To record from the reverse side, press h on the tape deck. Press DIRECTION repeatedly until g appears to record on one side or h (or j) to record on both sides. - Page 23 Press TUNING MODE repeatedly until “PRESET” appears. Press TUNING + or – to select the desired preset station. To preset radio stations, see page 24. Preset number and frequency (or station name* or RDS station name**) * The station name appears only if you have labelled the station (see page 27).
-
Page 24: Tuner
Tuner Presetting radio stations You can preset up to 30 stations, 20 for FM and 10 for AM. Press @/1 (power) to turn on the system. Press BAND TUNER repeatedly to select “AM” or “FM”. Press TUNING MODE repeatedly until “AUTO”... -
Page 25: Listening To The Radio
To tune in a station with a weak signal 1 Press TUNING MODE repeatedly until “MANUAL” appears in step 3. 2 Press m or M repeatedly to tune in the station and continue from step 5. To set another station to the exist preset number Start over from step 2. - Page 26 Listening to the radio (continued) Press . or > to select the desired preset station. Preset number and frequency (or station name* or RDS station name**) * The station name appears only if you have labelled the station (see page 27). ** European model only.
-
Page 27: Labelling The Preset Stations
Labelling the preset stations — Station Name You can label each preset station with up to 12 characters (Station Name). The Station Name appears when you tune in the station. CURSORT Press BAND TUNER repeatedly to select “AM” or “FM”. Press TUNING MODE repeatedly until “PRESET”... -
Page 28: Using The Radio Data System (Rds)
Labelling the preset stations (continued) Repeat steps 5 to 7 to complete the entire title. If you made a mistake Press CURSORT or t until the character you want to change flashes, then repeat steps 5 to 7. To erase a character Press CURSORT or t until the character you want to erase flashes, then press CLEAR. -
Page 29: Timer/Other Features
Timer/Other Features Falling asleep to music — Sleep Timer You can set the system to turn off after a certain time, so that you can fall asleep to music. You can preset the time to turn off in 10 minutes increments. -
Page 30: Waking Up To Music - Daily Timer
Waking up to music — Daily Timer You can wake up to music at a preset time. Make sure you have set the clock (see page 8). To wake up to the radio, preset the radio stations first (see page 24). 4–7 Prepare the sound source you want to play. -
Page 31: Timer Recording Radio Programmes
To cancel the procedure Press CLOCK/TIMER SET. To change the setting Start over from step 1. To check the setting/activate the timer Press CLOCK/TIMER SELECT and press . or > repeatedly until “SEL DAILY” appears. Then press ENTER/YES. It is not necessary to set the start and stop times every time. - Page 32 Timer recording radio programmes (continued) Set the time to start recording. Press . or > repeatedly to set the hour, then press ENTER/YES. The minute indication flashes. Press . or > repeatedly to set the minute, then press ENTER/YES. The hour indication flashes again. Set the time to stop recording following the procedure in step 4.
-
Page 33: Adjusting The Sound
The system automatically turns on about 30 seconds before the start time and prepares for timer-recording. Recording starts as soon as the system is ready, so recording may start earlier than the preset time. Notes • You cannot activate Daily Timer and the recording timer at the same time. -
Page 34: Optional Components
Optional Components Connecting audio components To enhance your system, you can connect optional components. Refer to the operating instructions of each component. Connecting the optional MD deck MDS-SP55 CD Synchro Recording and Timer-recording are possible when the SYSTEM CONTROL 3 connectors are connected. - Page 35 Connecting an MD deck for digital recording You can make a digital recording of a CD on an MD by connecting your MD deck using an optical cable (not supplied). Refer to the operating instructions included with your MD deck for details.
-
Page 36: Connecting External Aerials
Connecting external aerials Connect an external aerial to improve reception. FM aerial Connect an commercially available FM external aerial, or you can use a TV aerial instead. Jack type A IEC standard socket connector (not supplied) Jack type B 75-ohm coaxial cable (not supplied) AM aerial Connect a 6- to 15- meter insulated wire to the... -
Page 37: Additional Information
• Before you move the system, turn off the system and make sure all operations have finished. If you have any questions or problems concerning your system, please consult your nearest Sony dealer. On the speaker system This speaker system is magnetically shielded and can be used near TV sets. -
Page 38: Cleaning The Tape Heads
Precautions (continued) Before placing a cassette in the tape deck Take up any slack in the tape. Otherwise, the tape may get entangled in the parts of the tape deck and become damaged. When using a tape longer than 90 minutes The tape is very elastic. -
Page 39: Troubleshooting
Should any problem persist, consult your nearest Sony dealer. When bringing the system in for repairs, be sure to bring in the entire system. This product is a system product, and the entire system is needed to determine the location requiring repair. - Page 40 • Locate the aerials as far away from the speaker cords as possible. • Consult your nearest Sony dealer if the supplied AM aerial has come off the plastic stand. • Try turning off surrounding electrical equipments.
-
Page 41: Messages
Optional Components There is no sound. • Refer to General item “There is no sound.” on page 39 and check the condition of the system. • Connect the component properly (see page 34) while checking: – if the cords/cables are connected properly. –... -
Page 42: Specifications
Tape deck section (TC-SP55) Recording system 4-track 2-channel stereo Frequency response (DOLBY NR OFF) 40 – 14,000 Hz (±3 dB), using Sony TYPE I cassettes 40 – 15,000 Hz (±3 dB), using Sony TYPE II cassettes Speaker (SS-CSP55) Speaker system 2-way, bass-reflex type... - Page 43 General Power requirements European model: 230 V AC, 50/60 Hz Other models: 110 – 120 V or 220 – 240 V AC, 50/60 Hz Power consumption 70 watts Dimensions (w/h/d) incl. projecting parts and controls Tuner section: Approx. 202 Amplifier section: Approx.
-
Page 44: Index
H, I, J, K Hooking up external aerial 36 optional components 34 the aerials 6 the mains 6 the speakers 5 Sony Corporation Printed in Malaysia Labelling a CD 14 a preset station 27 Listening to the radio 25 Manual tuning 26...