Table of Contents
Advertisement
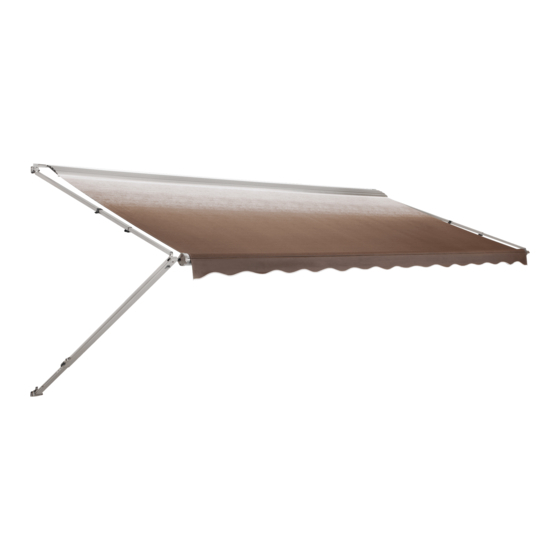
Model: Dometic A&E 8500 Awning
Australia's
Favorite Awning
For great looks and long life, more
RVers choose the A&E Imperial
8500 than any other brand or
model. Its heavy-duty premium
vinyl canopy has the rich vibrant
Horizon stripe color pattern on top
and bottom with color-matched
weathershield.
The dependable, easy-operating
A&E Universal Hardware is
available in straight or curved
models to fit virtually any vehicle.
• Large torsion assembly for
dependability, long life and
smooth, effortless operation
• Patented anti-slack rafter pivot
keeps fabric tinder tension when
moving arms between pivot and
carport positions
• A&E's heaviest polyester
reinforced vinyl fabric side hems
for added durability
• Exclusive Permaloop pull strap
makes it easier to open awning
A&E 8500 Colours
BURGUNDY ROSE
CODE DZ
ALPINE GREEN/PERIWINKLE
CODE DY
FAWN/CINNAMON
CODE EA
GULF BLUE
CODE DX
• Lengths 8ft to 25ft in
one foot increments
• Full approx. 8ft extension
• 12 Months Warranty Australia wide.
• Easiest-to-use ergonomic lock knobs
• A&E Universal hardware
A&E AWNINGS
The color in this chart should be used
as a guide only. For exact fabric color,
see A&E's fabric sample kit.
Advertisement
Table of Contents

Related Manuals for Dometic A&E 8500 Series


Summary of Contents for Dometic A&E 8500 Series
- Page 1 A&E AWNINGS Model: Dometic A&E 8500 Awning Australia’s Favorite Awning For great looks and long life, more RVers choose the A&E Imperial 8500 than any other brand or model. Its heavy-duty premium vinyl canopy has the rich vibrant Horizon stripe color pattern on top and bottom with color-matched weathershield.
- Page 2 8410000, 8471000, 8472000, 8474000, 8475000, 8480000, 8481000, 8481003, 8490000, 8491000, Series Universal Hardware for use with The Dometic Corp. 8500, 9000 Fabric Roller Tube Assembly Dometic PTY Lire et comprendre ce manuel avant de This manual must be read and un- Clayton Vic procéder à...
-
Page 3: Safety Instructions
CAUTION: means if the safety information is not followed someone might be injured and/or damage to equipment might occur. Read and follow all safety information and instruc- tions. Dometic... - Page 4 FIG. 4B SLAT IMPORTANT: Read and understand ALL of the follow- (9000 Awnings) ing steps before beginning installation. The Dometic Corporation reserves the right to modify appear- ances and specifications without notice. FIG. 4A FIG. 3 AWNING BEFORE FABRIC RAIL AWNING Installation of A&E Awnings will briefly require three people.
- Page 5 6. Install Bottom Brackets Place top pivot in position over awning rail from below Snap the patio foot on the bottom of the inner arm into the as shown in FIG. 5B. Align pivot directly behind and bottom bracket. (FIGS. 6A & 6B). Insure the arm top centered with the main support arm.
- Page 6 9. Secure Awning to Awning Rail 7. Install Stop Plugs. Open and close awning a few times to allow for natural self adjustment of awning. Secure by installing a #6 x 1/2" Tek screw into the rail. This step is essential for the proper (FIG.
- Page 7 TO OPEN AWNING: Back to index Hook the rod into the loop of the pull Using the provided pull rod, Loosen the black adjustment knob behind each main arm. strap, and pull the awning all the way reach up and pull the lock- •...
- Page 8 TO CLOSE AWNING: Pull stakes from the ground, lower arm to the shortest position, swing arm toward the vehicle, and snap the patio foot into the bracket. Repeat for other side and proceed to next step. Raise the lift handle to release the lock button.
- Page 9 Repeat other side. Your awning is now ready for travel. • If malfunctions occur that cannot be corrected by reviewing this user’s guide, A&E ACCESSORIES FOR COMFORT AND CONVENIENCE: contact a qualified Dometic service technician. • A&E Slide Topper™ protects your slideout unit. •...
- Page 10 A&E AWNINGS - SPARE PARTS Model: Dometic A&E 8500/9000 Awning...
- Page 11 A&E AWNINGS - SPARE PARTS Model: Dometic A&E 8500/9000 Awning SATIN HARDWARE ITEM DESCRIPTION TALL SHORT 8482003.001 8483003.002 Arm, main (A1-A6) (2 req.) 3104502.293S 3104502.301S A1 Handle. lift (G1-G2) 830644 830644 A2 Pop Rivet (4 req.) 308171.020 308171.020 A5 Safety lock 830587.001...
- Page 12 A&E AWNINGS - SPARE PARTS Model: Dometic A&E 8500/9000 Awning...
- Page 13 A&E AWNINGS - SPARE PARTS Model: Dometic A&E 8500/9000 Awning WHITE HARDWARE ITEM DESCRIPTION TALL SHORT 8483003.401B 8483003.402B Arm, main (A1-A6)(2 req.) 3104502.293B 3104502.301B A1 Handle, lift (G1-G2) 830644 830644 A2 Pop Rivet (4 req.) 308171.020 308171.020 A5 Safety lock 830587.001...
- Page 14 A&E AWNINGS - SPARE PARTS Model: Dometic A&E 8500/9000 Torsion Assemblies Part No.: 3108399.035 TORSION ASSEMBLY – RIGHT-HAND Part No.: 3108399.019 TORSION ASSEMBLY – LEFT-HAND...
- Page 15 A&E AWNINGS - SPARE PARTS Model: Dometic A&E 8500/9000 Torsion Assemblies ITEM PART DESCRIPTION 730013.001 Spring, torsion 730297.001 Rod, torsion 3104384.031 Pin, drive 1/8 (2 req.) 830567.005 Top casting, painted w/Warning Label 3104384.023 Pin, drive 5/32 830496.012 End cap asm., painted 730013.002...
- Page 16 A&E AWNINGS - SPARE PARTS Model: Dometic A&E 8500/9000 Awning ITEM PART DESCRIPTION 3108399.001 Torsion Asm, RH 3108399.019 Torsion Asm, LH 940001 Pull Strap 3108340.008 Roller tube 9’ 3108340.009 Roller tube 10’ 3108340.010 Roller tube 3108340.011 Roller tube 3108340.012 Roller tube 3108340.013...
- Page 17 8300 8500 9000 REPLACEMENT OF TORSION ASSEMBLY 1. Insert the leg of the idler opposite the torsion spring screw and washer over the seamed groove of the roller tube. See FIG. 10 FIG. 10. NOTE: The idler leg opposite the torsion spring screw has a triangle shape.
- Page 18 FIG. 13A RIGHT-HAND END CAP “A” Fabric without hemmed edge Cut Poly Rope flush with end of tube See Fig. 11 Trim Poly Rope Open leaving sufficient Groove length to tuck in place behind the open groove Place open notch Valance in alignment with open groove...
- Page 19 RIGHT-HAND END CAP “B” Fabric without hemmed edge Cut Poly Rope flush with end of tube See Fig. 11 FIG. 13D Trim Poly Rope Open leaving sufficient Groove length to tuck in place behind the open groove Place open notch Valance in alignment with valance groove...
- Page 20 FIG. 13G LEFT-HAND END CAP Fabric The Left-Hand End Cap is always placed with open notch in alignment with open groove Fig. 11 Trim Poly Rope leaving sufficient length to tuck in place behind groove Valance Open Groove F. WINDING TORSIONS AWNINGLENGTH ROLLED UP EXTENDED...
- Page 21 This program will address the most common system problems associated with the A&E Patio Awnings supplied by The Dometic Corporation. Our intent is to provide you with a guideline of checks to make, should you encounter one of the following symptoms.
- Page 22 A&E DIAGNOSTIC SERVICE MANUAL Patio Awnings SYMPTOM CAUSE REFER TO 14. Water leaks through guard Operation Guard Tube deflection 15. Water drips down the side of coach Awning rail Rubber seal 16. Water leaks through fabric Fabric 2.11 SECTION 1 1.2 WASHER STACK-UP HARDWARE COMPONENTS Washer stack-up merely means the proper positioning of...
- Page 23 A&E DIAGNOSTIC SERVICE MANUAL Patio Awnings On the Series 9000 awning the top mounting bracket broken off, the push button assembly must be replaced. can be mounted lower when possible. If the top mount- At times the lock pin of the push button assembly can ing bracket is mounted above center of the awning rail, break off and jam between the push button housing and the aluminum guard may not cover the fabric completely...
- Page 24 A&E DIAGNOSTIC SERVICE MANUAL Patio Awnings Attempting to open the awning without first loosening TOP MOUNTING BRACKET the black adjustment knobs can damage the slider of the secondary rafter, making it difficult to open the AWNING RAIL awning. SECTION 2 FABRIC ROLLER TUBE ASSEMBLY (FRTA) CLEARANCE 2.1 POSITION...
- Page 25 A&E DIAGNOSTIC SERVICE MANUAL Patio Awnings To check fabric for square, measure from the top right The seams of the vinyl awning are electronically welded hand corner of the fabric (not the weatherguard) to the together with a heat seal. The welded seams are the bottom left hand corner at the poly rope.
- Page 26 A&E DIAGNOSTIC SERVICE MANUAL Patio Awnings 9000 WITH HINGE SLAT A - VINYL STRIP B - HINGE SLAT VINYL STRIP "A" C - TOP SLAT D - MAIN SLAT E - AWNING RAIL INSTALL A 1/8" POP RIVET EACH END HINGE SLAT "B"...
- Page 27 A&E DIAGNOSTIC SERVICE MANUAL Patio Awnings The roller tube is a 3-1/2 inch diameter tube. It has three provides tension on the roller tube to roll the awning up symmetrical grooves to retain the poly ropes of the awning into the travel position. fabric.
- Page 28 A&E DIAGNOSTIC SERVICE MANUAL Patio Awnings TORSION ASSEMBLY TORQUE SPECIFICATIONS Number of Turns MODEL NUMBER 5000 7000 7500 9500 Awning Length (Ft.) 8000 Grande Pavillion 8500 9000 SPRING IDENTIFICATION CHART Standard Heavy Duty 10' 8" Wire Dia. .120 .140 Painted red cap Painted red cap end and no paint end and white...
- Page 29 A&E DIAGNOSTIC SERVICE MANUAL Patio Awnings If the pull strap is rolled up at one end of the awning, it improperly. A close inspection of the stitching could can cause the fabric to telescope in that direction during reveal the cause of a sag or pucker. roll-up, and create a bulge or wrinkles at that end.
- Page 30 A&E DIAGNOSTIC SERVICE MANUAL Patio Awnings There are three types of awning rail used in the RV AWNING RAIL industry. Of these, type A and B (see below) are 4.1 LEAKAGE acceptable for use on the 9000 Series awning that When water drips down the side of the coach, the seal utilizes a hinge slat (see Sec.2.5) .
Need help?
Do you have a question about the A&E 8500 Series and is the answer not in the manual?
Questions and answers
I have followed all of the instructions. However the lever wont go to the down position unless I pull the arm straight out from the rv. and then from there I'm not sure how to make it work.
If the lever on your Dometic 8500 Series does not go to the down position, check if the main support arm can extend freely. If not, inspect the adjustable arm assembly for nicks, burrs, bends, or twists. If any damage is found, the adjustable arm assembly must be replaced.
This answer is automatically generated