Table of Contents
Advertisement
Quick Links
Advertisement
Table of Contents

Subscribe to Our Youtube Channel
Related Manuals for Efergy Elite True Power Meter


Summary of Contents for Efergy Elite True Power Meter
- Page 1 Efergy True power Meter Instruction manual...
-
Page 2: Table Of Contents
CONTENT INTRODUCTION WARRANTY SAFETY INFORMATION IN THE BOX HARDWARE INSTALLATION Find the main feed wires Installing the AC/AC adaptor Install the sensors Connect to the transmitter Link the transmitter and monitor MONITOR SETUP Setting time and date Currency Programming the tariffs Summer tariff Winter tariff Carbon emissions ratio... -
Page 3: Introduction
Efergy Energy Meters show the amount of energy that a household is consuming at the time the display is read. The display can also give the user a reading showing usage in financial terms. -
Page 4: Warranty
- Read this instruction manual for safe, proper and efficient use - Keep your original receipt Efergy warrants this Energy Meter for the period of 1 year, from the date of delivery, to be free of defects in materials or workmanship (excluding batteries). -
Page 5: Safety Information
When installing the Efergy Energy Meter you should find that everything is straight-forward. However, there are a number of important health and safety issues which you need to be aware of: The current sensors clip onto the supply cables inside the main electrical panel, which delivers power to your home. - Page 6 Efergy energy monitoring systems are considered plug and play devices that meet all regulatory requirements for installation in the United States and Canada. Do not force or bend the cables at any point during installation. If you are worried or have any concerns about the installation, please contact a qualified electrician immediately.
-
Page 7: In The Box
IN THE BOX The Efergy True Power Meter pack contains the following elements: 1 x AC/AC adaptor 1 x Monitor 1 x Transmitter 2 x XL Sensor 2 x Anchors 1 x Instruction manual 1 x AC/DC adaptor 2 x Screws... -
Page 8: Hardware Installation
HARDWARE INSTALLATION Efergy Energy Meters are installed by clipping the sensors around the feed wires of your electric panel. In Canada and the United States, the residential voltage is 120V for small appliances and lighting and 240V for major appliances and equipment, such as central air conditioner, electric water heater and oven. - Page 9 The meter can be wall-mounted at a convenient location or taken throughout your home to determine how much different electrical loads consume. Efergy Energy Meters update every 10 seconds, so you can apply any new load and watch for the change in the reading on your display.
-
Page 10: Find The Main Feed Wires
Find the main feed wires __________________________________________________________ Locate your electrical panel Find the main feed wires for your home Hardware installation follows the same steps in Remove the outside cover from your electrical this case as with an 120/240V panel. panel and locate the main feed wires. You should find up to four feed wires entering your main You can normally find your main electrical panel electrical panel: two black wires, one white wire... -
Page 11: Installing The Ac/Ac Adaptor
Screw the locknut onto the threaded hub of the AC/AC adaptor securing the adaptor in place through the wall of the service panel as shown. Note: The AC/AC adaptor is only to be used for powering the Efergy True Power Meter Transmitter. -
Page 12: Install The Sensors
Step 4 - Install the black wire Remove sufficient insulation from the end of the black wire, exposing the bare conductor. Turn off any 15A single pole breaker and secure the exposed bare wire under the breaker attachment screw. If all breakers are in use, do not place two wires under the screw on the breaker. -
Page 13: Connect To The Transmitter
Connect to the the transmitter ________________________________________________________ Insert 3 AA batteries into the back of the transmitter. Plug the sensor lead with the “L” into the left port on the transmitter, the sensor lead “R” into the centre port on the transmitter, and the power supply lead into the square right port on the transmitter. -
Page 14: Link The Transmitter And Monitor
Link the transmitter and monitor __________________________________________________________ LINK DC 5V Press the LINK button on the back of the monitor Power on the monitor by plugging it into a household power outlet with the included AC/DC and hold for two seconds. The transmission power adaptor, or insert 3 AA batteries into the signal symbol will flash for one minute or until... - Page 15 The transmission signal symbol will flash for While the transmission signal symbol in the one minute or until the transmitter and monitor are display flashes, push the button on the transmitter linked. and wait until the transmission signal symbol becomes solid.
-
Page 16: Monitor Setup
MONITOR SETUP The monitor needs to know the time, date, unit cost per kWh charged by your electricity supplier, along with voltage and alarm settings. The following steps will move through each of these settings. Backward Forward Push HISTORY button at any Press and hold down time, your settings will be MODE/SET button for three... -
Page 17: Setting Time And Date
Setting time and date Press and hold for 2 seconds the TIME SET. button located on the reverse of the monitor. The time setup will flash on the display. Use the BACKWARD and FORWARD buttons to set the hour. Press the MODE/SET button once to save. Repeat the same process to set the minutes. -
Page 18: Programming The Tariffs
Programming the tariffs Your monitor is pre-programmed so this process may not apply for you. Tariff examples Summer (May1-Oct31) Weekdays Your monitor has been pre-programmed from the factory in accordance with the standardized Ontario time of use tariffs, including weekends as off-peak. The display will also automatically change from the ‘Summer Tariff Structure’... -
Page 19: Summer Tariff
☼ Summer tariff Press the MODE/SET button to enter tariff hours setting - you will note that the words SUMMER TARIFF 1 will appear. The 1 represents the tariff times for weekdays (represented by 1, 2, 3, 4) and weekends (represented by 5). The time setting FROM will be flashing at the top right, use the BACKWARD and FORWARD buttons to change the hour, then press the MODE/SET button to set. -
Page 20: Winter Tariff
Winter tariff The programming procedure for winter tariffs is identical to the summer tariffs, you will see WINTER TARIFF 1 on the monitor. Use the MODE/SET button to access and the BACKWARD and FORWARD buttons to adjust time values. Press the MODE/SET button to set and proceed as above through all 3 tariffs. -
Page 21: Carbon Emissions Ratio
Carbon emissions ratio You can also alter the carbon emissions ratio displayed on your monitor. This can be increased and decreased using the BACKWARD and FORWARD buttons. Press the MODE/SET button to store the value. The North American average is 0.50kg.CO2/ kWh, this is the default value. -
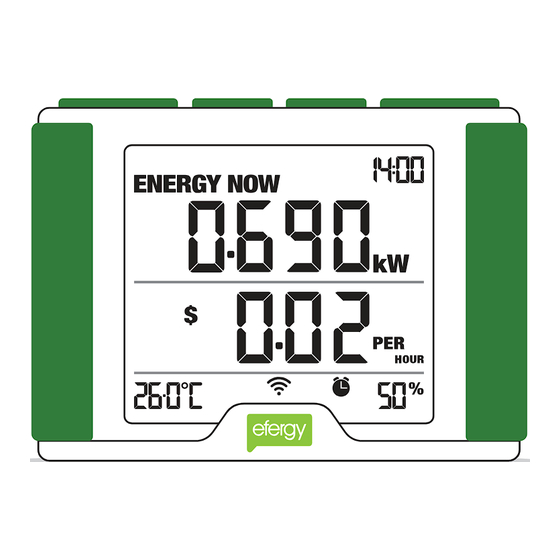
Page 22: Get Familiar With The Display
GET FAMILIAR WITH THE DISPLAY ENERGY NOW The home screen of the display is the ENERGY NOW, it displays accurate energy (KW) usage in real-time. Push the MODE/SET button to change information displayed from cost (displayed in $). The lower part of the screen shows estimated cost... - Page 23 HISTORY The HISTORY mode displays the historical consumption information for days, weeks and months in kWh, $ and KgCO2. The lower part of the screen shows the average information in days, weeks, or months in kWh, $ and KgCO2. Push the HISTORY button to access daily, weekly, and monthly stored data. Use the BACKWARD FORWARD buttons to scroll between dates and compare consumption data.
-
Page 24: How Can I Reduce My Energy Use
How can I reduce my energy use? Efergy Energy Monitors show you how much energy you’re using, how much it costs, the average and historic usage data. Once you’ve installed your energy monitor, walk around your home and switch off everything you can, then walk around holding your energy monitor or app, and switch things back on as you go. - Page 25 FAQs If I remove the batteries will I lose the information on the monitor? The monitor has an internal memory, so if you need to change or remove the batteries and the information stored on it will not be lost. How do I reset the monitor (clear the stored data and start again)? Press and hold the MODE/SET and HISTORY buttons simultaneously for two seconds.
-
Page 26: Customer Support
If you have any questions about using your monitor or if you’d like further advice on monitoring electricity at home, please feel free to contact us or visit the website for up-to-date information, downloads and frequently asked questions. Website: www.efergy.com Support site: efergy.com/support Technical support: customercare@efergy.com Sales: sales@efergy.com Distributed by Florida Eco Products Website: www.floridaecoproducts.com... -
Page 27: Technical Details
TECHNICAL DETAILS Model name: Elite True Power Meter Model No. ELITE-TPM-NA-4.0 Frequency: 433.5MHz Transmission time: Transmission range: 130-230ft (40-70m) Working voltage range: 120/240V 60Hz - Single phase only Measuring current: 50mA - 120A nominal (200A Max.) Carbon ratio: 0.50 kgCO2/kWh... - Page 28 Technical notes for electrician Electricity system Sensors # Volt setting 120/240V, 4 Wire, Single Phase (typical residential service in US and Canada) 240V, 3 Wire, Single Phase 120/208V, 3 Wire, 2 Phases of a 3 Phase 120/208V 2 Sensors Three wires phase 1 live, phase 2 live, Grid 120V is live to neutral and 208 is phase to phase.
- Page 29 www.efergy.com...
Need help?
Do you have a question about the Elite True Power Meter and is the answer not in the manual?
Questions and answers