Table of Contents
Advertisement
Available languages
Available languages
Quick Links
®
PAVILLON-SEITENWÄNDE / GAZEBO SIDE PANELS /
PAROIS LATÉRALES POUR TONNELLE
PAVILLON-SEITENWÄNDE
Montage-, Bedienungs- und Sicherheitshinweise
PAROIS LATÉRALES POUR TONNELLE
Instructions de montage, d'utilisation et consignes de sécurité
BOČNÍ STĚNY NA ZAHRADNÍ STAN
Pokyny k montáži, obsluze a bezpečnostní pokyny
PAREDES LATERAIS PARA TENDA
Indicações de montagem, utilização e segurança
IAN 280583
IAN 280592
GAZEBO SIDE PANELS
Assembly, operating and safety instructions
PAVILJOENZIJWANDEN
Montage-, bedienings- en veiligheidsinstructies
PAREDES LATERALES PARA CARPA
Instrucciones de montaje, de uso y de seguridad
Advertisement
Table of Contents

Subscribe to Our Youtube Channel
Related Manuals for FLORABEST 280583


Summary of Contents for FLORABEST 280583
- Page 1 Montage-, bedienings- en veiligheidsinstructies BOČNÍ STĚNY NA ZAHRADNÍ STAN PAREDES LATERALES PARA CARPA Pokyny k montáži, obsluze a bezpečnostní pokyny Instrucciones de montaje, de uso y de seguridad PAREDES LATERAIS PARA TENDA Indicações de montagem, utilização e segurança IAN 280583 IAN 280592...
- Page 2 DE / AT / CH Montage-, Bedienungs- und Sicherheitshinweise Seite GB / IE Assembly, operating and safety instructions Page FR / BE Instructions de montage, d‘utilisation et consignes de sécurité Page NL / BE Montage-, bedienings- en veiligheidsinstructies Pagina Pokyny k montáži, obsluze a bezpečnostní pokyny Strana Instrucciones de montaje, de uso y de seguridad Página...
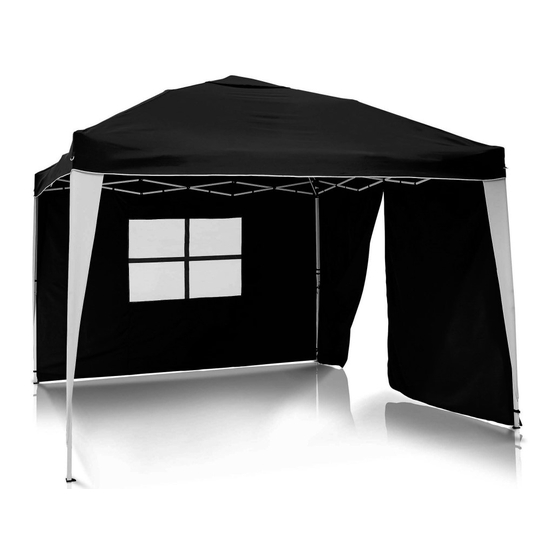
- Page 4 Pavillon-Seitenwände Lieferumfang 1 Seitenwand mit Fenster Einleitung 1 Seitenwand mit Reißverschluss 1 Montage- und Bedienungsanleitung Wir beglückwünschen Sie zum Kauf Ihres neuen Produkts. Sie haben sich damit für ein Sicherheitshinweise hochwertiges Produkt entschieden. Machen Sie sich vor der ersten Inbetriebnahme mit dem Produkt ver- traut.
-
Page 5: Montage
Wählen Sie einen möglichst festen, ebenerdigen Kleine undichte Stellen an den Nähten können mit Untergrund als Standplatz. einem Nahtspray behoben werden und für die Eine falsche Reihenfolge der Montage bzw. Pavillonplane kann ein Imprägnierspray verwen- Demontage könnte einen Schaden am Produkt det werden. -
Page 6: Reinigung Und Pflege
stehen Ihnen gegen den Verkäufer des Produkts und den Eckstangen / Teleskopstangen gesetzliche Rechte zu. Diese gesetzlichen Rechte Pavillons (Abb. A). Stellen Sie sicher, dass der werden durch unsere im Folgenden dargestellte umgelegte Saum an den Rändern der Seiten- Garantie nicht eingeschränkt. wände nach Innen zeigt. -
Page 7: Safety Notices
Gazebo Side Panels Scope of delivery 1 Side wall with window Introduction 1 Side wall with zip 1 Set of assembly instructions and instructions for use We congratulate you on the purchase of your new product. You have chosen a high quality Safety Notices product. -
Page 8: Installation
Do not remove any sewn-in labels, type plates or Installation instructions. Please also familiarise yourself with the local fire Note: We recommend 2 people to assemble and protection regulations. dismantle this product. This product is constructed for quick assembly and Tip: Familiarise yourself with assembly of the product dismantling and is not suitable for long-term use. -
Page 9: Cleaning And Care
Cleaning and Care The warranty applies to defects in material or manu- facture. This warranty does not cover product parts subject to normal wear, thus possibly considered Never wash the product in a washing machine. consumables (e.g. batteries) or for damage to fragile Never use petrol, solvent or other cleaning parts, e.g. -
Page 10: Utilisation Conforme
Parois latérales pour tonnelle Contenu de la livraison 1 cloison latérale avec fenêtre Introduction 1 cloison latérale avec fermeture zippée 1 notice de montage et d'utilisation Nous vous félicitons pour l‘achat de votre nouveau produit. Vous avez opté pour un Consignes de sécurité... - Page 11 Le non respect de l'ordre de montage ou de Utilisez uniquement ce produit comme une cloison démontage peut endommager le produit. Toute latérale de remplacement sur les pavillons exis- responsabilité est exclue. tants. Ne pas enlever les étiquettes cousues de type Avant chaque utilisation, vérifiez que le produit ne signalétique ou indicateur.
-
Page 12: Nettoyage Et Entretien
Démontage des cloisons latérales Ce produit bénéficie d‘une garantie de 3 ans à compter de sa date d’achat. La durée de garantie débute à la date d’achat. Veuillez conserver le ticket Ouvrez les fermetures auto-agrippantes les unes de caisse original. Il fera office de preuve d’achat. après les autres sur les montants de coin / mon- tants télescopiques et les tringles croisées du... - Page 13 Paviljoenzijwanden Omvang van de levering 1 zijwand met raam Inleiding 1 zijwand met ritssluiting 1 montage- en gebruiksaanwijzing Hartelijk gefeliciteerd met de aankoop van uw nieuwe product. U hebt voor een hoog- Veiligheidsinstructies waardig product gekozen. Maak u voor de eerste ingebruikname vertrouwd met het product.
- Page 14 Een verkeerde volgorde bij de montage of de- Gebruik het product alleen als vervangende montage kan schade aan het product veroorza- zijwanden voor bestaande paviljoens. ken. Elke vorm van aansprakelijkheid is uitgesloten. Controleer het product voor elk gebruik op Verwijder geen ingenaaide etiketten, type- of beschadigingen of slijtage.
-
Page 15: Reiniging En Onderhoud
Zijwanden demonteren stublieft. Dit document is nodig als bewijs voor aankoop. Open na elkaar de klittenbandsluitingen bij de Wanneer binnen 3 jaar na de aankoopdatum van dit hoekstangen/telescoopstangen en bij het ge- product een materiaal- of productiefout optreedt, dan kruiste stangenstelsel van het paviljoen (afb. - Page 16 Boční stěny na zahradní stan Obsah dodávky 1 postranní stěna s oknem Úvod 1 postranní stěna se zipem 1 návod k montáži a obsluze Blahopřejeme Vám ke koupi nového výrobku. Rozhodli jste se pro kvalitní výrobek. Před prv- Bezpečnostní pokyny ním uvedením do provozu se seznamte s výrobkem.
- Page 17 Seznamte se s protipožárními předpisy v místě Montáž postaveného výrobku. Tento výrobek byl konstruován pro rychlou mon- Poznámka: Doporučujeme montáž a demontáž táž a demontáž a není vhodný k dlouhodobému dvěma osobami. používání. Tip: Seznamte se pokud možno před prvním použi- Výrobek nepoužívejte při silném větru, dešti a tím s montáží...
-
Page 18: Čistění A Ošetřování
Čistění a ošetřování Záruka platí na vady materiálu a výrobní vady. Tato záruka se nevztahuje na díly výrobku podléhající opotřebení (např. na baterie), dále na poškození Nikdy neperte výrobek v pračce. křehkých, choulostivých dílů, např. vypínačů, akumu- Nikdy nepoužívejte benzin, ředidla nebo jiné látorů... - Page 19 Paredes laterales para carpa Contenido 1 pared lateral con ventana Introducción 1 pared lateral con cremallera 1 manual de instrucciones de montaje y manejo Enhorabuena por la adquisición de su nuevo producto. Ha elegido un producto de alta Indicaciones de seguridad calidad.
-
Page 20: Montaje
Elija, en la medida de lo posible, una base firme Los pequeños puntos de fuga que presenten las y llana para montar el cenador. costuras se pueden reparar con un spray para Un montaje o desmontaje erróneo puede provo- costuras y para la lona del cenador se puede car daños en el producto. -
Page 21: Limpieza Y Cuidados
producto, usted tiene derechos legales frente al ven- Fije las paredes laterales mediante los cie- dedor del mismo. Nuestra garantía (abajo indicada) rres con velcro a las varillas cruzadas y las no supone una restricción de dichos derechos barras esquinadas/telescópicas del cenador legales. -
Page 22: Material Fornecido
Paredes laterais para tenda Material fornecido 1 Painel lateral (com janela) Introdução 1 Parede lateral com fecho de zíper 1 Manual de montagem e instruções Damos-lhe os parabéns pela aquisição do seu novo produto. Acabou de adquirir um Indicações de segurança produto de grande qualidade. - Page 23 Escolha como local uma superfície o mais firme e de costuras e, para a lona da tenda, pode-se utili- plana possível. zar um spray de impregnação. Uma sequência errada da montagem ou desmon- Utilize este produto somente como paredes late- tagem poderia provocar danos no produto.
-
Page 24: Limpeza E Conservação
Desmontar paredes laterais comprovativo da compra. Esse documento é necessá- rio para comprovar a compra. Abra um após o outro os fechos de gancho e Caso num espaço de tempo de 3 anos a partir da argola das barras de canto /barras telescópicas data da compra deste producto surja um erro de e barras em cruz da tenda (Fig. - Page 25 Stand der Informationen · Last Information Update · Version des informations · Stand van de informatie · Stav informací · Estado de las informaciones · Estado das informações: 01 / 2017 · Ident.-No.: HG01773A / B012017-8 IAN 280583 IAN 280592...
Need help?
Do you have a question about the 280583 and is the answer not in the manual?
Questions and answers