Advertisement
Table of Contents
GENERAL PUMP
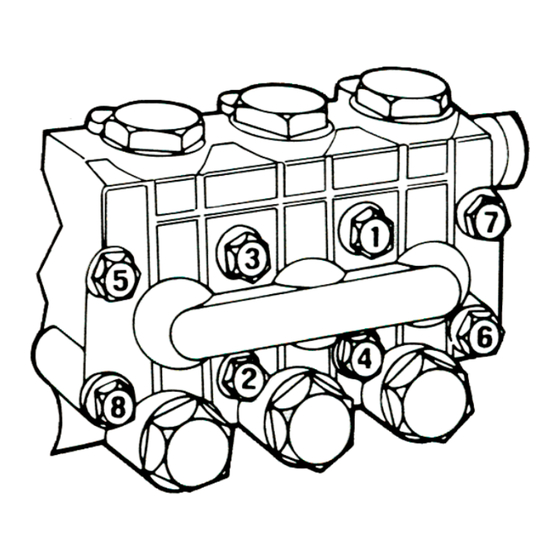
VALVE ASSEMBLIES (Figure 1)
1. All inlet and discharge valves can be serviced
without
disrupting
plumbing.
The
inlet
are identical in all models.
2. To service any valve, remove valve cap and
extract valve assembly.
3. Examine o-rings and replace if there is any
evidence of cuts abrasions or distortion.
4. Remove valve assembly (retainer, spring valve,
valve seat) from valve cavity.
5. Remove o-ring from valve cavity.
6. Only one valve kit is necessary to repair all the
valves in the pump. The kit included new o-rings,
valve seat, poppet, spring and retainer, all
pre-assembled.
7. Install new o-rings in valve cavity.
8. Insert assembly into valve cavity.
9. Replace valve cap and torque to specifications.
REMOVING MANIFOLD HEAD (Figure 2)
1. Remove
the
fasteners
2. Separate head from crankcase. NOTE: It may be
necessary to tap head lightly with rawhide
mallet to loosen. CAUTION: When sliding head
from crankcase use caution not to damage
plungers.
3. The V-packing assemblies may come off with
the head. At this point, examine plungers.
Plunger surfaces should be smooth and free
from scoring or pitting; if not, replace.
4. Reinstall
manifold
specifications per sequence described below.
TORQUE SEQUENCE FOR TIGHTENING HEAD
(Figure 4)
Install all head bolts fingertight. Torque to 10 foot pounds
in sequence as shown, then retorque to specifications,
again in sequence shown.
A member of the Interpump Group
SERVICING INSTRUCTIONS
the
inlet
or
discharge
and
discharge
valves
retaining
the
head.
head
and
torque
to
General Pump
is a member of
the Interpump Group
47 Series
Triplex Plunger Pump
1
2
4
Advertisement
Table of Contents

Related Manuals for General Pump 47 Series


Summary of Contents for General Pump 47 Series
- Page 1 47 Series GENERAL PUMP A member of the Interpump Group Triplex Plunger Pump SERVICING INSTRUCTIONS VALVE ASSEMBLIES (Figure 1) 1. All inlet and discharge valves can be serviced without disrupting inlet discharge plumbing. inlet discharge valves are identical in all models.
- Page 2 20mm sleeve 2530017 bolt 2530023 22mm sleeve 2530018 2530024 24mm sleeve 190446 Oil Drain Kit 100295 General Pump Series 100 Oil (1-16 oz. bottle) 100214 General Pump Series 100 Oil (6-16oz. bottles) 100216 General Pump Series 100 Oil (24-16 oz. bottles)
- Page 3 47 Series GENERAL PUMP Servicing Instructions A member of the Interpump Group REPLACING V-PACKINGS (Figure 7, 8, 9 & 10)) 1. Remove manifold from crankcase. 2. Insert proper extractor collet through main seal retainer. Tighten collet and extract retainers, v-packings and head rings.
-
Page 4: Troubleshooting
May be caused by humid air condensing i Change oil intervals. Use General Pump SAE 30 nto water inside the crankcase non-detergent oil. Water in crankcase. Worn packing and/or piston rod sleeve, Replace packing.
Need help?
Do you have a question about the 47 Series and is the answer not in the manual?
Questions and answers