Table of Contents
Advertisement
Advertisement
Table of Contents

Related Manuals for Moneual MBOT 900


Summary of Contents for Moneual MBOT 900
- Page 1 Ver 1.0 User manual MBOT 900 Android...
- Page 2 Contents Thank you for deciding to purchase this MONEUAL MBOT robot vacuum cleaner. Before using the product, please read this user manual carefully and keep it for future reference. Depending on the model, some content of this user manual may vary from the actual product. The contents of this manual are subject to change without notice.
-
Page 3: Table Of Contents
Contents Before use Important notes Care and Cleaning the dust bin maintenance Package content Cleaning the dust lter Cleaning the sensors and wheels Product description Cleaning the main brush Cleaning the side brushes Storage/Battery change Installation Preparation Cleaning the charging contact instructions Charging the device Charging station... - Page 4 Important Instructions You may be killed or seriously injured You may be injured or your appliance Important information, de nitions, if you do not follow this instruction. may be damaged if you do not follow general rules and notes are explained. this instruction.
- Page 5 Important notes Only use the original adapter, battery and the original charging station to prevent damage to the device as well as electric shocks, surges and/or re. If damage occurs to the device or accessories, discontinue use of the robot and contact customer service.
-
Page 6: Package Content
Package content MBOT900 robot vacuum cleaner - Pre-assembled main brush and side brushes - Pre-assembled dust bin and lter Charging station Mains adapter Protective strip Replacement set of side brushes Cleaning brush - Screwdriver and replacement Replacement Warranty booklet and for cleaning screws - for loosening/ lter set... -
Page 7: Product Description
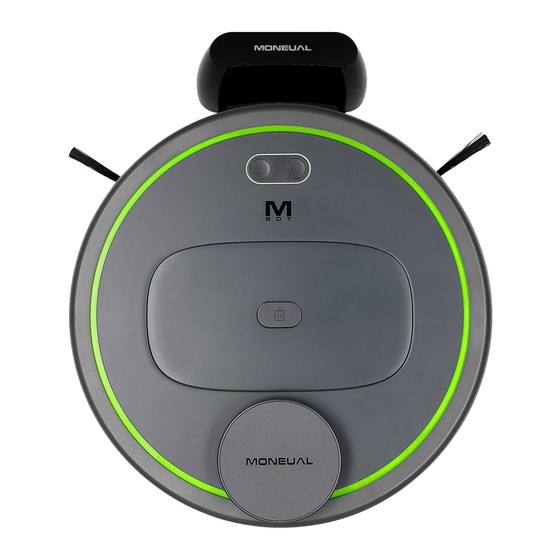
Product description ① ② ① Laser sensor & impact strip ③ ④ ② Upper cover ⑧ ③ Dust bin button ④ Dust bin ⑤ Operating button ⑥ Impact strip ⑦ Signal window for obstacle sensors ⑥ ⑤ ⑧ Side brushes ⑦... -
Page 8: Preparation
Preparation Download the free smartphone app for full use of the MBOT900. Android Remove the protective strip, Attach the protective strip so that the impact strip can supplied to the impact strip move and can recognise obstacles. of the laser sensor. Charging the device Hold the device with both hands and place it on the charging station. -
Page 9: Charging Station
Charging station Adaptor plug Charging terminal CAUTION! When using the charging station, remember that Plug in the mains adaptor. If there is a power there should be a min. clearance of 3m at the front connection, the green LED on the top of the and 1m at the sides. -
Page 10: Setting Up The App
Setting up the app Download: Please read the terms of Select your preferred Open the MBOT Home screen use and accept them, language in the app on your if this applies left bottom of the screen. smartphone. (required for use of the app). - Page 11 Setting up the appt Click “Register” to register Click “Add device” in the Enter the details of your Go to your smartphone to use the app. main menu and follow the wireless home network. settings and connect your Enter your data. The instructions.
- Page 12 Setting up the app Now you are in the robot's Click “My robots”. Now you can see an Enter any name and con rm. main menu. overview of all your devices. Click “More” if you want to Click on the edit symbol to rename the robot.
-
Page 13: Product Notes Before Operation
Instructions before operation Please consider the following points before using the robot vacuum cleaner. Make sure that the robot vacuum cleaner is not damaged when it is removed from its packaging. The device must be fully charged before being used for the rst time. See page 8 for further details about charging. - Page 14 Instructions before operation Cleaning principle When you start cleaning, the device The device autonomously demar- During cleaning, obstacles are initially moves to the right along cates the room into areas which it bypassed or touched lightly. the edge and at the same time then covers track by track.
-
Page 15: Operation Without The App
Operation without the app Press both buttons for 3 sec to change WLAN connection mode. ON / OFF button LED status HOME button Press for 3 seconds Green Press once -> The device powers down -> Normal / Charging -> Pause / Return to charging (LED ashes red 4 times) station Yellow... -
Page 16: App Functions
App functions Noti cation centre Device name List of all noti cations to Change name – see Page 12 robot and system (smart- phone). Spot cleaning Select an area to be cleaned Zone cleaning intensively Let the robot clean in zones (1.5 x 1.5 m) speci ed in advance. - Page 17 App functions Current device status My robots Manage all connected appliances - see Page 23. History Specify zones - see Page 18 See the cleaning history. My account Manage your app account Cleaning schedule Remote control Cleaning at speci c times and Permits manual control of the on speci c days device via the arrow buttons...
-
Page 18: Zone Cleaning
Zone cleaning Zone cleaning makes it possible to divide your home into di erent zones and to let the robot target them for cleaning. Accordingly, you can decide which zones are to be cleaned when, how thoroughly, and how often. You need an existing map Click “More”... - Page 19 Zonenreinigung Zone cleaning When you specify a “Prohibited zone” (red), it remains xed on the map until you change the colour or delete it. When you have speci ed zones on the map, at the start of cleaning the robot always tries to locate itself on the map (even if you have changed the position of the charging station).
-
Page 20: Spot Cleaning
Spot cleaning Using spot cleaning, you can let the robot perform targeted cleaning of a square area (1.5 x 1.5 m), independent of the speci ed zones. To start spot cleaning, During cleaning, the exact click “Spot cleaning” on cleaning path and the the main screen, select the current position of the area to be cleaned and... -
Page 21: Regulating The Suction
Regulating the suction You can regulate the suction in 3 levels according to your requirements. The suction levels all have di erent suction, noise level and battery consumption. Low level Long battery life Low noise Low suction Normal level Normal battery life Normal noise level Normal suction Turbo level... -
Page 22: Cleaning Schedule
Cleaning schedule You can use spot cleaning to preprogram at what time and on which days the robot should automatically clean which area / which zones. In addition, you can specify the period during which the robot should not beep. To create a cleaning plan, Select a desired time to You can select individual... -
Page 23: My Robots
My robots Manage your connected devices and users. You can manage all connect- Click the edit icon on the To share the robot, the user ed devices and users right of the robot to grant must have created a MBOT via the submenu “My access to a di erent user, account with the email... -
Page 24: Maintenance & Fault Diagnosis
Maintenance & fault diagnosis After you have serviced When you replace a wear You can use the submenu “Fault the device and have part with a new one, use diagnosis” to perform a quick replaced wear parts, you the button “Reset” to reset check for any faults on the can reset the wear status. -
Page 25: Cleaning The Dust Bin
Cleaning the dust bin Press the dust bin button The dust bin springs up by Pull the dust bin up from to release. a few millimetres so it can the housing. be easily removed. Use the cleaning brush supplied to Flip the lid of the dust bin remove any dirt from the dust bin and open and empty the bin. -
Page 26: Maintenance Cleaning The Dust Lter
Cleaning the dust lter Remove the lter cover by Remove any dirt from the The lter cover as well as To speed up the drying pulling the top of the dust lter cover using the the ne particle lter and process, the lter parts can bin upward. -
Page 27: Cleaning The Sensors And Wheels
Cleaning the sensors and wheels Clean the three oor sensors with the cleaning brush supplied or with a cotton bud. - If the sensors are very dirty, you can use a moistened cotton bud. - Do not use too much moisture - Never use alcohol or thinner. -
Page 28: Cleaning The Main Brush
Cleaning the main brush Press the brush cover’s release lever in and Lift the main brush on the left side to remove it from its pull the brush upward. mount. Remove any hair collected using the ne blade on the First insert the main brush with the square on the cleaning brush supplied. -
Page 29: Cleaning The Side Brushes
Cleaning the side brushes Remove the screws from the side brushes with Remove any hair and dirt collected and replace the side the screwdriver provided and pull the side brushes and tighten them. Right and left do not matter. brushes upwards. Storage/Battery change If you are not using the robot for a long period of time, please remove the battery to extend its life. -
Page 30: Cleaning The Charging Contact
Cleaning the charging contacts If the device experiences problems when docking on the charging station, please check the charging contact on the bottom of the robot. If this is very dirty, no contact can be made with the charging station. To guarantee full functionality, please clean the impact strip and the signal window regularly. -
Page 31: Customer Service Troubleshooting
Troubleshooting The robot vacuum cleaner gives out a combination of LED colours and beeps to inform you of the issue/error concerned. First try solving the issue using the suggestions below. If the proposed solutions are unsuccessful, please contact customer services. Cause Dust bin removed during standby. -
Page 32: Technical Speci Cations
Technical speci cations Operating voltage 14,4 V Adapter Rated output 27 W Output voltage 24 V Battery Li-Ion, 2600mAh 14,4 V Output current 630mA Charging time 4 to 5 hours Charging station Working time up to 80 mins Input voltage 24 V Operating range 0°C bis +45°C, <... - Page 36 Customer service support@moneual.de Before contacting customer services, please make sure you have the following information available: Model Problem Serial number Address and phone number Retailer name www.moneual.de...
Need help?
Do you have a question about the MBOT 900 and is the answer not in the manual?
Questions and answers