Advertisement
Quick Links
If you are reading this, most probably, you are about to build Erica
Synths DIY MIDI-CV module. This module is 35mm deep, skiff
friendly, has solid mechanical construction and doesn't require
wiring. Erica Synths Black MIDI-CV is compact, highly accurate and
easy to use duophonic MIDI interface. It emulates classical
monophonic and duophonic synth behaviour, as well as can be
configured for use in two independent MIDI channels. Bonus
features – MIDI clock output and analogue glide circuit on both
channels.
The DIY MIDI-CV kit comes in three versions:
1) 2PCBs + pre-programmed controller chip + connectors + glide
potentiometer,
2) 2PCBs + pre-programmed controller chip + connectors + glide
potentiometer + panel,
3) Full kit.
FEATURES:
• Two CV and Gate outputs
• MIDI clock output (4ppq – sequencer friendly)
• Configurable MOD output – modulation wheel or velocity
• Analogue glide on both MIDI channels
• One or two MIDI channel configuration
• One or two voice switch
SPECIFICATIONS:
• CV range
• Max CV deviation
• Gate and Clock level
• Glide time
• Module width
• Module depth
• Power consumption
Connect MIDI keyboard to the module! Push and hold
PROGRAMM button for 2". MIDI LED will start to blink slowly.
While holding PROGRAMM button, select midi channel by
pushing a key on the keyboard. C of any octave corresponds to
MIDI channel 1, C# - channel 2, D – channel 3, etc. Channels 1-12
Setting MIDI
can be assigned to send midi messages to the module.
channel
For two MIDI channel configuration push two keys
simultaneously. CV1/Gate1 will be assigned to the lowest midi
channel, CV2/Gate2 – to highest.
As you release PROGRAMM button, the module will advance to
MOD output configuration.
In MOD output configuration mode MIDI LED starts to blink
faster.
If you wish to assign a modulation wheel to MOD output, simply
MOD output
rotate it on the midi controller.
If you wish to assign key velocity to the MOD output, push any
configuration
key on the keyboard.
Push PROGRAMM button to confirm, and the module will exit
configuration mode.
GUIDE TO ASSEMBLY OF ERICA SYNTHS MIDI-CV MODULE
0-8V
0.001V; 1cent
5V
0 – 2"
6HP
35mm
+40mA, -9mA
1
2
4
5
6
8
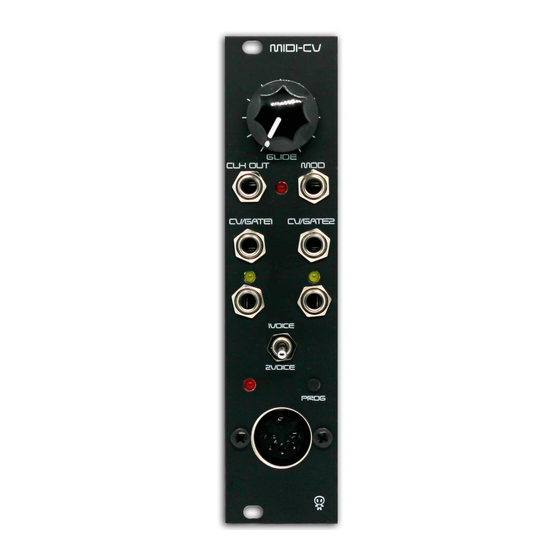
Use this knob to set the glide time on the
1
output CV! It affects both channels
simultaneously.
This is 4ppq Clock output – ready to control
your sequencers. In two MIDI channel mode
2
make sure, only one MIDI device has MIDI
clock activated.
This is Modulation CV output. You can
3
configure it for modulation wheel CV output or
key velocity. Refer to the table below!
4
These are CV outputs.
These are Gate outputs, LEDs indicate active
5
gates.
This is Voice switch. In one MIDI channel mode
you can select between one voice mode
6
(highest note priority) or two voice mode
(highest and lowest note priority).
Push PROGRAMM button promptly to send
MIDI panic message. Push and hold the button
7
and you will enter configuration mode. Please,
refer to the table on configuration settings.
8
This is MIDI input, obviously.
3
7
Advertisement

Related Manuals for Erica Synths MIDI-CV


Summary of Contents for Erica Synths MIDI-CV
- Page 1 GUIDE TO ASSEMBLY OF ERICA SYNTHS MIDI-CV MODULE If you are reading this, most probably, you are about to build Erica Synths DIY MIDI-CV module. This module is 35mm deep, skiff friendly, has solid mechanical construction and doesn’t require wiring. Erica Synths Black MIDI-CV is compact, highly accurate and easy to use duophonic MIDI interface.
- Page 2 GUIDE TO ASSEMBLY OF ERICA SYNTHS DIY MIDI-CV INTERFACE ASSEMBLY Take precautions with regard to electrostatic discharge (ESD) safety. Handling components should be done in electrostatically safe environment. Use personal and workplace grounding. Any discharge (even a minor one) from body to a component may permanently damage it.
- Page 3 GUIDE TO ASSEMBLY OF ERICA SYNTHS DIY MIDI-CV INTERFACE Turn the Controls board around and solder two Solder ceramic capacitors, electrolytic resistors, female connectors, PSU connector and capacitors, ferrite beads and 16MHz electrolytic capacitors! If you use 10mm high crystal on the Main board!
- Page 4 GUIDE TO ASSEMBLY OF ERICA SYNTHS DIY MIDI-CV INTERFACE Use two black M3 screws and nuts to fix DIN5 midi Place LEDs in the relevant places (mind the connector! Midi connectors typically are installed polarity), but do not solder them yet! Install upside down.
- Page 5 VCO 1V/oct input and a chromatic tuner to the output of the VCO. Disconnect MIDI-CV module from the PSU. Then push and hold PROGRAMM button and connect the module to PSU busboard! MIDI LED will start to blink, which means the module is in calibration mode.
Need help?
Do you have a question about the MIDI-CV and is the answer not in the manual?
Questions and answers