Table of Contents
Advertisement
Quick Links
Touch Screen Wireless Keypad
For Remote Control of the 2GIG Security System
INSTALL INSTRUCTIONS
This document describes the basic installation information for the 2GIG‐
2GIG‐TS1 and the steps necessary to "pair" (or learn in) the Touchscreen
Wireless Keypad to the Control Panel.
Box Contents
• 2GIG‐TS1
• AC Power Supply
• AC Power Supply Bracket
• Screws and anchors
The box contents will vary depending on whether the 2GIG‐TS1
TIP:
was purchased as part of a kit or not.
BEFORE YOU BEGIN
Is the 900 MHz Transceiver installed in the Panel?
For the 2GIG‐TS1 to communicate with the Control Panel, the 900 MHz
Transceiver (2GIG‐XCVR2) must be already be installed in the Control
Panel.
Is the 2GIG-TS1 paired with the Control Panel?
The 2GIG‐TS1 and the Control Panel have to be paired to communicate
with each other.
To check for to see if the 2GIG-TS1 is paired with the
Control Panel
Upon power up, the 2GIG‐TS1 displays the following screen:
2GI
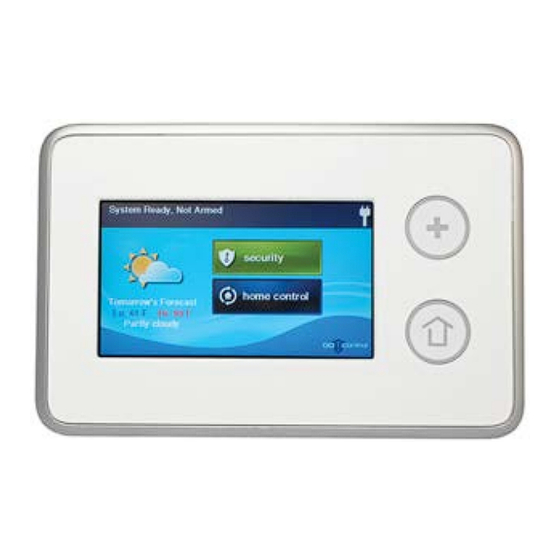
2GIG-TS1 PRODUCT OVERVIEW
The Model 2GIG‐2GIG‐TS1 Touch Screen Wireless Keypad is a remote
control device that offers the functionality of a system keypad but also
extends all user control of the 2GIG Control panel to other locations in a
user's home. Using the 2GIG‐TS1, users can control lights, thermostat
and door locks and see the status of every zone in their home using the
exact same and familiar interface found on the Control Panel. The keypad
is designed for indoor use only.
IMPORTANT:
Not for UL 985 installations.
The panel
and
buttons serve as controls as well as indicators.
Pressing the
(Emergency) button displays emergency icons on the
display for Panic, Fire, and Emergency alarm activation (each has
programmable options and can be enabled or disabled). Pressing the
(Home) button changes the system display to the Home Screen. The
keypad is powered from a plug‐in power supply. The 2GIG‐TS1 exchanges
information through a secure 2‐way wireless connection with the Control
Panel.
NOTE:
Before using the 2GIG‐TS1 it must be "learned" into the
Control Panel.
Mounting Tools
Some special tools may be required to mount the 2GIG‐TS1 onto the
wall:
• Screwdriver
• Pencil
• Wire stripper
• Staple gun
• Drywall saw (or equivalent)
• Ladder
PREPARING THE KEYPAD
1 Remove the screw.
2 Flip open the back cover of the 2GIG-TS1.
3 Disconnect the hanging strap.
4 Use the back cover as the mounting plate.
NOTE:
Check that the 2GIG‐TS1 Keypad is functioning before
selecting a location for the Keypad.
Advertisement
Table of Contents

Related Manuals for Linear 2GIG-TS1


Summary of Contents for Linear 2GIG-TS1
-
Page 1: Before You Begin
Is the 2GIG-TS1 paired with the Control Panel? Mounting Tools The 2GIG‐TS1 and the Control Panel have to be paired to communicate Some special tools may be required to mount the 2GIG‐TS1 onto the with each other. wall: • Screwdriver To check for to see if the 2GIG-TS1 is paired with the • Pencil Control Panel • Wire stripper Upon power up, the 2GIG‐TS1 displays the following screen: • Staple gun • Drywall saw (or equivalent) • Ladder PREPARING THE KEYPAD 1 Remove the screw. - Page 2 SELECTING A LOCATION FOR THE KEYPAD Connect the Power Wires to the Keypad Re‐connect the hanging strap. Make sure that AC Power is available nearby. Use #6 insulated spade terminals (not supplied) to connect wires TIP: Be careful of studs, electrical wires and pipes in the wall. from the power supply to the keypad. Use the keypad’s back cover as a template to mark the screw holes with a pencil and the power (wiring) access hole. Use a drywall saw to cut the wiring hole. Close the keypad. Mounting the Keypad Use the 3 screws and anchors that are supplied to attach the mounting plate to the wall. Route 18 AWG wire between the keypad and the location of the power supply. Wire Size and Length To ensure proper operation, Do Not exceed the following maximum A Snap case closed. length for the wire size installed: B Tighten case screw.
- Page 3 LEARNING/PAIRING THE KEYPAD WITH THE CONTROL PANEL Make sure that the Control Panel has power using the supplied AC adapter and confirm that the adapter is connected. A Control Panel without the 900 MHz Transceiver WARNING: installed cannot communicate with the 2GIG‐TS1. Make sure that the 2GIG‐TS1 has power from the supplied AC transformer. Connect the AC adapter to the 2GIG‐TS1. Confirm that the wires are connected using the correct polarity. As the 2GIG‐TS1 powers up, the following message is visible on the display. Set the RF Keypad Equipment Code to 1059 by pressing the → arrow until “(1059) 2GIG‐TS1 wireless touchscreen keypad” appears. Press the ↓ arrow to advance to the next op on. From the Control Panel’s Installer Toolbox, select System Configuration. Select the Go To button. To go to question 4, enter 04. Learn the 2GIG‐TS1 into the Control Panel. A er pressing the ↓ arrow in the previous step, the Learn button appears. Select the RF Keypad number to assign to the 2GIG‐TS1. Use the → arrow to select the RF Keypad number (1‐4). After selecting the RF Keypad number, press the ↓ arrow to start configuring the specific INITIATING THE PAIRING PROCESS parameters for the RF Keypad. Initiate the pairing process at the Control Panel by pressing the Learn button. Press the → arrow or press the number 1 on the keypad toggle the se ng on the first ques on to “used”. Press the ↓ arrow to con nue configuring options.
- Page 4 Screen, the user can enter the duress code only. Installers must following: remember that the Installer Toolbox can only be accessed from the From the Control Panel, go to Installer Toolbox / System Control Panel. The 2GIG‐TS1 cannot access the Installer Toolbox. Configuration. TIP: Although there is a default master code: 1111, there is no Select the Go To button and enter 04. The Control Panel displays default duress code. Q4: select RF keypad # (1 to 4). Select the configured 2GIG‐TS1 you wish to remove and press the ↓ arrow. Check to ensure that the 2GIG-TS1 firmware Mark the RF Keypad number selected as “unused” by pressing the → version matches the Control Panel firmware arrow. This action toggles the setting on the first question between version The 2GIG‐TS1 and the Control Panel are required to have the same firmware version to fully communicate with each other (e.g. CP v1.10 and 2GIG‐TS1 v1.10). From both the 2GIG‐TS1 and Control Panel Home Screen, choose Security / Menu / Toolbox. ©2013 2GIG Technologies Inc. All Rights Reserved.
-
Page 5: Limited Warranty
From the Toolbox Screen, use the → arrow un l you see the Version to try to correct the interference by one or more of the following Screen. measures. • Reorient or relocate the receiving antenna 2GIG-TS1 Version Screen • Increase the separation between the equipment and receiver • Connect the equipment into an outlet on a circuit different from that to which the receiver is connected • Consult the dealer or an experienced radio/TV technician for help Any changes or modifications not expressly approved by the party responsible for compliance could void the user’s authority to operate the equipment. Les changements ou modifications non approuvés expressément par la partie responsable de la conformité pourrait annuler l'autorité de l'utilisateur à faire fonctionner l'équipement. Industry Canada Notices This device complies with Industry Canada licence‐exempt RSS standard(s). Operation is subject to the following two conditions: (1) this Control Panel Version Screen device may not cause interference, and (2) this device must accept any interference, including interference that may cause undesired operation of the device. Le présent appareil est conforme aux CNR d'Industrie Canada applicables aux appareils radio exempts de licence. L'exploitation est autorisée aux deux conditions suivantes : (1) l'appareil ne doit pas produire de brouillage, et (2) l'utilisateur de l'appareil doit accepter tout brouillage radioélectrique subi, même si le brouillage est susceptible d'en ...
Need help?
Do you have a question about the 2GIG-TS1 and is the answer not in the manual?
Questions and answers