Table of Contents
Advertisement
Quick Links
Advertisement
Table of Contents

Related Manuals for FlashPoint R2

Summary of Contents for FlashPoint R2
- Page 1 Radio Transmitter for Fujifilm FPRRR2TF...
- Page 2 Flashpoint R2 Radio Transmitter for Fujifilm Thank you for choosing Flashpoint! The Flashpoint R2 Radio System transmits TTL data directly to the vast R2 Family of Flash which is fully compatible with many camera TTL systems, as well as select manually controlled strobes and monolights.
- Page 3 For Your Safety • Always keep this product dry. • Do not use in rain or in damp conditions. • Stop using this product if it breaks open due to internal shifting, falling or strong impact. • STRONG electric shock may occur if you touch the components inside it. •...
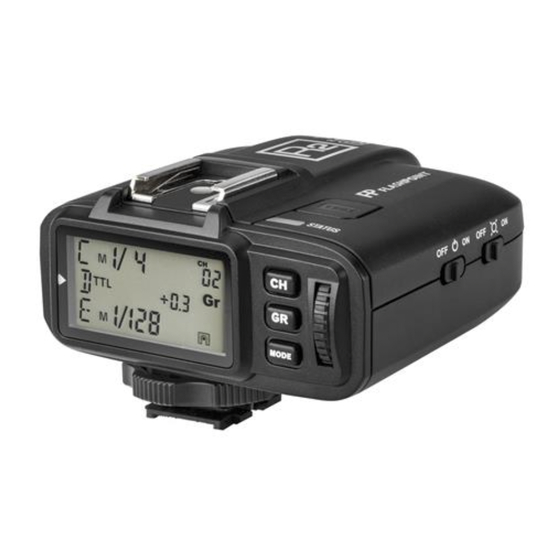
- Page 4 Name of Parts Body / Transmitter TEST Trigger Button Battery Compartment AF Assist Beam Micro USB Port Switch (for firmware updates) Power Switch PC Sync Port Hot Shoe Speedlite Connection Status Indicator Lamp CH/OK Channel Setting ‘OK’ Button LCD Panel Group Setting Button Select Dial Hot Shoe Camera...
-
Page 5: Low Battery Indicator
Transmitter Panel Output Settings per Group in the M mode; Channel Settings FEC Settings per Group in the TTL mode Multi Mode Icon Mode Settings Synchronization Delay Setting Icon w Group Low Battery Indicator Currently Selected Group (method 2) Single Contact Mode Icon Installing Batteries Slide the battery compartment lid of the transmitter. - Page 6 USING THE FLASH TRIGGER (NON-TTL) The flash trigger features the following functions: 1. As a Wireless Flash Trigger 1.1 Mount the transmitter on camera hotshoe and turn it on before turning on the camera. 1.2 Set the transmitter and the receiver to the same channel by pressing the Channel Setting Button.
-
Page 7: Setting The Transmitter
SETTING THE TRANSMITTER • Power Switch Slide the Power Switch to ON. The LCD screen will turn on. The Status Indicator Lamp does not illuminate. Note: In order to avoid power consumption, turn off the transmitter when not in use. AF Assist Beam Power Switch •... - Page 8 The minimum power output value is 1/128 and cannot be set to 1/256 for most of camera flashes. However, the value can change to 1/256 when using in combination with stronger Watt-Second flashes such as the Flashpoint XPLOR600 or Rapid R2.
- Page 9 • Multi Flash Group ON/OFF Settings 1. Initiate the Multi Flash <MODE> in the C.Fn Custom Functions (set C.Fn-04 as 1). 2. Short press the <GR> button to select the group. Click to scroll through the modes forwardly and double-click to scroll through in reverse sequence. 3.
- Page 10 • Group Settings 1. Long press the <GR> Button to set the exposure values for all the groups in any mode simultaneously. 2. The settings of the groups which are in the same MODE with the current group will blink. Turn the Select Dial to change the settings. 3.
- Page 11 • Modeling Lamp Control Double-click the <CH/OK> Button to power ON/OFF the linked unit’s modeling lamp. Power Saving Mode • 1 The flash trigger will go into standby mode after an inactive period of time. The LCD panel will turn off. 2 Pressing any of the buttons (<TEST>...
- Page 12 Press the TEST Button to turn on the flash trigger. When the Status Indicator Lamp blinks two times, the effective remote distance is below 98 feet, and the transmitter and receiver can communicate normally in this proximity.
-
Page 13: Transmitter Setup
1. Press the <CH/OK> Button for 2 seconds or longer until <Fn> is displayed. 2. Select the custom function number (No). • Turn the Select Dial to choose the Custom Function No. 3. Change the Setting. • Press the <GR> Button until the custom function No. - Page 14 • SHOE MOUNT FLASH The following options are available when an optional shoe-mounted flash unit is attached and turned on. Flash control mode: The flash control mode is selected from the flash unit. This can in some cases be adjusted from the camera; the options available vary with the flash. •...
- Page 15 4. Sync: Control flash timing. • (1ST CURTAIN): The flash fires immediately after the shutter opens. • (2ND CURTAIN): The flash fires immediately before the shutter closes. • (AUTO FP(HSS): High-speed sync (compatible units only). The camera automatically engages front-curtain high-speed sync at shutter speeds faster than the flash sync speed. Equivalent to 1ST CURTAIN when MULTI is selected for flash control mode.
- Page 16 Selecting the Operation Method Options Press the <CH/OK> Button for 5 seconds to switch the operation methods (Method 1/Method 2). R2T-F Operation Method 1 (by default) TTL/M Mode Button Operation Function Short press (under normal status) Enter CH settings; (under settings)Confirm and back to normal status Double-click Control the ON/OFF of modeling flash Long press for 2 seconds...
- Page 18 R2T-F Operation Method 2 TTL/M Mode Button Operation Function Short press (under normal status) Enter CH settings; (under settings) Confirm and back to normal status Double-click Control the ON/OFF of modeling flash Enter C.Fn custom settings Long press for 2 seconds Long press for 5 seconds Switch the Operation Methods (Method 1/Method 2) Short press...
- Page 19 Multi Mode (C. FN-04-on) Operation Function Button (under normal status) Enter CH settings; Short press (under settings) Confirm and back to normal status Double-click Control the ON/OFF of modeling flash CH/OK Long press for 2 seconds Enter C.Fn custom settings Long press for 5 seconds Switch the Operation Methods (Method 1/Method 2) Short press...
-
Page 20: Troubleshooting
Troubleshooting 1. Unable to trigger flash or camera shutter: Make sure batteries are installed correctly and Power Switch is turned on. Check if the transmitter and the receiver are set to the same channel, if the hotshoe mount or connection cable is well connected, or if the flash triggers are set to the correct mode. -
Page 21: Technical Data
Technical Data Model R2T-F Compatible Cameras Fujifilm cameras Support for the cameras that have PC sync socket. Builted-in remote system 2.4G Wireless transmission Modulation mode 2 AA Batteries Power supply Exposure Control Manual flash TTL autoflash Multi flash TTL Control High-speed sync Flash exposure compensation Yes, ±3 stops in 1/3 stop increments... - Page 22 Model R2T-F Others Synchronization delay set Yes (0~10ms,use 100us as the unit) Beep ON/OFF Modeling flash ON/OFF ZOOM setting Adjust the flash's focal length through the transmitter Output interface Transmitter: use a PC cord to input and output Firmware upgrade Use the Micro USB port to upgrade Memory function Settings will be stored for 2 seconds after last operation...
- Page 23 Flashpoint may direct with a copy of the sales receipt or dated itemized receipt. Flashpoint may, at its option, replace your product, offer to provide a functionally equivalent product, or repair any product with new, refurbished or used parts as long as such parts are in compliance with the product’s...
Need help?
Do you have a question about the R2 and is the answer not in the manual?
Questions and answers