Table of Contents
Advertisement
Advertisement
Table of Contents

Subscribe to Our Youtube Channel
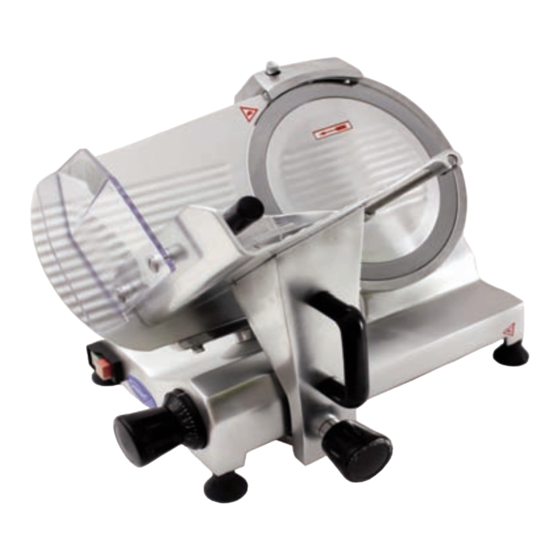
Related Manuals for General GSE-110


Summary of Contents for General GSE-110
-
Page 2: Table Of Contents
GSE-112 90 days parts The General GSE-109 (nine inch), GSE-110 (ten inch) and GSE-112 (twelve inch) slicers are heavy duty pre- Warranty registration must be completed and received- cision crafted, versatile units. These all-purpose slicers within 10 days of installation for warranty activation. -
Page 3: Service/Technical Assistance
(406mm W x 457mm D x 381mm H) • Safety interlock switch to prevent harm when cleaning and removing the knife. • GSE-110 is equipped with a 120 Watt, motor that is completely enclosed, permanently lubricated • Safety gard edge around the knife to help prevent... -
Page 4: Important Safety Information
• This equipment should be serviced by quali- fied personnel only. Contact the nearest • Install or locate the equipment only for its General authorized service facility for repair. intended use as described in this manual. Do not use corrosive chemicals on or in this •... - Page 5 IMPORTANT General reserves the right to change specifications and product design without notice. Such revisions do not entitle the buyer to corresponding changes, improvements, additions or replacements for previously purchased equipment. P/N GENSLICERMAN...
-
Page 6: Specifications
GSE-109-110-112 SLICER SPECIFICATIONS ELECTRICAL RATINGS WARNING GSE-109 ELECTRICAL SHOCK HAZARD Voltage Wattage Amperage Hertz FAILURE TO FOLLOW THE INSTRUCTIONS IN THIS MANUAL COULD RESULT IN SERIOUS INJURY OR DEATH. • Electrical ground is required on this appliance. • Do not modify the power supply cord plug. If it GEM-120 does not fit the outlet, have a proper outlet installed by a qualified electrician. -
Page 7: Weights And Dimensions
DIM C WEIGHT GSE-109 16.0 in 18.0 in 15.0 in 37.5 lbs 406 mm 457 mm 381 mm 17 Kgs GSE-110 MODEL DIM A DIM B DIM C WEIGHT GSE-110 17.0 in 21.0 in 15.0 in 44.1 lbs 432 mm... -
Page 8: Recieving
457 mm 25 Kgs RECIEVING DROP N TELL To help assure you receive your GENERAL prod- ping process. If your “G-Shock” device looks like this, uct in the best possible condition, General has you should immediately notify your shipper, dealer or installed a “G-Shock”... -
Page 9: Installation
1. Carefully open the box. It should contain the fol- • Do not allow the cord to hang over edge of table or counter. lowing: • GSE-109, GSE-110 or GSE-112 Slicer, • Before attaching any accessories or attachments • Warranty Packet, to the slicer, refer to the operating instructions. -
Page 10: Operation
NOTE: The GSE-110 and 112 have a locking screw 4. Verify the knife cover is secured by turning the located just below the knob. It must be knob clockwise until it stops. -
Page 11: Cleaning
GSE-109-110-112 SLICER OPERATION (CONTINUED) OPERATION - PREP SLICING PRODUCT (CONTINUED) 5. Verify the cut thickness dial located on the front 1. With your right hand. Hold the black handle on left of the slicer turns freely and moves the guide the press plate and push in a forward motion with plate accordingly. -
Page 12: Maintenance
GSE-109-110-112 SLICER OPERATION (CONTINUED) CLEANING PRESSER AXEL LUBRICATION (CONTINUED) (Continued) 6. RInse the slicer with warm sanitizing solution, 3. The presser guide bar can be lubricated daily for again taking care on and around the knife. the let optimal use. the machine air dry. - Page 13 GSE-109-110-112 SLICER OPERATION (CONTINUED) MAINTENANCE 8. Press the front silver button gently until you hear (CONTINUED) the stone against the blade. Hold for 3 to 5 sec- 6. Turn the machine on and press the rear silver onds to clean the oposite side of the knife of button on the sharpener lightly until you hear the burrs created from the sharpening process.
-
Page 14: Replacement Parts
GEM-110/120/130 MIXER REPLACEMENT PARTS (GSE-110) P/N GENSLICERMAN RevA 10-2011... -
Page 15: Gse-110
GSE-109-110-112 SLICER REPLACEMENT PARTS (GSE-110) P/N GENSLICERMAN RevA 10-2011... - Page 16 GSE-109-110-112 SLICER REPLACEMENT PARTS (GSE-110) P/N GENSLICERMAN RevA 10-2011...
-
Page 17: Gse-112
GSE-109-110-112 SLICER REPLACEMENT PARTS (GSE-112) P/N GENSLICERMAN RevA 10-2011... -
Page 18: Replacement Parts
GSE-109-110-112 SLICER REPLACEMENT PARTS (GSE-112) P/N GENSLICERMAN RevA 10-2011... -
Page 19: Notes
GSE-109-110-112 SLICER NOTES P/N GENSLICERMAN RevA 10-2011...
Need help?
Do you have a question about the GSE-110 and is the answer not in the manual?
Questions and answers