dji Robomaster S1 User Manual
Hide thumbs
Also See for Robomaster S1:
- Quick start manual (55 pages) ,
- Disclaimer and safety manuallines (4 pages) ,
- Quick start manual (10 pages)
Table of Contents
Advertisement
Advertisement
Table of Contents

Related Manuals for dji Robomaster S1


Summary of Contents for dji Robomaster S1
- Page 1 User Manual v1.0 2019.06...
-
Page 2: Using This User Manual
2. Quick Start Guide 3. User Manual Check to make sure all parts are included and prepare for assembly by reading the RoboMaster S1 Quick Start Guide. Refer to this user manual for more information. Watch all tutorial videos and read the RoboMaster S1 Safety Guidelines and Disclaimer before using for the first time. -
Page 3: Table Of Contents
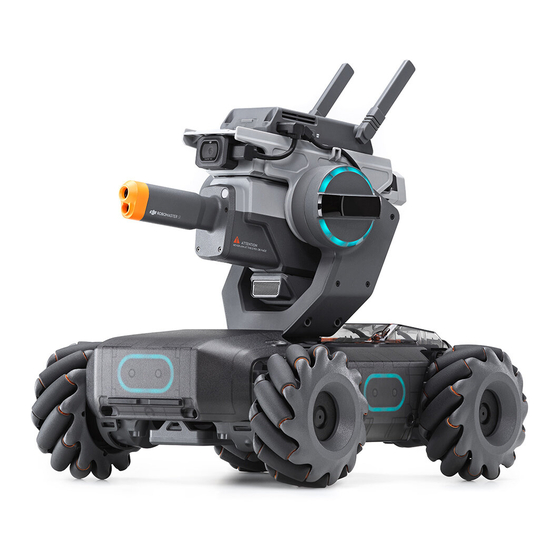
Contents Using this User Manual Legends Before Use Watching the Video Tutorials Referring to the RoboMaster S1 Programming Guide Contents Product Profile Introduction S1 Diagram Preparing Modules and Functions Using the RoboMaster App Omnidirectional Chassis Gimbal Intelligent Controller Blaster Camera... -
Page 4: Product Profile
S1 robot recognition. The S1 supports Scratch and Python programming. With DJI’s project-based tutorials, users can gradually master programming theory and robotics knowledge. The S1 also features Solo mode and Battle mode, where users can practice their skills and compete against others. -
Page 5: Preparing
27. Battery Eject Button Preparing Assembling the S1 Refer to the RoboMaster S1 Quick Start Guide. Powering On the S1 Follow the steps below to power on the S1: 1. Press the rear armor release button to open the chassis rear armor. - Page 6 A. Search for the RoboMaster app in the App Store or on Google Play or scan the QR code to download the app on your mobile device. B. Users can also download the RoboMaster software for Windows from the official DJI website to control the S1 with a keyboard and mouse.
- Page 7 ROBOMASTER S1 User Manual Initializing the S1 with the App Activating the S1 After connecting, use your DJI account to activate the S1 in the RoboMaster app. Activation requires an internet connection. 1. Start activation. Complete robot initialization to continue...
- Page 8 ROBOMASTER S1 User Manual 2. Lift the chassis and follow the prompts to rotate the Mecanum wheels in the order shown onscreen until all wheels have been rotated. Motor Addressing Lift up the chassis Use the Mecanum wheel mounting plate or another load-bearing object to raise the chassis until the wheels are elevated off the ground.
- Page 9 ROBOMASTER S1 User Manual Motor addressing is required when a motor is replaced. Open the RoboMaster app, click Settings -> System, and select Motor Addressing. Armor Addressing Armor addressing is required in the app when using the S1 for the first time. Follow the prompts to complete armor addressing.
-
Page 10: Modules And Functions
Product Support: Tap to enter the official DJI product support page. b. Maintenance Support: Tap to enter the official DJI Repair Center page. c. User Manuals: Tap to enter the official DJI user manual download page. d. Vision Markers: Tap to enter the official Vision Marker download page. - Page 11 ROBOMASTER S1 User Manual Connect The S1 must be connected with the app. Tap to see a guide on how to connect via Wi-Fi or router. Connection via Wi-Fi Users can enter both Solo and Battle mode when connecting via Wi-Fi.
- Page 12 ROBOMASTER S1 User Manual Connection via Router Users can enter both Solo and Battle mode when connecting via router. Follow the steps below to connect: 1. Power on the S1, and slide the mode switch on the Intelligent Controller to 2.
-
Page 13: Omnidirectional Chassis
Replay Beginner Guide. Check SD Card Space Remaining and perform Format SD Card. Enable GPS Information, DJI Device Information, DJI Product Improvement, and read Terms of Use. Solo Tap to enter Solo mode. Users can connect either via Wi-Fi or router. Refer to the Gameplay section for more information. - Page 14 ROBOMASTER S1 User Manual Avoid crashing into any objects at high speed. Motion Controller Overview The motion controller is the core module for the S1 chassis movement, providing a rich external module interface for video transmission and connecting the gimbal, battery, armor, and motors.
- Page 15 ROBOMASTER S1 User Manual 7. PWM Output Port The S1 motion controller enables the duty cycle to be set through the Scratch or Python program using the PWM output port. 8. S-Bus Port Reserved port. 9. M0 Port Reserved port.
- Page 16 ROBOMASTER S1 User Manual Mecanum Wheel The Mecanum wheel is a commonly used robotic omnidirectional chassis moving solution, which is divided into two types: left-threaded and right-threaded. The four-wheeled chassis requires two pairs of Mecanum wheels. Left-threaded Right-threaded Left-threaded Mark...
-
Page 17: Gimbal
ROBOMASTER S1 User Manual Gimbal Introduction The S1 is equipped with a 2-axis gimbal to provide a stable platform for the Blaster and the camera. When the S1 is in motion, the Blaster remains stable and can launch gel beads or emit an infrared beam, and at the same time provides a smooth FPV experience for the user. -
Page 18: Intelligent Controller
ROBOMASTER S1 User Manual The default mode of the S1 is Chassis Lead Mode. The user can control the angle of the gimbal on both the pitch and yaw axes. The pitch axis control range is -20° to +35° and the yaw axis control range is ±250°. -
Page 19: Blaster
Connection to Router: When scanning the QR code with the S1 to join network, press this button first. DO NOT pull on the antenna. If the Intelligent Controller antenna is damaged, the performance of the S1 will be affected. Contact DJI if the antenna is damaged. Blaster Introduction Wear the safety goggles provided by DJI. - Page 20 ROBOMASTER S1 User Manual 1. Trajectory 2. Launch Trajectory Light 3. Narrow Infrared Unit 4. Container Eject Button DO NOT aim the blaster at people or animals when launching the gel beads. DO NOT point the launch trajectory light at the eyes of people or animals.
-
Page 21: Camera
ROBOMASTER S1 User Manual Installing/Removing the Gel Bead Container Follow the steps below to install or remove the gel bead container. Press the container eject button before removing the gel bead container. Camera Designed for S1 robots, the S1 camera features a 1/4-inch sensor with 5 million pixels and a FOV of 120°, allowing users to control the S1 from a first-person perspective. -
Page 22: Intelligent Battery
ROBOMASTER S1 User Manual Speaker The S1 speaker is compatible with a 2.5 mm device with a power rating of 2 W. The speaker provides users with a more immersive experience with sound effects such as when the S1 launches gel beads or is hit by another S1. - Page 23 ROBOMASTER S1 User Manual 8. Short Circuit Protection: Automatically cuts the power supply when a short circuit is detected. 9. Battery Cell Damage Protection: The DJI RoboMaster app displays a warning message when a damaged battery cell is detected. 10. Sleep Mode: Sleep mode is entered to save power when the battery is not in use. If the battery is turned on without being connected to the S1, the battery will turn off after five minutes.
- Page 24 Note that you do not need to unplug and re-plug the charger in the event of a charging temperature error. Charging will resume when the temperature falls within the normal range. DJI is not responsible for damage caused by third-party chargers. Mounting the Intelligent Battery When in use, open the rear armor cover and insert the battery into the battery compartment.
- Page 25 ROBOMASTER S1 User Manual Using the Intelligent Battery Checking the Battery Level Press the battery level button once to check the battery level. The Battery Level Indicators will also show the current battery level during discharging. The indicators are defined below.
-
Page 26: S1 Led Indicator Description
ROBOMASTER S1 User Manual S1 LED Indicator Description The S1 features LED indicators on the four armor modules of the chassis body and on both sides of the gimbal, which indicate the current status of the S1. 1. Gimbal LED indicator, eight on each side. -
Page 27: Gamepad (Not Included)
Gamepad (Not Included) Introduction The RoboMaster S1 Gamepad is designed for the RoboMaster S1. By connecting to a mobile device running the DJI RoboMaster app, users can control the S1 and perform multiple tasks with the Gamepad and app. Additionally, a mouse can be connected to the gamepad for more precision control of the S1. - Page 28 ROBOMASTER S1 User Manual Charging the Gamepad It is recommended to fully charge the Gamepad before using for the first time. 110-220V It takes approximately two hours to fully charge a gamepad. The USB charger is not included in the package.
-
Page 29: Operating Your S1
It is recommended to use the S1 on flat surfaces such as wooden floors and carpets. Uneven surfaces such as sand or rocks may damage the wheels or motors. Using Solo Mode Enter Solo mode to see the page below. © 2019 DJI All Rights Reserved. - Page 30 ROBOMASTER S1 User Manual 1. Back button: Tap to return to the home page. 2. SOLO mode games button: Tap to enter Target Practice or Target Race. 3. Connection status button: Tap to see how to connect the S1 and the app.
- Page 31 ROBOMASTER S1 User Manual Operating the S1 The camera view is mainly used to control the chassis, gimbal, and Blaster of the S1. Controlling the Chassis Tap the chassis control button to move the S1 forward, backward, or sideward. The launch button can be tapped at the same time to launch gel beads or emit infrared beams while moving the chassis.
-
Page 32: Gameplay
2. Tap to enter Target Practice. Practice Target Practice 向上 Hit the designated vision markers before the time expires. The player with the highest score wins 左转 右转 向下 on the upper right corner to read the game rules. © 2019 DJI All Rights Reserved. - Page 33 ROBOMASTER S1 User Manual 3. Start Target Practice. 0:08:29 LEVEL SCORE 2000 Target Race In Target Race, users race to vision markers and hit them as fast as possible before the time expires. High scores can be compared with other users. Users can set the vision markers beforehand.
-
Page 34: Battle
ROBOMASTER S1 User Manual 3. Play Target Race. 00:12.56 CHECKPOINTS Battle Introduction In Battle mode, users can experience a variety of multi-player games, including Race and Free-For- All. Refer to the Connect section for more information on how to enter Battle mode. - Page 35 ROBOMASTER S1 User Manual All players are required to connect to the same game room through the same router. To ensure fair play, all players are required to use the same firmware version. Free-For-All Mode In Free-For-All, users launch gel beads or emit infrared beams at opponent S1s. If an S1 is hit, the Hit Point Bar is reduced.
-
Page 36: Operating The S1 Using A Gamepad
ROBOMASTER S1 User Manual Operating the S1 using a Gamepad Introduction You can also use the S1 Gamepad connected to a mobile device to control the S1 in the following ways. 1. Using the Gamepad connected to a mobile device. -
Page 37: Using A Pc And Robomaster Windows Version
Install the Windows version of the RoboMaster app to a computer and control the S1 directly via a mouse and keyboard. Installing the Windows Version of RoboMaster 1. Users can download the RoboMaster app for Windows from the official DJI website on a computer to control the S1 with a keyboard and mouse. https://www.dji.com/robomaster_app 2. -
Page 38: Lab
The RoboMaster S1 Lab offers hundreds of programming blocks that allow you to access features such as PID control. The RoboMaster S1 Programming Guide provides instructions and examples to help users quickly learn programming techniques for controlling the S1. - Page 39 ROBOMASTER S1 User Manual 1. Scratch page: Tap to view Scratch programs. 2. Python page: Tap to view Python programs. 3. Cloud space: Tap to view programs in the cloud space. 4. Program name: Displays the name of the program.
- Page 40 AI Modules There are six AI modules that can be programmed by entering Lab -> DIY Programing -> Scratch. Refer to the Smart section of the RoboMaster S1 Programming Guide for more programming examples. Note that the AI module will be effected in the following situations: a.
- Page 41 Program or a Custom Skill and run on the S1. Users can also convert Scratch programs into Python code and use the display station to help get started with programming with Python. Refer to the RoboMaster S1 Programming Guide for more information.
-
Page 42: Appendix
Intelligent Controller Connection via Wi-Fi: 80-100 ms Latency Connection via Router: 100-120 ms (unobstructed, free of interference) Live View Quality 720p/30fps Max Live View Bitrate 6 Mbps Operating Frequency 2.4 GHz, 5.1 GHz, 5.8 GHz © 2019 DJI All Rights Reserved. - Page 43 ROBOMASTER S1 User Manual 2.400-2.4835 GHz FCC: ≤30 dBm SRRC: ≤20 dBm CE: ≤19 dBm MIC: ≤20 dBm 5.170-5.250 GHz FCC: ≤30 dBm Transmission Power (EIRP) SRRC: ≤23 dBm CE: ≤20 dBm MIC: ≤23 dBm 5.725-5.850 GHz FCC: ≤30 dBm SRRC: ≤30 dBm...
- Page 44 ROBOMASTER S1 User Manual Wide Infrared Units Effective Range 3 m (in indoor lighting conditions) Effective Width 360° (in indoor lighting conditions) Hit Detector For the hit detector to be activated, the following conditions must be met: Gel bead diameter ≥ 6mm, Detection Requirements launching speed ≥20 m/s, and the angle between the...
-
Page 45: Firmware Update
ROBOMASTER S1 User Manual [1] Measured in an interference-free and unobstructed environment with a distance of approximately one meter between the mobile device, the router, and the S1. The iOS device used was an iPhone X. The results of testing with different Android device may be different. -
Page 46: Setting The Pwm Ports
ROBOMASTER S1 User Manual c. The pitch cannot rotate horizontally when the yaw is controlled separately. d. The gimbal drifts when there is no operation or when the operation is stopped. e. The S1 moves involuntarily while rotating. f. The chassis is uncontrollable and the gimbal goes limp when warning prompts appear in the app. - Page 47 DJI Support https://www.dji.com/support This content is subject to change. Download the latest version from https://www.dji.com/robomaster-s1/downloads If you have any questions about this document, please contact DJI by sending a message to DocSupport@dji.com. Copyright © 2019 DJI All Rights Reserved.
Need help?
Do you have a question about the Robomaster S1 and is the answer not in the manual?
Questions and answers