Table of Contents
Advertisement
Advertisement
Table of Contents

Related Manuals for promethean ClassFlow Connect

Summary of Contents for promethean ClassFlow Connect
- Page 1 Installation & User Guide TP-1986-EN-US-V03...
- Page 2 Copyright Information TP-1986-EN-US-V03 © 2015 Promethean Limited. All rights reserved. Promethean is owner of a number of trademarks in several jurisdictions across the world. The Promethean products documented in this guide include aspects which are protected under their respective patent, copyright, design copyright, registered design and trademark laws.
-
Page 3: Table Of Contents
Contents Safety Information Setting up your system Care during use Cleaning your device Connect About your device Box contents ClassFlow Connect at a glance What you need Installing your device Configure Configuring your device Connecting to ClassFlow Configuring your network Software updates Factory reset Use Using your ClassFlow Connect Troubleshoot Troubleshooting... -
Page 4: Safety Information
Safety Information Your ClassFlow Connect is designed and tested to meet the latest standards of safety for information technology equipment. However, to ensure your safety, it is important that you read the following safety instructions. Setting up your system Read and follow all instructions in the documentation before •... -
Page 5: Cleaning Your Device
Promethean reserves the right to charge for exterior case repair/replacement. To clean your ClassFlow Connect, unplug the power lead and all cables. Then use a soft, lint-free cloth to gently wipe the exterior case. Avoid getting moisture in any openings. -
Page 6: Connect
Box contents 1 x ActivConnect device 1 x Wall mount • • 1 x WiFi antenna 4 x Mounting screws • • 3 x Power leads (USA, EU, UK) 4 x Rubber pads • • 1 x AC to DC power adapter • Manufacturer: Delta Electronics Inc Model No: ADP-40KD BB Input: 100-240V 1.2A 50-60Hz Output: 19V 2.1A ClassFlow Connect Installation & User Guide... -
Page 7: Classflow Connect At A Glance
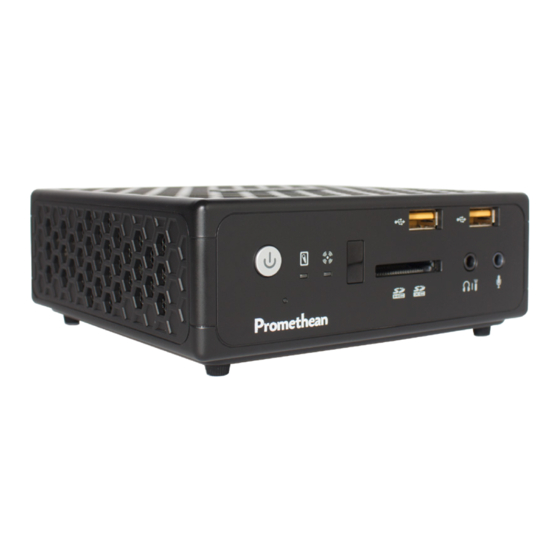
ClassFlow Connect at a glance Front of device 1. Power switch 2. Hard disk status indicator 3. WiFi status indicator 4. Infrared receiver 5. Memory card slot 6. Headphone/S/PDIF audio output jack 7. USB 2.0 ports 8. Microphone jack Rear of device 9. Power input (19V DC 2.1A) 10. HDMI output 11. DisplayPort 12. USB 3.0 ports 13. Ethernet port 14. eSATA port 15. WiFi antenna connector 16. Ventilation area 17. USB port for interactive surface ClassFlow Connect Installation & User Guide... -
Page 8: What You Need
Connect What you need To start using your ClassFlow Connect device you will need: Panel, display, interactive whiteboard or projector. • HDMI or DisplayPort (DP) cable to connect the device to • your projector or display. USB cable to activate touch functionality between the • device and your touch display, if you have one. -
Page 9: Installing Your Device
Since Miracast functionality requires peer-to-peer connection between your shared device(s) and the ClassFlow Connect, carefully select a location that does not restrict this connection. Mounting the ClassFlow Connect within 4 feet of a Promethean ActivPanel or any other device emitting infrared interference is NOT recommended. Miracast performance will be significantly degraded if the device is positioned directly below or next to the ActivPanel, because the infrared bezel plane of the ActivPanel will cast emissions over the ClassFlow Connect’s WiFi... - Page 10 Step 2: Connecting the video and audio cables IMPORTANT NOTE: Turn off the power to ALL devices during installation. Only power on the ClassFlow Connect device AFTER all other devices are turned on. Follow the instructions that are applicable to your system: Connecting to an HDMI display/projector 1. Connect one end of the HDMI cable to the back of your...
- Page 11 ClassFlow Connect device. 4. Connect one end of a standard audio jack cable to the back of your display or projector. 5. Connect the other end of the cable to the headphone jack on the front of the ClassFlow Connect device. Step 3: Connecting touch input to your ClassFlow Connect device If you have a touch display you will need to: 1. Connect one end of the USB cable to the USB (touch) port on your display.
-
Page 12: Configure
ClassFlow Connect for the first time. 2. Press the power button on your ClassFlow Connect device. The first time you use ClassFlow Connect you will be asked to digitally sign the End User License Agreement. This can be simply selected on the interactive display or you can use a keyboard and mouse to assist. -
Page 13: Connecting To Classflow
Configure If you cannot access this area of the menu, your display may not be calibrated. Simply connect a USB mouse and keyboard for use until you calibrate your display. Once logged in you can configure the following: Change device name. Recommended if you have multiple • devices on the same network. Change administrator password. • Adjust sound settings. • Display resolution and calibration. -
Page 14: Configuring Your Network
ClassFlow Connect device on your network when trying to mirror, your network administrator may have disabled this feature. Please contact your network administrator to verify that IP Multicast is enabled on your subnet and that all devices you are looking to mirror are on at least one of the two network subnets your ClassFlow Connect device is affiliated with. Software updates Your ClassFlow Connect has a future ready design. You can check for and install updates through the Software Update option in Settings. ClassFlow Connect Installation & User Guide... -
Page 15: Factory Reset
This function is available through the Software Update option in Settings. Only use this feature if instructed by our technical support team or your network administrator. You will lose all your settings and will need to re-configure your device. Using your ClassFlow Connect The desktop provides instructions for each of the features on your ClassFlow Connect. You can select one of the following options to find out more: Share Your Screen • Control the Screen •... -
Page 16: Troubleshoot
Promethean Support at prometheankb.com or support.prometheanworld.com. If your device is not responding, first check the following: The cables between the ClassFlow Connect and your • display/projector are correctly and firmly in place. The power cables for ClassFlow Connect and your display/ • projector are securely connected to a working power source. Your display/projector is turned on and set to the correct •... -
Page 17: Troubleshooting
Troubleshoot Troubleshooting If you encounter an issue with your ClassFlow Connect, there is usually a quick and easy solution. For example: My projector has a VGA cable, but not a HDMI or DP. What can I do? VGA to HDMI or VGA to DP converters are available on the market to support this conversion. - Page 18 Troubleshoot The ClassFlow Connect is not showing the correct screen size on my display. If your ClassFlow Connect is not showing the correct screen size, shut down your device from the menu, ensure your display/ projector is turned on, then restart the device. Although not recommended, the ClassFlow Connect can be restarted by holding down the power button.
-
Page 19: Service And Support
Service and support We hope this guide, along with the on-screen instructions and the Promethean Support site, provides you with all the information you need to use your device. NOTE: A later version of this guide may be available on the Promethean Support site. -
Page 20: Compliance
Europe Promethean hereby declare that the PRM-ACON1-01 is in compliance with the Low Voltage Directive 2006/95/EC and the Electromagnetic Compatibility Directive 2004/108/EC. The equipment meets the following conformance standards: EN 55022, EN 55024 and EN 60950-1. Please contact Promethean for a copy of the declaration of conformity if required. WARNING: This is a Class B product. In a domestic environment this product ClassFlow Connect Installation & User Guide... - Page 21 Waste Electrical and Electronic Equipment (WEEE) For more information concerning the correct disposal of these products, please contact your Promethean reseller. The PRM-ACON1-01 incorporates an Intel 3160HMW or Azurewave AW-CE123H or AW-NB110H Wifi Module with specific compliance information.
- Page 22 1. this device may not cause interference. 2. this device must accept any interference, including interference that may cause undesired operation of this device. L ‘ utilisation de ce dispositif est autorisée seulement aux conditions suivantes : 1. il ne doit pas produire de brouillage. 2. l’ utilisateur du dispositif doit étre prêt à accepter tout brouillage radioélectrique reçu, même si ce brouillage est susceptible de compromettre le fonctionnement du dispositif. ClassFlow Connect Installation & User Guide...
- Page 23 Europe Europe – EU Declaration of Conformity Marking by the above symbol indicates compliance with the Essential Requirements of the R&TTE Directive of the European Union (1999/5/EC). This equipment meets the following conformance standards: EN300 328, EN301 489-17, EN60950-1. Please contact Promethean for a copy of the Declaration of Conformity if required. Europe: Restrictions for use of 2.4 GHz frequencies. France: Limited implementation . Outdoor use is limited to 10 mW e.i.r.p. within the band 2454-2483.5 MHz. Military Radiolocation use. Refarming of the 2.4 GHz has been ongoing in recent years to allow current relaxed regulation. Full implementation planned 2012.
- Page 24 Germany, Greece, Hungary, Iceland, Ireland, Italy, Latvia, Lithuania, Luxembourg, Malta, Netherlands, Norway, Poland, Portugal, Romania, Slovak Republic, Slovenia, Spain, Sweden, Switzerland, United Kingdom. www.prometheankb.com www.support.prometheanworld.com www.prometheanworld.com TP-1986-EN-US-V03 ©2015 Promethean Ltd. All Rights Reserved. Products are subject to availability by country. Product Specifications are subject to change without notice.
Need help?
Do you have a question about the ClassFlow Connect and is the answer not in the manual?
Questions and answers