Advertisement
Snow Performance Boost Cooler
You must completely read through these instructions before installing and operating
CAUTION
:
this product. Failure to do so can result in damage to this product and the vehicle.
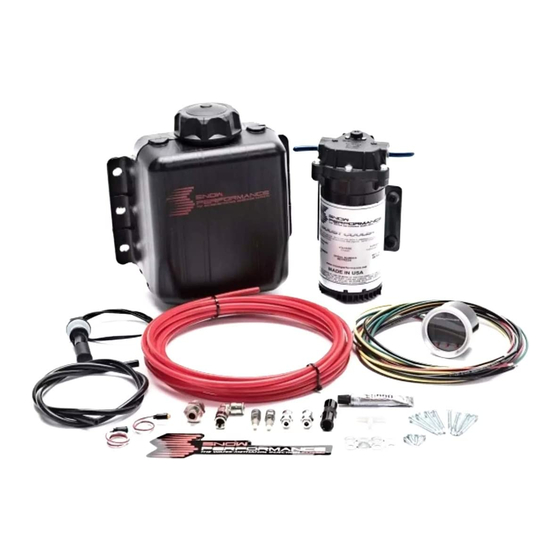
Congratulations on your purchase of a Snow Performance Boost Cooler® Gas Water-Methanol
Injection kit! Keep these instructions for reference. First locate the part# of your injection system
which can be found on the front of the Boost Cooler® box. Use this number to identify which set of
Required Tools Needed For Install:
●
Phillips/Flat Head Screwdriver
●
Power Drill
●
Razor Blade
●
Preferred Electrical Connectors (Crimping/Stripping Tools, Blue Butts, Eye Hooks, Posi-Taps,
Fuse Taps, Soldering Supplies etc)
●
Spare 16 Gauge Wire (Optional Depending On Install)
●
Open End Wrench / Socket Set
●
1/8" – 27 NPT Tap (Optional Depending On Install)
Average Install Time: 4-6 Hours
Locate the wiring diagram for your injection kit further in these instructions beginning
on page 8 for overview of system layout before attempting install.
®
Gas Water-Methanol Injection Kit Instructions
(Part#'s 210, 210-BRD)
Version: 1.0
electrical and setting instructions to follow.
Page | 1
Advertisement
Table of Contents

Related Manuals for Snow Performance Boost Cooler 210

Summary of Contents for Snow Performance Boost Cooler 210
- Page 1 Failure to do so can result in damage to this product and the vehicle. Version: 1.0 Congratulations on your purchase of a Snow Performance Boost Cooler® Gas Water-Methanol Injection kit! Keep these instructions for reference. First locate the part# of your injection system which can be found on the front of the Boost Cooler®...
- Page 2 Step 1 Self Sealing Low Level Sensor Install (Optional) Although not required for kit operation, the low level sensor and yellow led are a great way to monitor the level of your water-meth tank. The level sensor is designed to turn on the led or alert the controller in some kits as soon as the level inside the reservoir reaches the level of the sensor.
-
Page 3: Step 2 Tank Install
Step 2 Tank Install OPTIONAL: If desired you can use the stock windshield washer fluid tank as the tank for your water- meth system. Simply drill and tap a 3/8” NPT hole in desired feed spot for system and install the 3/8” NPT fitting into the tank using E-6000 sealant on threads/around area. - Page 4 Step 3 Pump Install Braided Line Kits Only- Install (2) 3/8” NPT to 4AN Straight fittings into the pump inlet and outlet using E6000® sealant on the threads. Do not overtighten as damage to the pump housing can occur. Quick Connect Kits Only-Remove the blue rubber plugs from the quick-connect fittings by first pushing the plug toward the pump, hold the grey collar against the pump, and gently pull the...
-
Page 5: Step 4 Nozzle Selection
**The end of the nozzle with the fine mesh screen should be inserted into the nozzle holder** Correct Correct **Teflon sealants are not compatible with methanol, and should not be used with the install of your Snow Performance Boost Cooler®** Page | 5... - Page 6 Step 5 Nozzle Mounting Typical nozzle placement is approximately 6” or less before the throttle body inlet on the vehicle but the nozzle can be installed anywhere on the intake pipe after a intercooler outlet/supercharger outlet/turbo outlet. The nozzles should always be placed after an intercooler due to the possibility of the narrow passages and loss of air velocity leading to puddling.
- Page 7 Braided line kits - Fit the NPT thread to 4AN adapters in each side of the check valve using E-6000 sealant on the NPT threads only. Connect the 5 foot section of braided line from the pump outlet to check valve inlet and the 1’...
-
Page 8: Wiring Diagram
Part# 210 / 210-BRD Wiring Diagram Step 1 VC-50 Wiring/Boost Source Step 1: Mount controller in desired location using a 52 mm gauge pod. Step 2: Slide boost hose (black silicon hose supplied in kit) over the black boost line coming from the controller and sure with a wire tie. - Page 9 Step 2 VC-50 Injection Settings / Screens Main Screen ● Main Screen (see right) is used to monitor boost pressure, injection, low level, second stage activation, and to prime the system. ● To prime the system press the red button underneath “P”. This will command 100% injection briefly to fully prime the system.
- Page 10 Text Color ● Setting screen 4 (see right) is used to select what text color will be displayed on screen. Using the red buttons below the up and down arrows adjust the color to the desired setting (Red, Blue, Green, Yellow, Orange, Purple, White) are available.
-
Page 11: Tuning Quick Reference
Step 4: Hit the prime button on the VC-50 controller. The system should engage and fluid should be atomized out of the nozzle. Step 5: Enjoy increased octane! See tuning tips / FAQ at the end of these instructions for more info. VC-50 Fault Alerts Low Level Alert •... -
Page 12: Maintenance
Q: What fluids can I use in my water/methanol system? Boost Juice®: This is the best fluid to use and is Snow Performance’s 49% methanol, 51% water mixture that can be shipped to your door or picked up at a local dealer. (If you are using your washer reservoir as the injection tank, Boost Juice®... - Page 13 Q: Can I use pure methanol? While all components of Snow Performance systems are designed to be able to handle 100% pure methanol, it is not recommended for a number of reasons. • Safety: Pure methanol is easy to ignite with a low 140F degree flash-point and burns with an invisible flame.
- Page 14 This is a high performance product – use at your own risk. Snow Performance Inc., Its agents, employees or owners shall not be under any liability whether in contract or otherwise whether or not resulting from our negligence or contents of information supplied for any damage or loss resulting from such information.
- Page 15 Return Policy: All returns must be called in for RMA #. Snow Performance will not take used kits or parts for refund. If you are returning an unused kit there is a 15% restocking fee minus shipping/handling. All returns must be made within 30 days of purchase date. No exceptions.
Need help?
Do you have a question about the Boost Cooler 210 and is the answer not in the manual?
Questions and answers