
Subscribe to Our Youtube Channel
Related Manuals for DigitaLinx DL-HD24A-H2


Summary of Contents for DigitaLinx DL-HD24A-H2
- Page 1 DL-HD24A-H2 Owners Manual Rev 190717 11675 Ridgeline Drive Phone: 719-260-0061 Colorado Springs, CO Toll-Free: 800-530-8998 80921 Fax: 719-260-0075...
-
Page 2: Important Safety Instructions
DL-HD24A-H2 Owners Manual Important Safety Instructions » Please completely read and verify you understand all instructions in this manual before operating this equipment. » Keep these instructions in a safe, accessible place for future reference. » Heed all warnings. » Follow all instructions. -
Page 3: Table Of Contents
DL-HD24A-H2 Installation Guide Table of Contents Product Overview ��������������������������������������������������������������������������������������������������������������������������������������� Product Overview ��������������������������������������������������������������������������������������������������������������������������������������� Product View ���������������������������������������������������������������������������������������������������������������������������������������������� Front Panel ���������������������������������������������������������������������������������������������������������������������������������������������������� Switcher - Rear Panel ������������������������������������������������������������������������������������������������������������������������������������ Installation Instructions ������������������������������������������������������������������������������������������������������������������������������ Rack Mounting the Switcher ������������������������������������������������������������������������������������������������������������������������� Connecting Video Sources ����������������������������������������������������������������������������������������������������������������������������� Connecting Displays �������������������������������������������������������������������������������������������������������������������������������������� Connecting Audio Output ������������������������������������������������������������������������������������������������������������������������������... -
Page 4: Product Overview
4K video input can automatically be down scaled to an 1080p output when connecting a display that only supports resolutions up to 1080p. The DL-HD24A-H2 supports 4K signals up to 4K@60Hz / 4:4:4 / 8 bit color and features an easy EDID management option using dip switches on the rear panel of the unit. -
Page 5: Product View
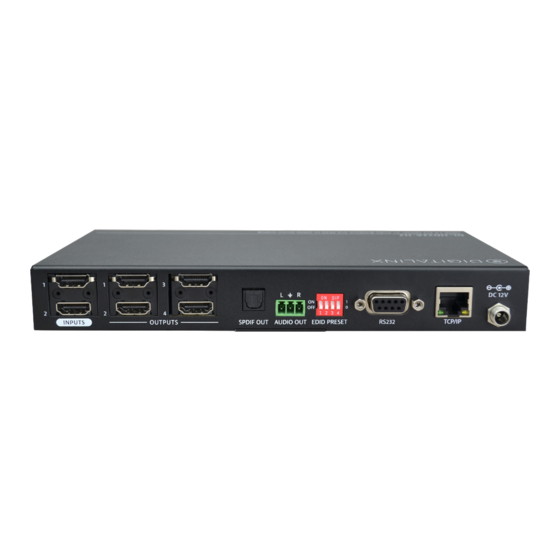
DL-HD24A-H2 Installation Guide Product View Front Panel 1. POWER LED INDICATOR Illuminates solid RED when device is powered ON 2. OUTPUT LED INDICATORS - Illuminates solid GREEN when there is an HDMI output on the corresponding channel 3. SOURCE BUTTON and LED INDICATORS AUTO - Switching mode indicator;... - Page 6 DL-HD24A-H2 Owners Manual Rear Panel 1. INPUTS - Two HDMI input ports to connect HDMI sources 2. OUTPUTS - Four HDMI output ports to connect HDMI displays 3. AUDIO OUT -3 pin phoenix connector for analog audio output 4. SPDIF OUT - Toslink digital audio output port for digital audio output 5.
-
Page 7: Installation Instructions
Connecting Displays Connect the display devices to the HDMI output of the DL-HD24A-H2 using a High Speed HDMI cable that is less than or equal to 5 meters in length for 4k60 signals and 8 meters for 1080p signals. -
Page 8: Connecting Rs232 Control
DL-HD24A-H2 Installation Guide Connecting RS232 Control Connect a control system to the DL-HD24A-H2 switcher via RS232 so the switcher can be controlled by a 3rd party control system using serial communication. PIN 2 - Transmit RS232 Wiring PIN 3 - Receive... -
Page 9: Connecting Ethernet
Telnet Control To connect to the DL-HD24A-H2 and control it as a Telnet client, connect a computer to the same LAN as the DL- HD24A-H2 , be sure your computer is in the same network ID range as the switcher, enter in the default IP of the switcher into a telnet server and use Port 4001 to connect. -
Page 10: A/V Diagram
DL-HD24A-H2 Installation Guide DL-HD24A-H2 A/V DIAGRAM A/V Diagram Media Player 1 Control System Media Player 2 HDMI CATx RS232 AUDIO 4K Display 4K Display Audio Amplifer / AVR 1080p Display 1080p Display... -
Page 11: Web Browser Control / System Settings
Web Browser Control / System Settings Connecting to Web Control Interface Open a web browser and type in the IP address of the DL-HD24A-H2. The default IP address is 192.168.0.178. Be sure the computer you are using to connect to the DL-HD24A-H2 web GUI is in the same IP / Network ID range. -
Page 12: Audio / Video Switching
To switch the AV route, check either HDMI 1 or HDMI 2 in the SOURCE buttons section, once selection has been made all displays connected to the outputs of the DL-HD24A-H2 will be switched to this input. Note: you must... -
Page 13: Display On/Off Control
GUI. When RS232 control is used the GUI will only control the displays ON or OFF status when connected to the RS232 port of the DL-HD24A-H2. RS232 commands can be set for ON/OFF status in the RS232 menu in the DL-HD24A-H2 web GUI. -
Page 14: Configuring And Testing Rs232 Display Commands
The RS232 menu allows you to test and configure RS232 command strings through the RS232 serial port output on the DL-HD24A-H2. The RS232 settings for the displays RS232 commands will be located in the displays manufacturers manual or RS232 guide that should be used to configure this section. -
Page 15: Network Settings
DL-HD24A-H2 Installation Guide Network Settings The Network menu allows you to set the IP address mode to either Static or DHCP, by default the The DL- HD24A-H2 is set to Static mode with a pre-defined IP address of 192.168.0.178 / subnet 255.255.255.0 and gateway set to 192.168.0.1... -
Page 16: Access Settings
DL-HD24A-H2 Installation Guide Access Settings The PASSWORD menu allows you to change the password credentials for the admin login of the The DL- HD24A-H2. To change the password for the admin login, enter in the desired password then click Confirm... -
Page 17: Edid Management
DL-HD24A-H2 Installation Guide EDID Management Front Panel Settings EDID (Extended Display Identification Data) is data generated from a connected display in an HDMI system to communicate the resolution capabilities to a connected video source. The front panel EDID switch allows for lowest common denominator or highest common denominator EDID settings for the two HDMI inputs as well as setting EDID using presets via dipswitches. -
Page 18: Dipswitch Settings
When using a preset EDID table via dipswitch be sure that the PRESET selection has been made on the EDID switch on the front panel of the DL-HD24A-H2. See pg 17. When a dipswitch is in the down position, the switch represents “0” of OFF, when the dipswitch position in the up position it represents “1”... -
Page 19: Rs232 And Tcp/Ip Control
DL-HD24A-H2 Installation Guide RS232 and TCP/IP Control RS232 Settings: 9600 baud, 8 Data bits, 1 Stop bit, Parity = None TCP/IP Settings: User defined IP address (default IP address:192.168.0.178), Telnet port 4001 There are no spaces between any of the characters in the command string. The commands are case sensitive. -
Page 20: Audio On/Off Control
DL-HD24A-H2 Installation Guide Audio On/Off Control Description Command Examples IISON. Command: Turns the stereo analog L/R audio IISON.<CR><LF> output ON Response: IIS OUT ON! IISOFF. Command: Turns the stereo analog L/R audio IISOFF.<CR><LF> output OFF Response: IIS OUT OFF! SPDIFON. -
Page 21: Display On/Off Cec Control
Display On/Off CEC Control Displays connected to the DL-HD24A-H2 via HDMI can be turned ON/OFF via CEC from a 3rd party control system using the commands below. Be sure that the display supports CEC and the option is turned ON. -
Page 22: System Commands
DL-HD24A-H2 Installation Guide System Commands Description Command Examples RST. Command: Restores the device to factory RST.<CR><LF> defaults Response: DL_HD28A_H2 VER 1.0.0 CEC_ON RS232_ON TMDS_ON TV1_OFF TV_DELAY 500 ms! SYS_DELAY 30 min! HDMI OUT SWITCH TO AUTO MODE! DIP0000! DIP EDID0000! -
Page 23: Technical Specifications
DL-HD24A-H2 Installation Guide Technical Specifications Input/Output Connections HDMI Inputs Two (2) HDMI Type A Receptacles HDMI Outputs Four (4) HDMI Type A Receptacles TCP/IP One (1) 8P8C Port (Shielded RJ45 Female) RS232 One (1) Female DB9 Port Audio - One (1) Analog L/R audio output, 3-Pin 3.5mm Phoenix... - Page 24 Thank you for your purchase. For Technical Support please call our toll free number at 800-530-8998 or email us at supportlibav@libav.com www.libav.com Digitalinx is a brand of:...
Need help?
Do you have a question about the DL-HD24A-H2 and is the answer not in the manual?
Questions and answers