Table of Contents
Advertisement
Quick Links
Download this manual
See also:
Installation Manual
Advertisement
Table of Contents

Related Manuals for PNI PLACEPOD


Summary of Contents for PNI PLACEPOD
- Page 1 ® PLACEPOD VEHICLE COUNTING SENSOR USER MANUAL...
- Page 2 PlacePod® Vehicle Counting Sensor In-Ground and Surface-Mount PlacePod Vehicle Counting sensor (PlacePod VC) is an in-ground sensor that communicates with a LoRa gateway to provide real-time vehicle counts. PlacePod VC provides accurate count data for passing vehi- cles in driveways and designated entrances/exits, up to 7 years of battery life, and is stable over tem- perature fluctuations, even in harsh environments.
-
Page 3: Table Of Contents
INSTALLATION SITE SURVEY ..................11 INSTALL THE PLACEPOD .....................12 CALIBRATE THE PLACEPOD ..................13 PNI CLOUD SERVICE ....................13 APPENDICES ........................27 APPENDIX I: GLOSSARY ....................27 APPENDIX II: PLACEPOD SPECIFICATIONS ..............29 PNI Sensor PlacePod Vehicle Counting Sensor User Manual R01 4/19 Page 3 of 29... -
Page 4: Introduction
INTRODUCTION This guide is designed to support the PlacePod VC device. For questions relating to other elements of the LoRa Network, please contact the provider. For information about PNI’s PlacePod Vehicle Detection Sensor, please visit: PlacePod Smart Parking. The PlacePod User Manual is divided into three sections: System Functional Elements •... -
Page 5: System Functional Elements
Each sensor has a unique ID for easy provisioning, tracking and management. Gateways – Each PlacePod VC device communicates to the gateways set up to receive these • signals. The gateways collect the signals from the PlacePod VC devices and send the infor- mation on to the Network Service. -
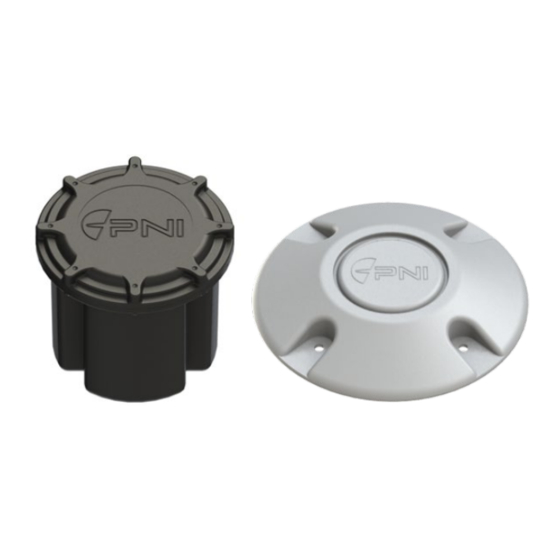
Page 6: Placepod Physical Sensor
The surface mount models are used for short term product evaluation only. The in-ground model is the default since placing the PlacePod VC sensor just below the parking surface pro- vides the most durable, permanent installation and the battery life of the surface mount is designed for short term pilot studies. -
Page 7: Gateway
The same lane may have RSSI variation of 10 to 15dB when a car is present or when the space is vacant. PNI recommends testing for a -90dBm RSSI without a car in the lane as the baseline for gateway setup. For small projects, a minimum of two gateways are recommended as redundancy protection. -
Page 8: Pni Parking Management Application
PARKING MANAGEMENT APPLICATION PNI provides a cloud-based service for interfacing with algorithms for processing the vehicle count data, configuring the parking area size and managing and resetting the current vehicle count. An API allows users to integrate the vehicle count data into their custom or 3rd party applications, digital signage, and parking guidance systems. -
Page 9: Placepod Counting Solution Setup And Installation
2. Acquire gateways and install in pre-determined location decided from pre-installation LoRa RF site survey. A pre-installation survey can be an important step in determining the number of gateways required for a reliable network. A PlacePod VC sensor can be used as a survey tool in a site survey as follows: a. -
Page 10: Activate Placepod
Using the PlacePod Sensor Utility iOS or Android application will activate the PlacePod so that it will join and communicate with the RF network. In order for PlacePod VC to join the network it is im- portant that the RF network is available at the time of activation. -
Page 11: Installation Site Survey
Support. INSTALLATION SITE SURVEY Once the PlacePod VC has been activated it is important to ensure that the sensors are able to communicate with the LoRa network by performing an installation survey. The installation survey is performed in a similar manner to the pre-installation survey described in Section 3.2.2. However, in this case the actual PlacePods and gateways being deployed are tested during installation (but before final installation so adjustments can be made if required). -
Page 12: Install The Placepod
Please refer to the Installation Guide for details on each type of installation. PlacePod VC sensors are installed in pairs, a front and back sensor for each lane being monitored. Each PlacePod has a unique ID which can be found on the bottom of the sensor. PNI recommends that you record each sensor ID and match it to the entrance/exit lane and make note of the sensor location (front or back) before installing it into the driveway. -
Page 13: Calibrate The Placepod
CALIBRATE THE PLACEPOD The PlacePod must be calibrated before it is able to properly detect a vehicle counting event. Once the PlacePod is installed in the driveway, ensure that the space is free of any non-permanent ferrous objects such as toolboxes, installation tools, and other equipment. Consult the... - Page 14 5. Paste the API key in the “Value” field and click “Authorize” PNI Sensor PlacePod Vehicle Counting Sensor User Manual R01 4/19 Page 14 of 29...
- Page 15 6. Close the Authorization window, scroll down to the “ParkingLot” section and click on “POST” /api/v2/parkinglots 7. The section will expand. Click on “Try it out” PNI Sensor PlacePod Vehicle Counting Sensor User Manual R01 4/19 Page 15 of 29...
- Page 16 Otherwise do not change anything. 9. You can optionally change the fields like “name” or “address”. Once the fields look ok, click ”Ex- ecute.” PNI Sensor PlacePod Vehicle Counting Sensor User Manual R01 4/19 Page 16 of 29...
- Page 17 10. You should see a response like this: 11. Record the ID in the response body. 12. Scroll down to the “Sensor” section and click on “POST” /api/v2/sensors PNI Sensor PlacePod Vehicle Counting Sensor User Manual R01 4/19 Page 17 of 29...
- Page 18 13. The section will expand. Click on “Try it out” PNI Sensor PlacePod Vehicle Counting Sensor User Manual R01 4/19 Page 18 of 29...
- Page 19 14. You will initially see a body like this: 15. Remove fields “appEui” and “appKey” and change “network” to “PNI”. 16. For field “parkingId”, enter the ID recorded from earlier. 17. For “sensorId”, enter the sensor’s ID that is included with it.
- Page 20 19. Now click “Execute” 20. You should see a response like this: PNI Sensor PlacePod Vehicle Counting Sensor User Manual R01 4/19 Page 20 of 29...
- Page 21 21. Go back up to the body, and enter the other PlacePod VC’s serial number 22. Repeat steps 18 and 19. You should see a result like this: 23. Scroll up to the “Driveways” section and click on “POST” /api/v2/driveways...
- Page 22 26. Change “parkingLotId” to the Id that was recorded earlier. 27. Change “frontSensorId” to match the serial number of one of the PlacePods and “backSensorId” to match the other serial number. PNI Sensor PlacePod Vehicle Counting Sensor User Manual R01 4/19 Page 22 of 29...
- Page 23 “isDirectionIn” to false. 29. The body should now look something like this 30. Now click “Execute” 31. You should see a response like this: PNI Sensor PlacePod Vehicle Counting Sensor User Manual R01 4/19 Page 23 of 29...
- Page 24 32. If another driveway is needed, repeat steps 11 – 29. Make sure to use the other PlacePod VC’s serial numbers. 3.7.2 Sending data Once you have decoded an event packet (Cayenne type 0x00 “digital input” and channel 0x21) you should have an integer value between 0 and 128 inclusive.
- Page 25 Or if you’re using our PlacePod VC evaluation kit and have the sensors provisioned on PNI’s Cloud, then the necessary data will automatically be forwarded for processing. No additional setup is required. 3.7.3 Receiving Data 1. Repeat steps 2 - 5 from Initial setup 2.
- Page 26 9. The “count” field will represent the estimated number of vacant parking spaces left in the park- ing lot. This is calculated using the counts from all the specific parking lot’s driveways. PNI Sensor PlacePod Vehicle Counting Sensor User Manual R01 4/19 Page 26 of 29...
-
Page 27: Appendices
APPENDIX I: GLOSSARY Bluetooth Low Energy (BLE): A wireless technology designed to connect an individual person’s devices. Ferrous: A material containing Iron. Materials containing iron in the vicinity of a PlacePod can interfere with the calibration of the device. Gateway: LPWAN equipment that receives wireless signals from remote devices (such as parking sen- sors) using LoRa bandwidth, and then relays these signals to a network service using a different commu- nications protocol. - Page 28 Activation Type OTAA (over the air activation) Certifications FCC (915MHz), CE (868MHz) Footnote: * Specifications are subject to change. Table 4-2 PlacePod Vehicle Counting Sensor Default Settings Parameter Default Frequency Sub Band (US915, AU915) Spreading Factor US915, EU868 = 7...
-
Page 29: Appendix Ii: Placepod Specifications
If a Product is defective, transportation charges for the return of the Product to Customer within the United States and Canada will be paid by PNI. For all other locations, the warranty excludes all costs of shipping, customs clearance, and other related charges. PNI will have a reasona- ble time to make repairs or to replace the Product or to credit Customer’s account.
Need help?
Do you have a question about the PLACEPOD and is the answer not in the manual?
Questions and answers