ClearClick Video2Digital User Manual
Converter 2.0
Hide thumbs
Also See for Video2Digital:
- Manual (2 pages) ,
- Users manual & quick start manual (26 pages)

Subscribe to Our Youtube Channel
Related Manuals for ClearClick Video2Digital


Summary of Contents for ClearClick Video2Digital
- Page 1 User’s Manual & Quick Start Guide Full 1-Year Warranty & USA-Based Tech Support Email Us At: support@clearclick.tech www.ClearClick.tech...
- Page 2 Register Your Product Make sure you register your product at: www.ClearClick.tech Browse All Our Products! If you’re looking for fun, unique, and easy-to-use technology, we’ve got it! Please visit our website to browse all of our products: www.ClearClick.tech Safety Precautions – Important, Please Read: 1.
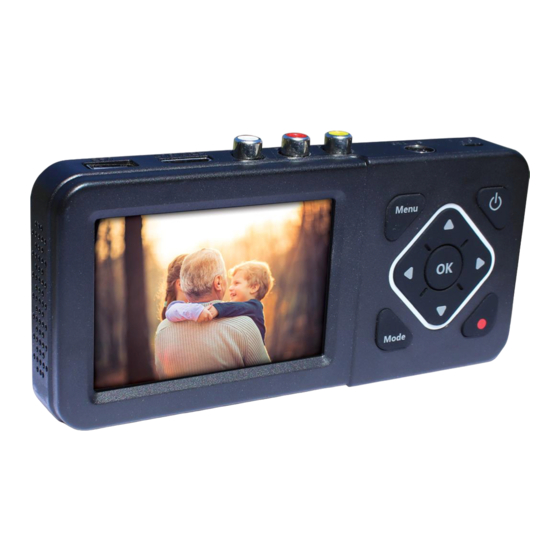
- Page 3 What’s In The Box? Device Diagram & Explanation (continued on next page)
- Page 4 LED indicators: A blue light means the device is on. A blue blinking light means it is running low on memory. LCD Screen: LCD screen for preview/playback. Panel Buttons: Power: A single press will turn on/off the display screen. Hold down for several seconds to turn off normally.
-
Page 5: Quick Start Guide
Quick Start Guide 1. Plug in and turn on the device. Using the included USB cable and power adapter, plug in the Video2Digital® Converter 2.0 to a wall outlet. Then, power the device by pressing and holding the power button for several seconds. - Page 6 Converter 2.0. Connect the cable to the “OUT” ports of your video source, and into the yellow, white, and red “IN” ports on the top of the Video2Digital® Converter 2.0. Note, the converter’s preview screen may remain black or blue until the device detects a live signal from your video source.
- Page 7 Your video should appear on the Video2Digital® Converter’s screen. (Note: If your video looks jerky during recording or playback, do not worry. When you transfer the video to your computer, the video will appear normally.) Simply press the record button (“Rec/Stop”) to start recording your video in digital format! To stop recording, simply press the “Rec/Stop”...
- Page 8 Simply unplug your USB flash drive or SD card from the converter and plug it into your computer. (NOTE: Don’t unplug your USB flash drive or SD card until you’ve stopped recording by pressing the “Rec”/”Stop” button first, as described in the previous step.) Your USB drive or SD card will show up as a new drive on your computer.
- Page 9 How To Pause/Resume Recording After you’ve started recording, you may pause/resume recording by pressing the “OK” button. The converter won’t record anything while recording is paused. Press the “OK” button again to resume recording. How To Turn Off Time/Date Stamp By default, the converter will overlay the time &...
- Page 10 How To Use The “Auto Stop” Feature If you’d like, you can set the Video2Digital Converter 2.0 to automatically stop recording after a preset amount of time. (This is a helpful feature if you are converting a VHS tape or camcorder tape to digital format, and you’d like to leave your transfer unattended.)
- Page 11 How To Schedule Recordings You can schedule a recording by pressing the “Menu” button the device and selecting the “Schedule Recording” option. NOTE: Make sure your device is set to the right time and date before scheduling. On the above menu, the device allows you to set up a daily recording, a one time recording, or a weekly recording.
- Page 12 Confirmation: Choose to save the schedule settings. Cancel: Choose to exit without saving the schedule settings. How To Play Back Videos on the Device or a TV To play back videos on your device, go to Playback mode. From Recording mode, press the “Mode” button twice (or until a “Play”...
- Page 13 How To Format USB Drive or SD Card To format a USB drive or SD card and prepare it for recording, follow the steps below. NOTE: Formatting a USB drive or SD card will erase all data on it. In “Recording” mode, press the “Menu” button. Scroll down to select the “Formatting”...
- Page 14 FAQ’s & Troubleshooting 1. My video doesn’t show up on the LCD. A) First, make sure your video source is functioning correctly by plugging it into a TV. If your VCR or camcorder hasn’t been used in several years, it may need a tune-up or repair.
- Page 15 You can’t – this device is not meant to record from HDMI or HD video sources. (This device can only output to HDMI.) Instead, please check out our “HD Capture Box” and “HD Capture Box Ultimate” products for this purpose at www.ClearClick.tech.
- Page 16 8. The device isn’t working with an external USB hard drive. Since USB hard drives will consume more power than USB flash drives, the Video2Digital Converter may not provide enough power for them. Please use a compact USB thumb drive instead.
- Page 17 Then pull the card from the device. 12. I have a question that isn’t listed here, or need further support. No problem! Please email us at support@clearclick.tech with your order number, and we will get back to you as soon as possible.
-
Page 18: Technical Specifications
Technical Specifications CVBS/S- Video NTSC 720x480i60 / PAL 720x576i50 Input HDMI 1280x720p60 Output Output HDMI, Speaker Signals Recording 720x480p60 / 720x576p50 Supported File FAT32, FAT, NTFS, exFAT Systems Recording MP4 (H.264) Format Recording Maximum 4GB per file Capacity 128GB (USB flash drive) 128GB (SD card) Maximum Storage... - Page 20 www.ClearClick.tech...
Need help?
Do you have a question about the Video2Digital and is the answer not in the manual?
Questions and answers