Table of Contents
Advertisement
Quick Links
Advertisement
Table of Contents

Related Manuals for Campbell SDMS40


Summary of Contents for Campbell SDMS40
- Page 1 01/2019 Copyright © 2019 Campbell Scientific, Inc.
-
Page 2: Limited Warranty
Limited warranty “Products manufactured by CSI are warranted by CSI to be free from defects in materials and workmanship under normal use and service for twelve months from the date of shipment unless otherwise specified in the corresponding product manual. (Product manuals are available for review online at www.campbellsci.com.) Products not manufactured by CSI, but that are resold by CSI, are warranted only to the limits extended by the original manufacturer. - Page 3 Campbell Scientific reserves the right to refuse service on products that were exposed to contaminants that may cause health or safety concerns for our employees.
- Page 4 Periodically (at least yearly) check electrical ground connections. WHILE EVERY ATTEMPT IS MADE TO EMBODY THE HIGHEST DEGREE OF SAFETY IN ALL CAMPBELL SCIENTIFIC PRODUCTS, THE CUSTOMER ASSUMES ALL RISK FROM ANY INJURY RESULTING FROM IMPROPER INSTALLATION, USE, OR MAINTENANCE OF TRIPODS, TOWERS, OR...
-
Page 5: Table Of Contents
2. Precautions 3. Initial inspection 4. Quickstart 5. Features 6. Specifications 7. Installation 7.1 Mounting 7.1.1 Adjusting inclination angle or direction of the SDMS40 7.2 Wiring 8. Programming 8.1 SDI-12 programming 8.2 RS-232 programming 9. Operation 9.1 SDI-12 sensor measurements 9.2 RS-232 sensor measurements... - Page 6 C.1 Introduction C.2 SDI-12 command basics C.2.1 Acknowledge active command (a!) C.2.2 Send identification command (al!) C.2.3 Start verification command (aV!) C.2.4 Address query command (?!) C.2.5 Change address command (aAb!) C.2.6 Start measurement commands (aM!) C.2.7 Start concurrent measurement commands (aC!) C.2.8 Start measurement commands with cyclic redundancy check (aMC! and aCC!) C.2.9 Stopping a measurement command...
-
Page 7: Introduction
Once it completes a set of measurements, the SDMS40 takes an intelligent average of the depths to provide a representative average snow depth of the target area. -
Page 8: Precautions
Never open the sensor when the power is turned on. The SDMS40 uses a Class 2 laser. Do not stare into the laser beam. 3. Initial inspection Upon receipt of the SDMS40, inspect the packaging and contents for damage. File any damage claims with the shipping company. - Page 9 3. In the Available Sensors and Devices box, type SDMS40 or locate the sensor in the Sensors | Miscellaneous Sensors folder. Double-click SDMS40 (SDI-12) Multipoint Scanning Snowfall Sensor. The default average snow depth units are millimeters. This can be changed by clicking the Snow depth average box and selecting different units.
- Page 10 9. If the sensor is connected to the data logger, check the output of the sensor in the data logger support software data display in LoggerNet, PC400, RTDAQ, or PC200W to make sure it is making reasonable measurements. SDMS40 Multipoint Scanning Snowfall Sensor...
-
Page 11: Features
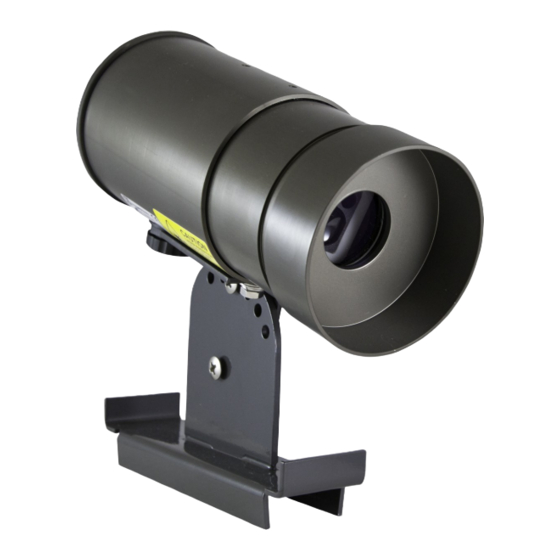
After mounting, the sensor performs a fully automatic calibration process to calculate install angle and height Output data on SDI-12 or RS-232 serial data interface Compatible with Campbell Scientific CRBasic data loggers: CR200(X) series, CR300 series, CR6 series, CR800 series, CR1000, CR1000X series, CR3000, and CR5000 6. Specifications Power supply:... -
Page 12: Installation
Quickstart (p. 2) for a tutorial. 7.1 Mounting The SDMS40 is environmentally sealed for outdoor installations. The enclosure provides protection from moisture and high humidity. It is not intended for operation under water. All that SDMS40 Multipoint Scanning Snowfall Sensor... - Page 13 Position the SDMS40 about one meter above the maximum seasonal snow depth height (FIGURE (p. 7), FIGURE 7-2 (p. 7)). This provides adequate height for required accuracy and resolution. Mounting procedure is provided in Table 7-1 (p.
-
Page 14: Adjusting Inclination Angle Or Direction Of The Sdms40
Lightly push the connector into place and screw the connector to secure. 7.1.1 Adjusting inclination angle or direction of the SDMS40 The SDMS40 can be installed at any angle between 0 and 45 degrees from the pole. After loosely tightening the screw on the common hole (FIGURE 7-1 (p. - Page 15 (p. 9) provides SDI-12 wiring and Table 7-3 (p. 10) provides RS-232 wiring. Once mounting and wiring of the SDMS40 are complete, apply power to the SDMS40. Table 7-2: SDI-12 sensor wire color, function, and data logger connection Power supply...
-
Page 16: Programming
For the CR6 and CR1000X, triggering conflicts may occur when a companion terminal is used for a triggering instruction such as TimerInput(), PulseCount(), or WaitDigTrig(). For example, if the SDMS40 is connected to C3 on a CR1000X, C4 cannot be used in the TimerInput(), PulseCount(), or WaitDigTrig() instructions. -
Page 17: Rs-232 Programming
CRBasic program, the variable used SerialIn() SerialIn() in the instruction needs to be declared as an ASCII string format. SplitStr() Split out digital count value from the input string. SDMS40 Multipoint Scanning Snowfall Sensor... -
Page 18: Operation
9. Operation 9.1 SDI-12 sensor measurements (p. 12). When using an M! The SDMS40 responds to the SDI-12 commands shown in Table 9-1 command, the data logger waits for the time specified by the sensor, sends the D! command, pauses its operation, and waits until either it receives the data from the sensor or the sensor timeout expires. -
Page 19: Rs-232 Sensor Measurements
"a” refers to the address of the sensor. 9.2 RS-232 sensor measurements The SDMS40 measures the current snow depth at a user-programmable interval (minutes) and transmits data on its RS-232 serial data lines to an external device, such as a data logger. By default, the sensor is in polling mode, where measurements are triggered by request from a data logger. - Page 20 @m⏎ Run a round of measurements immediately. SDMS40 status. This shows various system information such as cur- @s⏎ rent firmware version and installation angle and height. Perform automatic calibration to determine installation height and @ac⏎...
-
Page 21: Maintenance And Calibration
(Manual calibration (p. 16)). 10.2.1 Automatic calibration SDMS40 supports a fully automatic calibration process, which calculates the height and inclination angle of the SDMS40. Calibration is required when you first set up the sensor and SDMS40 Multipoint Scanning Snowfall Sensor... -
Page 22: Manual Calibration
10.3 Updating operating system To update the sensor operating system, download the operating system available from: www.campbellsci.com/sdms40. A terminal emulator software such as PuTTY Portable is required to do this update. PuTTY Portable is available at no charge from https://portableapps.com/apps/internet/putty_portable. - Page 23 Select the Session Category and set the parameters to the following: a. Select a serial line: Use the COM port assigned to your serial cable. b. Speed (baud): 57600 c. Data bits: 8 d. Stop bits: 1 e. Parity: None f. Flow control: None SDMS40 Multipoint Scanning Snowfall Sensor...
- Page 24 Table 10-1: Updating operating system procedure Step Procedure Select the Terminal Category and select the Force on option for both the Local echo and Local line editing parameters. SDMS40 Multipoint Scanning Snowfall Sensor...
- Page 25 Once the PuTTY terminal emulator opens, apply power to the sensor. Let the sensor initialize and perform its initial measurements. Proceed to step 10 after @@systemready@ is displayed. Type @b 0 and press the return key. SDMS40 Multipoint Scanning Snowfall Sensor...
- Page 26 Baud rate: 57600 Click the Upload button. The message Uploading … will appear at the bottom of Xloader. The operating system update may take a few minutes. Upon successful completion, an XXXXXX bytes uploaded message will appear. SDMS40 Multipoint Scanning Snowfall Sensor...
- Page 27 Operating system reset Pin 4 Blue Pin 3 Yellow Pin 2 Brown Ground Pin 5 *Only use when resetting the operating system. Table 10-3: Power wiring Color Function Connection Power 12 V Black Power Ground SDMS40 Multipoint Scanning Snowfall Sensor...
-
Page 28: Appendix A. Importing Short Cut Code Into Crbasic Editor
“–Wiring for CRXXX–” into the CRBasic program, usually at the head of the file. After pasting, edit the information such that an apostrophe (') begins each line. This character instructs the data logger compiler to ignore the line when compiling. You can SDMS40 Multipoint Scanning Snowfall Sensor... - Page 29 CRBasic code then right-click and select Comment Block. (This feature is demonstrated at about 5:10 in the CRBasic | Features video.) SDMS40 Multipoint Scanning Snowfall Sensor...
-
Page 30: Appendix B. Example Programs
SequentialMode '************************************************************************** ' Constants '************************************************************************** Const SDMS40_Interval = 1 'in minutes Const SDI12_PORT1 = C1 ' C1 is the Communications port used for connection to SDMS40 '************************************************************************** ' Diagnostic variables '************************************************************************** Public PTemp, batt_volt Units PTemp = deg C Units... - Page 31 CRBasic Example 1: CR1000X SDI-12 program to measure the SDMS40 Units Snow_Depth_Avg = mm SDI_Calibrate_Return Public Calibrate_Flag As Boolean Public SDMS40_Snow_Depth_Points(36) Units SDMS40_Snow_Depth_Points() = mm '************************************************************************** ' Diagnostic Data Table '************************************************************************** 'Daily diagnostic data table for troubleshooting purposes DataTable (Diagnostic,True,-1)
- Page 32 Calibrate_Flag = true Calibrate_Flag = false Call CalibrateSensors Else ' Measure average snow depth SDI12Recorder (Snow_Depth_Avg,SDI12_PORT1,0, "M!" ,1.0,0,-1,1) ' Returning SDMS40 36 snow Depth Points by sending 0D1! thru 0D8! commands SDI12Recorder (SDMS40_Snow_Depth_Points(1) ,SDI12_PORT1,0, "D1!" ,1.0,0,-1,1) SDI12Recorder (SDMS40_Snow_Depth_Points(6) ,SDI12_PORT1,0, "D2!" 1.0,0,-1,1) SDI12Recorder (SDMS40_Snow_Depth_Points(11) ,SDI12_PORT1,0, "D3!"...
-
Page 33: Rs-232 Program
CRBasic Example 1: CR1000X SDI-12 program to measure the SDMS40 NextScan EndProg B.2 RS-232 program Wiring for this example program is shown in Table B-2 (p. 27). Table B-2: Wiring for RS-232 example program Wire color Function CR1000X connection terminal... - Page 34 CRBasic Example 2: CR1000X RS-232 program to measure the SDMS40 Public As Boolean SDMS40_Calibrate_Now 'the user can set this to TRUE to calibrate the sensor Public SDMS40_Install_Height Units SDMS40_Install_Height = mm ReadOnly SDMS40_Install_Height Public SDMS40_Install_Angle Units SDMS40_Install_Angle = degrees ReadOnly...
- Page 35 CRBasic Example 2: CR1000X RS-232 program to measure the SDMS40 SplitStr "angle:" (SDMS40_string_temp,SDMS40_string, ,1,4) SplitStr "" (SDMS40_Install_Angle,SDMS40_string_temp, ,1,0) SplitStr (SDMS40_string_temp,SDMS40_string, "Height:" ,1,4) SplitStr (SDMS40_Install_Height,SDMS40_string_temp, "" ,1,0) Scan (10,Sec,5,0) PanelTemp (PTemp,_60Hz) Battery (batt_volt) 'The user's programming for other sensors would go here in the main scan...
- Page 36 CRBasic Example 2: CR1000X RS-232 program to measure the SDMS40 SerialIn "" (SDMS40_string,SDMS40_COMport,1000, ,2000) SplitStr "[M]" (SDMS40_Depth_Avg,SDMS40_string, ,1,4) SplitStr (SDMS40_string_temp,SDMS40_string, "[t]" ,1,4) SplitStr (SDMS40_Temperature(),SDMS40_string_temp, "" ,3,0) SplitStr (SDMS40_string_temp,SDMS40_string, "[P]" ,1,4) SplitStr (SDMS40_Depth_Points(),SDMS40_string_temp, "" ,36,0) SplitStr (SDMS40_string_temp,SDMS40_string, "[R]" ,1,4) SplitStr (SDMS40_Distance_Points(),SDMS40_string_temp, ""...
-
Page 37: Appendix C. Sdi-12 Sensor Support
SDI-12, Serial Data Interface at 1200 baud, is a protocol developed to simplify sensor and data logger compatibility. Only three wires are necessary — serial data, ground, and 12 V. With unique addresses, multiple SDI-12 sensors can connect to a single SDI-12 terminal on a Campbell Scientific data logger. -
Page 38: Acknowledge Active Command (A!)
Table C-1: Campbell Scientific sensor SDI-12 command and response set Name Command Response Start Verification atttn <CR><LF> Address Query a<CR><LF> aAb! Change Address b<CR><LF> Start Measurement atttn<CR><LF> aM1!...aM9! aMC! Start Measurement atttn <CR><LF> aMC1!...aMC9! and Request CRC Start Concurrent Measurement atttnn<CR><LF>... -
Page 39: Start Verification Command (Av!)
For example, to change an address from 0 to 2, the command is 0A2!. The sensor responds with the new address b, which in this case is 2. NOTE: Only one sensor should be connected to a particular terminal at a time when changing addresses. SDMS40 Multipoint Scanning Snowfall Sensor... -
Page 40: Start Measurement Commands (Am!)
To use this command, the scan interval should be 10 seconds or less. The response to each command has the form atttn<CR><LF>, where a = the sensor address ttt = time, in seconds, until the measurement data is available SDMS40 Multipoint Scanning Snowfall Sensor... - Page 41 10 seconds later, after a total of 30 seconds have XD0! passed, the data logger starts the process of data from sensor X by issuing the first D command. The sensor immediately responds with the sensor X+1+2+3+4+5<CR><LF> address and the 5 values. SDMS40 Multipoint Scanning Snowfall Sensor...
-
Page 42: Start Measurement Commands With Cyclic Redundancy Check (Amc! And Acc!)
A sensor may return up to 35 characters of data in response to a D command that follows an M! or MC! command. A sensor SDMS40 Multipoint Scanning Snowfall Sensor... -
Page 43: Continuous Measurement Command (Ar0
Data logger security may need to be unlocked before activating the transparent mode. Transparent mode is entered while the PC is communicating with the data logger through a terminal emulator program. It is accessed through Campbell Scientific data logger support SDMS40 Multipoint Scanning Snowfall Sensor... -
Page 44: Changing An Sdi-12 Address
10. To change the SDI-12 address, type aAb!, where a is the current address from the above step and b is the new address (see FIGURE C-1 (p. 39). Press Enter. The sensor changes its address and responds with the new address. 11. To exit SDI-12 transparent mode, click Close Terminal. SDMS40 Multipoint Scanning Snowfall Sensor... -
Page 45: Changing An Sdi-12 Address - Cr200(X) Series
10. To change the SDI-12 address, type aAb!, where a is the current address from the above step and b is the new address (see FIGURE C-2 (p. 40). Press Enter. The sensor changes its address and responds with the new address. 11. To exit SDI-12 transparent mode, click Close Terminal. SDMS40 Multipoint Scanning Snowfall Sensor... -
Page 46: References
FIGURE C-2. CR200(X) example of using the SDI-12 transparent mode to change the SDI- 12 address from 0 to 1 C.4 References SDI-12 Support Group. SDI-12: A Serial-Digital Interface Standard for Microprocessor-Based Sensors – Version 1.4. River Heights, UT: SDI-12 Support Group, 2017. http://www.sdi- 12.org/current_specification/SDI-12_version-1_4-Dec-1-2017.pdf. SDMS40 Multipoint Scanning Snowfall Sensor... - Page 47 Campbell Scientific Worldwide Offices Australia Germany Location: Garbutt, QLD Australia Location: Bremen, Germany Email: Email: info@campbellsci.com.au info@campbellsci.de Website: www.campbellsci.com.au Website: www.campbellsci.de Brazil South Africa Location: São Paulo, SP Brazil Location: Stellenbosch, South Africa Email: andread@campbellsci.com.br Email: sales@csafrica.co.za Website: Website: www.campbellsci.com.br www.campbellscientific.co.za...
Need help?
Do you have a question about the SDMS40 and is the answer not in the manual?
Questions and answers