Advertisement
Available languages
Available languages
Quick Links
Advertisement
Chapters

Related Manuals for KETRON SD4

Summary of Contents for KETRON SD4
- Page 1 MANUALE DI ISTRUZIONI • OWNER’S MANUAL BENUTZERHANDBUCH • MANUEL D’INSTRUCTION...
-
Page 3: Table Of Contents
Indice Pag. ISTRUZIONI PER LA SICUREZZA INTRODUZIONE Pannello frontale ConnessIonI aCCensIone dello strumento selezIone dI un Preset Per ognuna delle tre voCI dIsPonIbIlI modI dI funzIonamento desCrIzIone delle modalItà dI funzIonamento o Modo Masterkeyboard o Modo Accordion o Modo Organ o Modo 2x Midifile modIfICare la modalItà dI funzIonamento generazIone sonora gestIone delle voCI I PRESET... - Page 4 ComPleto deI suonI dIsPonIbIlI aPPendICe b: mIdI ImPlementatIon aPPendICe C: sYstem exClusIve Ketron...
-
Page 5: Istruzioni Per La Sicurezza
Manuale di Istruzioni ISTRUZIONI PER LA SICUREZZA IstruzIonI rIguardantI Il rIsChIo dI InCendIo, sCosse elettrIChe o danno alle Persone. avvertenza: per ridurre il rischio di incendio o scosse elettriche, non esporre lo strumento alla pioggia o umidità. PerIColo - Collegamenti errati della messa a terra possono provocare scosse elettriche. Nel dubbio fate verificare il Vostro impianto elettrico da un elettricista qualificato. Non modificate il cavo di alimentazione in dotazione. IstruzIonI ImPortantI Per la sICurezza e l’InstallazIone avvertenza - Usando prodotti elettrici, dovete seguire alcune precauzioni di base tra cui le seguenti: • Prima di usare lo strumento leggete attentamente il manuale. • Quando lo strumento viene usato da bambini è necessaria la presenza di un adulto. - Page 6 • Le superficie esterne dello strumento debbono essere pulite soltanto con un panno morbido ed asciutto. Non usate mai, benzina diluenti o solventi in genere. altre PreCauzIonI Se volete usare lo strumento in un paese estero, ed avete dei dubbi riguardante l’alimentazione, consultate precedentemente un tecnico qualificato. Lo strumento non deve essere mai soggetto a forti scosse. alImentatore esterno Per collegare lo strumento alla presa della rete elettrica, usare esclusivamente l’alimentatore KETRON fornito con lo strumento stesso. L’uso di altri alimentatori potrebbe comportare danni nei circuiti di alimentazione dello strumento. È pertanto di primaria importanza usare gli adattatori originali e chiedere del tipo giusto se doveste riordinarlo. InformazIone aglI utentI ai sensi dell’art.13 del Decreto Legislativo 25 luglio 2005 n. 151: “Attuazione delle Direttive 2002/95/CE, 2002/96/CE e 2003/108/CE relative alla riduzione dell’uso di sostanze pericolose nelle apparecchiature elettriche ed elettroniche, nonché allo...
-
Page 7: Introduzione
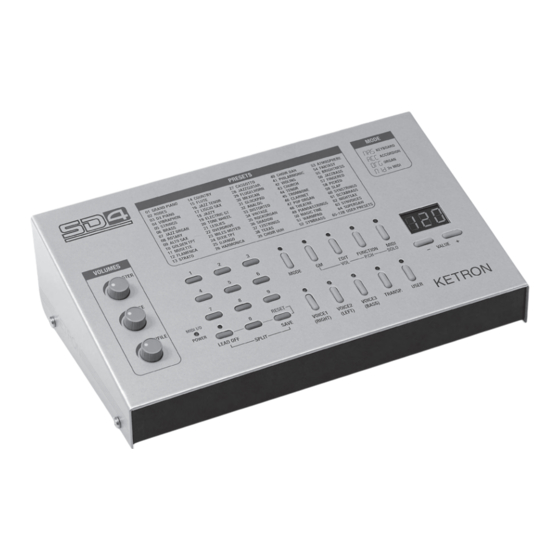
MIDI, Chitarre MIDI, ecc..), o collegato direttamente a qualsiasi personal computer provvisto di connessioni USB. Le 32 parti sonore interne dello strumento possono essere utilizzate in vari modi. Ad esempio è possibile riprodurre contemporaneamente due midifile o suonare uno dei tanti Preset sonori dello strumento con una master keyboard esterna mentre viene eseguito un midifile nell’altra porta MIDI disponibile. L’SD4 è provvisto di 64 Preset impostati dalla casa ed altri 64 interamente programmabili dall’utente. Ogni sound Preset può essere costituito da un massimo di tre differenti suoni e dispone di numerosi parametri di edit e di controllo. Pannello frontale L’SD4 dispone di un completo pannello comandi tramite il quale è possibile selezionare e controllare tutte le funzioni e le risorse sonore dello strumento. 1. Volume Master. Controlla il volume globale dello strumento. 2. Volume Voice. Controlla il volume della sezione MIDI dedicata alla riproduzione delle tre voice interne, right, left e bass relative alla porta Midi In2 (Voice) 3. Volume Midifile. Controlla il volume globale della sezione dedicata alla riproduzione dei midifile o di altre sequenze midi, e relativa alla porta Midi In 1. 4. Tastierino numerico tramite il quale è possibile impostare i parametri dello strumento in modo manuale. -
Page 8: Connessioni
8. Connessione usb per il collegamento dello strumento ad un personal Computer o altro dispositivo provvisto di connessione USB Master. aCCensIone dello strumento In condizioni di default l’sd4 può essere immaginato come costituito da due differenti generatori sonori teoricamente distinti. Tramite la porta mIdI In1 è possibile controllare simultaneamente sedici canali MIDI ed impostare, per ognuno di esso, uno dei 512 suoni della wavetable interna. Contemporaneamente, tramite la porta mIdI In2 (voice), è possibile controllare le tre differenti Voci dello strumento denominate right, left e bass. Dal pannello... -
Page 9: Modi Di Funzionamento
L’sd4 lavora con due distinte porte MIDI d’ingresso e, a seconda del modo di funzionamento selezionato, tali porte possono essere utilizzate per il collegamento di Sequencer esterni (riproduzione di Midifile o altre sequenze MIDI) o per il collegamento di Fisarmoniche MIDI, Masterkeyboard, ecc.. con le quali controllare le tre voci right, left o bass dello strumento. Per rendere più semplice l’utilizzo dell’sd4 la KETRON ha predisposto 4 differenti modi operativi preimpostati. desCrIzIone delle modalItà dI funzIonamento. Segue una breve descrizione dei modo di funzionamento dello strumento. • modo masterkeyboard In questa modalità la porta mIdI In 1 viene utilizzata per l’esecuzione di Midifile mentre... - Page 10 mentre, attivando almeno 2 voci, verrà impostato automaticamente il punto di split. Per cambiare il punto di split premere contemporaneamente i tasti “lead off” e “save” e selezionare la nota attraverso la masterkeyboard o attraverso i tasti “value +/-”. • modo accordion In questa modalità la porta mIdI In 1 viene utilizzata per l’esecuzione dei Midifile mentre la porta mIdI In2 per il collegamento di una Fisarmonica MIDI. Le tre voci ricevono i dati su tre canali MIDI distinti: v1Ch, v2Ch, v3Ch (per default posti rispettivamente a 1, 2 e 3). In questa modalità le 3 voci sono pilotabili singolarmente attraverso le 3 sezioni della fisarmonica midi (left – right – bass). • modo organ In questa modalità la porta mIdI In 1 viene utilizzata per il collegamento di una pedaliera MIDI mentre la porta mIdI In 2 per il collegamento di uno o due tastiere manuali. I canali di ricezione delle 3 voci sono 3 canali distinti: v1Ch, v2Ch, v3Ch (per default posti rispettivamente a 1, 2 e 3).
-
Page 11: Modificare La Modalità Di Funzionamento
è sufficiente interporre l’sd4 tra la Masterkeyboard e il Computer nel modo seguente: Nell’utilizzare la connessione USB occorre fare attenzione al fatto che, essendo tutte le porte MIDI sempre collegate, è possibile che i dati MIDI in uscita dal personal computer vengano rinviati agli ingressi dello stesso producendo fastidiosi loop sonori. Per evitare questi problemi è necessario disabilitare la funzione Midi Thru del sequencer utilizzato oppure impostare su “OFF” le uscite Midi dell’SD4. Per i dettagli consultare la sezione Menu Midi di... -
Page 12: Generazione Sonora
generazIone sonora La generazione sonora dello strumento è composta dalle seguenti sezioni: • 3 banchi GM da 128 suoni ognuno • 32 Drum set • 82 Groove (Drum 2) Esiste un ulteriore special bank da 128 suoni per un totale di 512 suoni differenti. Sono disponibili inoltre 128 Preset ognuno dei quali può essere costituito da un massimo di tre suoni GM. Un Preset in altre parole è una combinazione suoni che può essere assegnata ad ognuna delle tre sezioni right, left o bass dello strumento. Ad esempio, il Preset 49 (Piano&Strings) è costituito dai seguenti 3 suoni sovrapposti. gestIone delle voCI Per ognuna delle voci dello strumento right, left, e bass oltre a definire il Preset sonoro, è possibile definire l’ottava, il volume e abilitare o disabilitare la funzione mute. La seguente procedura mostra come modificare i parametri di una voce. • Premere il tasto relativo alla voce da modificare (right, left, bass). Il Led lampeggiante indica che la parte è nello stato di edit e può essere modificata. -
Page 13: Modifica Di Un Preset
right, left o bass. o Digitare il numero del Preset sul tastierino numerico o effettuare un scroll con tasti value +/-. modIfICa dI un Preset Come già detto ogni suono Preset può essere costituito da un massimo di 3 differenti suoni. Per modificare o creare un nuovo Preset seguire la procedura di seguito riportata: • Selezionare il Preset da modificare con il il tastierino numerico 0-9 o con i tasti value +/-. • Premere il pulsante “edit” per entrare nella relativa modalità. Il display mostrerà tre trattini “---” e i led right, left e bass inizieranno a lampeggiare indicando che è necessario scegliere il suono del Preset che si vuole modificare. • Selezionare uno dei tre suoni che compone il Preset premendo uno dei tastini right, left o bass. attenzione: in questa modalità i tastini right, left e bass non hanno la loro consueta funzionalità ma servono solamente per definire quale suono, appartenente al Preset, dovrà essere sottoposto alle operazioni di Edit. Una volta effettuata la selezione del suono il display mostra il numero del timbro corrispondente oppure mostra la scritta... -
Page 14: Esempio Di Modifica Di Un Preset
premere li tasto 6. Alla prima pressione il display visualizza la scritta “low” (Velocity Low) e successivamente il valore impostato. Alla seconda pressione il display visualizza “hIg” (Velocity High) e successivamente il valore impostato. La modifica dei valori impostata avviene tramite i tasti value +/-. • Per modificare la quantità di riverbero del suono, tenere premuto il tasto 6. Il display visualizza la scritta “rev” e successivamente il valore impostato. Modificare il valore con i tasti value +/-. (range 0 63). • Per modificare il tipo di effetto applicato al suono, premere il tasto 7. Il display visualizza la scritta “eff” e successivamente il tipo di effetto impostato. E’ possibile selezionare un solo effetto per ogni Preset. Le opzioni disponibili per questo parametro sono: o “OFF”: Nessun effetto... -
Page 15: Salvare Un Preset
Per salvare un preset in una delle locazioni di memoria disponibili effettuare la seguente procedura: • Tenere premuto il pulsante “save” per alcuni secondi. • Quando il display inizia a lampeggiare, tramite il tastierino numerico, inserire la locazione in cui salvare il Preset corrente (da 65 a 128). • Premere nuovamente il tasto save per confermare l’operazione di salvataggio. E’ possibile salvare un Preset su se stesso soltanto se si trova in una locazione che va da 65 a 128. menu transPoser L’sd4 dispone di tre diversi modi di trasposizione selezionabili in base alle esigenze dell’uten- te. Nella modalità global traspose la trasposizione è globale e agisce sull’intera macchina. Nella modalità solo midifile la trasposizione agisce solamente sulla porta MIDI dedicata alla riproduzione dei Midifile. In modalità solo Keyboard la trasposizione agisce solo sulle 3 voci right, left e bass. modIfICare Il valore della trasPosIzIone: • Premere il tasto trasposer. Il relativo led inizierà a lampeggiare e il display mostrerà il valore correntemente impostato. • Modificare il valore impostato tramite i tasti value +/- (range -24 +24). -
Page 16: Menu Gm
• solo Keyboard: la trasposizione agisce solo sulle 3 voci Right, Left e Bass. Il display visualizza la sigla “KeY” Per attivare la funzione di Intelligent transposer consultare la sezione Menu Function. modIfICa del Punto dI sPlIt Il punto di split definisce il range operativo delle 3 Voci right, left e bass. Per modificare il punto di split seguire le procedura qui di seguito descritta: • Premere contemporaneamente i tastini “lead off” e “save” • Premere la nota che individua il punto di split sulla masterkeyboard MIDI collegata allo strumento o impostare il valore desiderato tramite i tastini “value +/-”. • Al rilascio dei tasto il nuovo punto di split diventa operativo. menu gm Durante l’esecuzione di un Midifile è possibile effettuare delle modifiche in tempo reale sulle tracce Midi del brano che si sta ascoltando. In particolare è possibile cambiare per ogni canale Midi i seguenti parametri:... -
Page 17: Menu Midi
lativo. In questo modo l’individuazione delle tracce Midi su cui il parametro ‘solo’ è attivo risulterà più immediata. • Per selezionare una nuova traccia da editare, uscire dalla modalità di edit dei parame- tri premendo il tasto edit/vol, midi/solo o function/P.Ch attualmente selezionato (led lampeggiante) e scegliere una nuova traccia con i tasti value +/-. • Per uscire dal menù di GM, premere il tasto relativo. menu mIdI In questo menu è possibile gestire tutti i canali di ricezione e di trasmissione dello strumento. modIfICa del Canale globale dI rICezIone Nel modo masterkeyboard, il global rxChannel rappresenta il canale MIDI sul quale è pos- sibile, in base al punto di split, inviare le note a tutte e tre le voci right, left o bass dello strumento. Per modificare il canale di ricezione: • Premere il Tasto mIdI, il led inizia a lampeggiare e il display mostra il valore del canale midi di ricezione “global rxChannel”. • Modificare il canale di ricezione utilizzando i tasti value+/-. Altri parametri possono essere modificati per mezzo del tastierino numerico. Esso infatti, come nel caso del edit del Preset, attiva una serie di differenti funzioni in base al numero di tasto premu- to. Anche in questo caso, tenendo premuto uno dei... -
Page 18: Modificare Il Canale Di Trasmissione Della Voice Left
Il Canale dI trasmIssIone globale (global txChannel) • Tenere premuto il tasto 8. Il display visualizza la sigla “glt” e successivamente il valore impostato che va da 1 a 16. • Modificare il valore utilizzando i tasti value+/-. modIfICare Il Parametro mIdI out. • Tenere premuto il tasto 9. Il display visualizza la sigla “out” e successivamente il valore impostato. Quest’ultimo viene così rappresentato: o “1 2” - Entrambe le porte Midi In 1 e Midi In 2 sono collegate all’uscita Midi Out. L’ef- fetto è quello di un Soft Thru di entrambe le porte Midi in ingresso. o “1 “ - Solo la porta Midi In 1 è collegata all’uscita Midi Out. L’effetto è quello di un Soft Thru della sola porta Midi In 1. o “2“ - Solo la porta Midi In 2 è collegata all’uscita Midi Out. L’effetto è quello di un Soft Thru della sola porta Midi In 2. o “off” - Nessuna delle due porte Midi in ingresso è collegata all’uscita Midi Out. • Tenendo sempre premuto il tasto 9, modificare il valore utilizzando i tasti value+/-. Fare attenzione al parametro Midi Out nel caso di collegamento tramite USB. Essendo le porte MIDI virtuali USB una replica di quelle reali, collegando l’sd4 via USB ad un computer verrà instaurato un collegamento virtuale sia delle 2 porte Midi In che della porta Midi Out. Se il parametro Midi Out non è posto su “OFF”, lavorando con un sequencer dove è abilitata la funzione Thru, si può rischiare di generare un loop nei messaggi Midi. In questo caso è necessario mettere su “OFF” il parametro Midi Out dell’sd4 o disattivare la funzione Thru del sequencer. -
Page 19: Menu Function
menu funCtIon In questo menu è possibile cambiare alcune impostazioni dello strumento come l’intonazione globale, il tipo ed il livello generale del Riverbero nonché l’attivazione della modalità di tra- sposizione intelligente per i midifile. modIfICare Il global tune dello strumento. • Premere il tasto function. Il led relativo inizia a lampeggiare ed il display mostra il valore del global tune attualmente impostato. • Modificare con i tasti value +/- il valore impostato nel range che va da -50 a +50 cents. Altri parametri possono essere modificati per mezzo del tastierino numerico. Esso infatti, come nel caso del edit del Preset, attiva una serie di differenti funzioni in base al numero di tasto pre- muto. Tenendo premuto uno dei numeri, il display mostra prima una sigla di tre lettere che indica su quale parametro si sta intervenendo, poi, dopo qualche secondo, il relativo valore. Ad esempio, per... -
Page 20: Menu User
• Inserire la locazione dove salvare la configurazione attuale tramite il tastierino numerico (da 1 a 32). • Premere nuovamente il tasto Save per confermare l’operazione ed effettuare il salvatag- gio in memoria. lead off Tenendo premuto per qualche secondo il pulsante Lead Off viene messa in mute la melodia del Midifile. Per default questa funzione agisce sul canale 4 ma è possibile modificarne il valore attraverso il menu Function. sd4edItor SD4Editor è un software dedicato per la modifica dei Preset dell’SD4. E’ possibile scaricarlo dal sito ufficiale Ketron (www.ketron.it). Per mezzo di questo programma la modifica dei Preset può essere fatta in modo molto rapido tramite un PC dotato di una porta USB. Una volta aperto il programma, se l’SD4 è collegato attraverso il cavo USB, vengono visualizzati tutti i parametri che costituiscono il Preset attualmente selezionato sull’SD4. A questo punto è pos- sibile agire sui parametri di interesse e, se è collegata una masterkeyboard sulla porta Midi In 2, è possibile ascoltare l’effetto del cambiamento dei parametri in tempo reale. Attenzione: i parametri devono essere cambiati solo attraverso il programma su PC; In caso contrario, se si modificano i parametri direttamente sull’SD4, è necessario risincronizzare il programma pre- mendo il tasto “Refresh”. Anche se si seleziona un altro Preset sull’SD4 è necessario premere “Refresh” per aggiornare i parametri dell’SD4Editor. salvare le modIfIChe Una volta completate le modifiche è possibile salvare il Preset sull’SD4 seguendo le normali... -
Page 21: Aggiornamenti Del Firmware
Eventuali aggiornamenti del firmware possono essere scaricati dal sito ufficiale Ketron (www. ketron.it). Per poter effettuare l’aggiornamento del firmware è necessario innanzitutto sca- ricare ed installare il software SD4Update. Dopodiché è necessario scaricare il file relativo al nuovo firmware SD4 da installare. Per iniziare la procedura di aggiornamento seguire i seguenti passi: 1. Spegnere l’SD4. 2. Accendere l’SD4 tenendo premuti entrambi i tasti 1 e 3. 3. I led del display iniziano ad eseguire un movimento circolare indicando che l’SD4 è in modo programmazione. 4. Collegare il cavo USB. 5. Aprire il programma SD4Update. 6. Premere il tasto Open. 7. Selezionare il file relativo all’aggiornamento firmware. 8. Premere il tasto Program. 9. Attendere e non sPegnere l’sd4 fIno al termIne dell’aggIornamento. 10. Quando l’aggiornamento è ultimato il programma scrive “Write Complete” e i led del di- splay si fermano. 11. Se si ricevono messaggi di errore non spegnere l’SD4 e ripetere la procedura dal punto 8. 12. Scollegare il cavo USB. 13. Riavviare l’SD4. - Page 22 Index Page SAFETY INSTRUCTIONS INTRODUCTION Front panel ConneCtIons swItChIng the Instrument on seleCtIng a preset For eaCh oF the three voICes avaIlable. operatIng modes desCrIptIon oF the operatIng modes o Master keyboard mode o Accordion mode o Organ mode o 2x Midifile mode ChangIng operatIng mode sound generatIon voICe management THE PRESETS...
- Page 23 FIrmware and operatIng system updates speCIFICatIons appendIx a: Complete lIst oF sounds avaIlable appendIx b: mIdI ImplementatIon appendIx C: system exClusIve Ketron...
-
Page 24: Safety Instructions
Owner’s Manual SAFETY INSTRUCTIONS InstruCtIons about rIsK oF FIre, eleCtrIC shoCK or InJury to persons. warning: to reduce the risk of fire or electric shock, do not expose this instrument to rain or moisture. danger - Improper ‘earthing’ connections may cause electric shocks. In case of doubts, have your electric installation checked by a qualified electrician. Do not modify the power cable supplied with the instrument. Important saFety and InstallatIon InstruCtIons warnIng - W hen u sing e lectrical p roducts, s ome b asic p recautions m ust b e f ollowed, i ncluding t he f ollowing: • Before using this instrument, carefully read the User’s Manual. -
Page 25: Power Supply
If you wish to use your instrument abroad and if you have any doubts about the power supply, contact a qualified engineer previously. The instrument should never be subject to strong vibrations. external power supplIes To connect this instrument to the wall socket you will need the supplied KETRON power supply. Use of other power supplies could result in damage to the instrument’s power circuit. So be sure to ask for the right kind. InFormatIon For users Subject to article 13 of Legislative Decree no. 151 dated 25th July 2005: “Implementation of Directives 2002/95/CE, 2002/96/CE and 2003/108/CE related to the reduction in use of hazardous compounds in electrical and electronic equipment and waste disposal”. -
Page 26: Front Panel
In ports and to the built-in USB connection, sd4 is easily connected to any MIDI device (Master Keyboard, Midi Accordions, MIDI guitars etc.), or it can be connected directly to any personal computer that has USB connections. The 32 sound parts inside the instrument can be used in various ways. For example, you can play two midifiles simultaneously or play one of the many sound presets of the instrument from an independent master keyboard while playing a midifile in the other MIDI port available. sd4 offers 64 presets set by the manufacturer and another 64 that can be completely programmed by the user. Each sound preset may comprise a maximum of three different voices and the availability of numerous edit and control parameters. Front panel The SD4 instrument has a complete control panel that is used to select and control all of its functions and sound resources. - Page 27 6. mIdI In2 connection (voice) for connecting independent MIDI devices, such as a Master Keyboard, Midi Accordion, etc. 7. mIdI In1 connection to simultaneously control 16 MIDI channels on a sequencer or other independent MIDI device. 8. usb connection for connecting the instrument to a personal Computer or other device equipped with Master USB connection. swItChIng the Instrument on In default conditions, sd4 works as if it had two completely separate sound generators. Using the mIdI In1 port, you can simultaneously control sixteen MIDI channels and assign one of the 512 sounds of the built-in wavetable for each of them. At the same time, using the mIdI In2 port (voice), you can control the three different Voices of the instrument called right, left and bass. From the instrument’s panel or via MIDI Program change, you can assign one of the 128 sound presets available on the instrument for each of the afore-mentioned voices. seleCtIng a preset For eaCh oF the three voICes avaIlable. The three voices, which can be controlled via the channels of the mIdI In2 port (voice), can be activated and controlled using the three buttons on the front panel of the instrument and called left, right or bass respectively. The corresponding LED of each of the afore-...
-
Page 28: Operating Modes
• master keyboard mode In this mode, the mIdI In 1 port is used to play Midifiles while the mIdI In 2 port is used to connect a Master keyboard. The receiving channel on the MIDI IN2 port is the MIDI global channel (default setting: 1). Depending on the split point, using the master keyboard you can control one or more voices of sd4. By activating the individual voices using the corresponding keys on the panel of SD4 (left – right – bass), the split point is set automatically. For example, if you activate just one voice, the master keyboard will play throughout its full extension, whereas if you activate at least 2 voices, the split point will be set automatically. To change the split point, press the “lead off” and “save” keys together at the same time and select the note using the master keyboard or the “value +/-” keys. • accordion mode... - Page 29 to connect a MIDI Accordion. The three voices receive the data on three separate MIDI channels: v1Ch, v2Ch, v3Ch (the default settings are: 1, 2 and 3). In this mode, the 3 voices can be controlled individually via the 3 sections of the MIDI accordion (left – right – bass). • organ mode In this mode, the MIDI IN 1 port is used to connect a MIDI control pedal while the MIDI IN 2 port is used to connect one or two manual keyboards. The receiving channels of the 3...
- Page 30 “ACC”: Accordion “ORG”: Organ “MID”: 2 x Midifile • Press the value +/- keys to change the instrument’s operating mode. The USB connection enables MIDI connection and communication between the sd4 instrument and a personal computer. In particular, when sd4 is connected to a Master usb device, it is able to use power directly from the usb connection. The usb connection alone is therefore sufficient to switch the instrument on and set it in the selected operating mode. The first time that sd4 is connected to a computer’s usb port, it is detected and installed automatically by the system. The device is recognised by the personal computer as a mIdI device with three different virtual MIDI ports. The reaction of such ports is basically identical to the real ports at the back of the instrument. The MIDI data are exchanged between the sd4 instrument and the PC via USB to be able to exploit the instrument also as a MIDI interface. Supposing indeed you have a Master keyboard with the classic Midi Out connector (five-pole) and you want to connect it to a Computer that does not have the dedicated Midi In connector. To resolve the problem, simply install the sd4 instrument between the Master keyboard and the Computer in the following manner: When you use the USB connection, remember that, considering that all the MIDI ports are always connected, the MIDI data output from the personal computer could be sent back to the inputs of the same and produce annoying sound loops. To avoid these problems, disable the Midi Thru function of the sequencer used or set the Midi outputs of SD4 in “OFF”. For further details, consult the Midi Menu section of this manual. sound generatIon The sound generation of the instrument consists of the following sections: • 3 GM banks of 128 sounds each • 32 Drum set • 82 Grooves (Drum 2) There is another special bank of 128 sounds for a total of 512 different sounds. There are also 128 presets, each of which may comprise a maximum of three GM sounds. A Preset is in other words, a combination of sounds that can be assigned to each of the three right, left or bass sections of the instrument. For example: preset...
- Page 31 voICe management For each of the voices of the instrument, right, left and bass, not only can you define the sound preset, but you can also define the octave, the volume and enable or disable the mute function. The procedure that follows explains how to change the parameters of a voice. • Press the key related to the voice to be changed (right, left, bass). The LED blinks to point out that the part is in edit status and can be changed. • To change a timbre, simply enter the number of the preset on the numerical keypad 0-9 or scroll using the value +/- keys. • To change the octave, hold the key of the voice down (right, left or bass) and press the value+ or value- keys. When changing the octave, the display will show the letter ‘o’ followed by a numerical value, which indicates the alteration value made (Range -2,+2). • The volume of the current voice can be changed on the potentiometer 2 (Voice) on the instrument panel. Each time the potentiometer is moved, the display will show the value of the volume of the voice selected for a few seconds. • To activate the mute function, simply disable the voice by pressing the corresponding key (right, left or bass). THE PRESETS The 128 presets of the instrument are split-up as follows: • From 1 to 64, Presets that can be edited but not overwritten.
- Page 32 usual function but are merely used to define which sound, belonging to the Preset, is to be edited. Once the sound is selected, the display shows the number of the corresponding sound or shows the wording “oFF” if the sound involved is not used in the preset (muted). • Select the sound to be added to the Preset using the value +/- keys. A total of 512 sounds are available and their names are written in Appendix A of this manual. The parameters of the GM sound can be edited using the numerical keypad combined with the value +/- keys. Each number of the numerical keypad does indeed match an editable parameter. Hold one of the numbers down and the display will first show a 3-letter initial that points out which parameter is being edited, then after a few seconds it will show the related value. • To change the volume of the sound, hold key 1 down. The display will show “VOL” and then the value of the volume currently set. Edit the value using the value +/- keys (range 0-63). • To change the shift in semi-tones of the sound, hold key 2 down. The display will show “SHF” and then the value currently set.
- Page 33 • To set the “send effects” of the sound, hold key 9 down. The display shows “snd” and then the value set. Edit the parameter using the value+/- keys (range 0 to 63). • To indicate whether the sound shall react to the sustain and expression commands, press key 0. The first time you press it, the display shows “sus” and then the status, which may be “on” or “oFF”. The second time you press it, the display shows “EXP” and then the status, which may be “ON” or “OFF”. Edit the settings using the value +/- keys. You can set all the parameters back in their default conditions by pressing the value+ and value- keys simultaneously. In the case of the Volume, if you press the Value+ and Value- keys simultaneously, the voice is muted and the display shows “OFF”. The edit procedures...
- Page 34 • Press the save key again to confirm that you wish to save. You can save a preset over itself only if it is in a location from 65 to 128. transposer menu The sd4 instrument has three different transposer modes, which can be selected based on the musician’s needs. In global transpose mode, the transposition function is global and affects the whole machine. In midifile only mode, the transposition function just affects the MIDI port where the Midifiles are played. In Keyboard only mode, the transposition function just affects the 3 voices right, left and bass. ChangIng the transposer value: • Press the transposer key. The relative LED starts blinking and the display will show the value currently set. • Edit the value set using the value +/- keys (range -24 +24). • Press the transposer key again to exit the menu and go back to play mode. If the value of the transposer is not 0, the relative LED remains lit steady to inform the musi- cian that a transposition function is enabled.
- Page 35 edItIng the parameters • Press the gm key. The LED blinks and the display shows the Midi channel that will be changed. • Select the MIDI channel to be modified using the value +/- keys. Attention! The number of channels that can be selected from the GM menu changes based on the operating mode of the instrument. In particular, in the following modes: o master keyboard and accordion: 16 channels can be selected, being those related to the MIDI IN1 port. o 2xmidifile: there are 32, the first 16 relate to the MIDI IN1 port and the other 16 to the MIDI IN2 port. o organ: no channel is available and the display shows three dashes “---”.
- Page 36 show “V1R”, then the relative channel number. If you continue to hold key 1 down, simply press the Value +/- keys to increase or decrease the number of the channel of the Right voice. Here’s the map of the fun- ctions of each individual key of the numerical keypad within the Midi menu. edItIng the reCeptIon Channel oF the rIght voICe (voICe1 rxChannel) • Hold key 1 down. The display shows “v1r” and then the value set, which ranges from 1 to 16. • Edit the value using the value+/- keys. edItIng the reCeptIon Channel oF the leFt voICe (voICe2 rxChannel) • Hold key 2 down. The display shows “v2r” and then the value set, which ranges from 1 to 16. • Edit the value using the value+/- keys. edItIng the reCeptIon Channel oF the bass voICe (voICe3 rxChannel) • Hold key 3 down. The display shows “v3r” and then the value set, which ranges from 1 to 16.
- Page 37 “1 2” - Both Midi In 1 and Midi In 2 ports are connected to the Midi Out port. The effect is that of a Soft Thru of both Midi In ports. o “1 “ - Just Midi In 1 port is connected to the Midi Out port. The effect is that of a Soft Thru of just the Midi In 1 port. o “2“ - Just Midi In 2 port is connected to the Midi Out port. The effect is that of a Soft Thru of just the Midi In 2 port. o “oFF” - Neither of the two Midi In ports is connected to the Midi Out port. • Holding key 9 down again, edit the value using the value+/- keys. Pay attention to the Midi Out parameter if connected via USB. Since the virtual USB MIDI ports are duplicates of the real ports, when you connect the sd4 instrument to a computer via USB, a virtual connection will be established to both Midi In ports and the Midi Out port. If the Midi Out parameter is not set in “OFF”, when working with a sequencer, where the Thru function is enabled, you risk generating a loop in the Midi messages. In this case, you need to set the Midi Out parameter of the sd4 instrument in “OFF” or disable the Thru function of the sequencer. FunCtIon menu In this menu you can change some settings of the instrument, such as the Global Tune, the type and general level of the Reverb and also activate the intelligent transposer mode for Midifiles. edItIng the global tune oF the Instrument. • Press the Function key. The relative LED starts blinking and the display shows the value of the global tune currently set.
- Page 38 • Hold key number 2 down. The display shows “rev” and then a value that ranges from 0 to 7, which is the type of global reverb selected. • Edit the current setting using the value+/- keys. seleCtIng the amount oF global reverb • Hold key number 3 down. The display shows “vol” and then a value that ranges from 0 to 16, which is the level of global reverb selected. • Edit the current setting using the value+/- keys. user menu The Users are global configurations of the instrument in which all the operating parameters of sd4 are stored and which can be customised at pleasure. There are 32 User configurations. User number 1 is always the one to be loaded when the instrument is switched on. re-CallIng a user • Press the “user” key to access the relative menu. The LED starts blinking and the display shows the number of the User currently in use. • Enter the number of the User to be loaded using the numerical keypad 0-9 or use the value +/- keys to scroll the users available. • Press the user key again to exit the menu. savIng a user Once all the operating parameters of sd4 have been set, you can save the instrument’s status by saving it in a User.
-
Page 39: Firmware Updates
1. Switch SD4 off. 2. Switch SD4 on holding keys 1 and 3 down together at the same time. 3. The LEDs of the display start to rotate to point out that SD4 is in programming mode. 4. Connect the USB cable. 5. Open the SD4Update program. 6. Press the Open key. 7. Select the file of the firmware update. 8. Press the Program key. do not swItCh sd4 oFF untIl updatIng has been Completed 9. Wait and 10. Once updated, the program will display “Write Complete” and the LEDs of the display stop moving. 11. If you receive error messages, do not switch SD4 off but repeat the procedure from point 8. 12. Disconnect the USB cable. 13. Start-up SD4 again. - Page 40 Inhaltsverzeichnis Pag. SICHERHEITSHINWEISE EINFÜHRUNG BedIenfeld Anschlüsse eInschAlten des soundmoduls WAhl eInes Preset-sounds für dIe rIght-, left- und BAss-sektIon BetrIeBsmodI BeschreIBung der BetrIeBsmodI o Masterkeyboard-Modus o Akkordeon-Modus o Orgel-Modus o 2 x Midifile-Modus Ändern des BetrIeBsmodus usB-Anschluss klAngerzeugung BeArBeItung der sektIonen DIE PRESETS Aufrufen eInes Preset-sounds Ändern eInes Preset-sounds BeIsPIel für eIne Preset-sound-Änderung...
- Page 41 “IntellIgent trAnsPoser” IntellIgent trAnsPoser WAhl des AllgemeInen hAlltyPs WAhl der AllgemeInen hAllstÄrke user-menü Aufrufen eIner user-konfIgurAtIon sPeIchern eIner user-konfIgurAtIon leAd off sd4edItor sPeIchern der Änderungen AktuAlIsIerung der fIrmWAre sPecIfIcAtIons AnhAng A: sound-VerzeIchnIs AnhAng B: mIdI-ImPlementAtIon AnhAng c: system exclusIVe ketron...
- Page 42 Benutzerhandbuch SICHERHEITSHINWEISE hInWeIse Auf BrAndgefAhr, stromschlAgrIsIko und VerletzungsgefAhr. Achtung: um das Brand- und Stromschlagrisiko zu minimieren, ist das Instrument weder Regen noch Feuchtigkeit auszusetzen gefAhr - Falsche Erdungsanschlüsse können Stromschläge verursachen. Im Zweifelsfall lassen Sie Ihre elektrischen Leitungen von einem qualifizierten Fachmann überprüfen. Nehmen Sie keine Änderungen am mitgelieferten Netzkabel vor. WIchtIge hInWeIse zur sIcherheIt und zur InstAllAtIon Achtung - Beim Einsatz elektrischer Geräte sind einige grundlegenden Vorsichtsmaßnahmen zu beachten, wie zum Beispiel: • Bevor das Instrument verwendet wird, bitte die Bedienungsanleitung aufmerksam lesen. • Wenn das Instrument von Kindern benutzt wird, ist die Anwesenheit eines Erwachsenen unerläßlich. • Das Instrument ist nicht in der Nähe von Wasser zu verwenden, wie zum Beispiel in der Nähe eines Waschbeckens, eines Swimmingpools oder einer nassen Oberfläche.
- Page 43 Wenn Sie das Instrument im Ausland verwenden wollen und Zweifel bezüglich der Netzversorgung bestehen, wenden Sie sich bitte an einen Fachmann. Das Instrument darf keinen Stößen ausgesetzt werden. externe netzger Äte Bitte verwenden Sie ausschließlich das mit dem Instrumenten mit gelieferten KETRON Netzgeräte, um es an das Stromnetz anzuschließen. Werden andere Netzgeräte verwendet, so riskieren Sie dabei, die Leistungskreise Ihres Instruments zu beschädigen. Es ist von besonderer Wichtigkeit, dass ausschließlich Originalnetzgeräte verwendet werden und beim eventuellen Nachbestellen das richtige Modell angegeben wird.
-
Page 44: Einführung
Presets und weiteren 64 vom Benutzer frei programmierbaren ausgestattet. Jeder Preset-Sound kann sich aus maximal drei unterschiedlichen Einzelklängen zusammensetzen und über diverse Parameter editiert und gesteuert werden. BedIenfeld Das SD4 ist mit einem Bedienfeld ausgestattet, von dem aus sämtliche Funktionen und Klangressourcen des Moduls gewählt und gesteuert werden können. 1. Master-Volumeregler. Mit diesem wird die allgemeine Lautstärke des Soundmoduls eingestellt. -
Page 45: Anschlüsse
8. usB-Anschluss für die Anbindung des Soundmoduls an einen PC oder ein anderes Gerät mit USB-Master-Port eInschAlten des soundmoduls Unter Default-Bedingungen können Sie sich das sd4 aus zwei konzeptionell getrennten Klangerzeugern aufgebaut vorstellen. Über den mIdI In1-Port ist es möglich, sechzehn MIDI-Kanäle simultan zu steuern und für jeden von ihnen einen der 512 Sounds der internen Wavetable einzustellen. Gleichzeitig können über die mIdI In2 (Voice)-Buchse die drei als right, left und Bass bezeichneten Sektionen des Soundmoduls gesteuert werden. Vom Bedienfeld des Geräts aus oder über MIDI-Program-Cange ist für jede der oben genannten... -
Page 46: Betriebsmodi
32 user-Konfigurationen abspeichern. Beim Einschalten lädt das SD4 immer automatisch die Parameter der user nummer 1. Die Default-Einstellung der User-Konfiguration 1 ist der masterkeyboard-Modus. Demnach kann sofort begonnen werden, die geräteinternen Sounds zu spielen, wenn an den MIdI In2 (Voice)-Port ein Midi-Keyboard angeschlossen ist. BetrIeBsmodI Das sd4 arbeitet mit zwei separaten MIDI-Buchsen im Eingang, und je nach gewähltem Betriebsmodus können die Ports für den Anschluss an externe Sequenzer (zur Wiedergabe von Midifiles oder anderen MIDI-Sequenzen) oder den Anschluss an ein MIDI-Akkordeon, Masterkeyboard usw. genutzt werden, mit denen die drei Sektionen des Soundmoduls right, left und Bass zu steuern sind. Um die Bedienung des SD4 zu vereinfachen, hat KETRON 4 voreingestellte Betriebsmodi vorgesehen. -
Page 47: Akkordeon-Modus
Je nachdem, wo der Splitpunkt gesetzt ist, können über das Masterkeyboard eine oder mehrere Sektionen des sd4 gesteuert werden. Wenn Sie die einzelnen Sektionen über die jeweiligen Tasten am Bedienfeld des SD4 (left – right – Bass) aktivieren, wird der Splitpunkt automatisch eingestellt. Wenn Sie beispielsweise nur eine Sektion wählen, spielt das Masterkeyboard über seinen gesamten Tastaturumfang; wählen Sie hingegen zumindest 2 Sektionen, so wird automatisch der Splitpunkt gesetzt. Um den Splitpunkt zu ändern, drücken Sie gleichzeitig die Tasten lead off und save und wählen die gewünschte. Note durch Anschlagen der entsprechenden Taste am Masterkeyboard oder durch Eingabe der Notennummer über die Value +/- Tasten. • Akkordeon-modus Hierbei wird der mIdI In1-Port für die Ausführung einer Midi-Datei benutzt, während die mIdI In2-Buchse dem Anschluss eines MIDI-Akkordeons dient. Die drei Sektionen des Soundmoduls empfangen in diesem Fall die Daten über drei getrennte MIDI-Kanäle: V1ch, V2ch, V3ch (Default-Einstellung jeweils auf 1, 2 und 3). Sie sind daher einzeln über die 3 entsprechenden Bereiche des Midi-Akkordeons (left – right – Bass) steuerbar. • orgel-modus Hierbei wird der MIDI IN1-Port für den Anschluss einer MIDI-Pedalsteuerung benutzt,... -
Page 48: Ändern Des Betriebsmodus
Betriebsmodi sind: “MAS”: Masterkeyboard-Modus (Default-Einstellung) “ACC”: Akkordeon-Modus “ORG”: Orgel-Modus “MID”: 2 x Midifile-Modus • Mit den Value +/- - Tasten ändern Sie den Betriebsmodus des Geräts nach Wunsch. Der USB-Anschluss gestattet die Anbindung des SD4 an einen PC und den MIDI-Datenaustausch mit diesem. Insbesondere wenn das sd4 an ein usB-Master-Gerät angeschlossen wird, ist es in der Lage, die für seinen Betrieb erforderliche Versorgungsspannung direkt über die USB-Buchse zu beziehen. Der alleinige USB-Anschluss reicht daher aus, das Soundmodul einzuschalten und im gewählten Betriebsmodus zu benutzen. Beim ersten Anschluss des sd4 an den usB-Port eines Computers wird es automatisch vom System erfasst und installiert. -
Page 49: Klangerzeugung
Abschnitt “Midi-Menü” in diesem Handbuch. klAngerzeugung Die Klangerzeugung des Moduls umfasst drei Soundgruppen: • 3 GM-Bänke mit jeweils 128 Sounds • 32 Drum Sets • 82 Grooves (Drum 2) Zudem gibt es eine Spezialbank mit weiteren 128 Sounds, sodass insgesamt 512 unterschiedliche Klänge zur Auswahl stehen. Verfügbar sind ferner 120 Presets, die sich aus maximal drei unterschiedlichen GM-Sounds zusammensetzen können. Ein Preset ist mit anderen Worten eine Klangkombination, mit der jeweils eine der drei Sektionen des Soundmoduls right, left und Bass zu belegen sind. Der Preset 49 z. B. (Piano&Strings) setzt sich aus den 3 folgenden übereinander gelagerten Klängen zusammen:... -
Page 50: Aufrufen Eines Preset-Sounds
vom Bedienfeld aus über das Zifferntastenfeld 0-9 oder durch Scrollen mit den Value +/- - Tasten. Ebenso können Sie natürlich einen Preset-Sound über einen MIDI-Program-Change- Befehl aufrufen. Für jede Sektion des Moduls ist der jeweilig zugeordnete Sound durch Auswahl eines der 128 Presets zu ändern. Aufrufen eInes Preset-sounds Um einen Preset-Sound einer der drei Sektionen Right, Left oder Bass zuzuweisen, gehen Sie folgendermaßen vor: o Wählen Sie die Sektion, die mit einem Preset belegt werden soll, über die Tasten Right, Left oder Bass. o Geben Sie die Nummer des gewünschten Presets über das Zifferntastenfeld oder durch Scrollen mit den Value +/- - Tasten ein. Ändern eInes Preset-sounds Wie bereits erwähnt, kann sich jeder Preset-Sound aus maximal 3 unterschiedlichen Klängen zusammensetzen. Um einen Preset zu ändern oder einen neuen zu erstellen, führen Sie folgende Schritte aus: • Wählen Sie den gewünschten Preset durch Eingabe über das Zifferntastenfeld oder durch Scrollen mit den Value +/- - Tasten. - Page 51 • Zur Einstellung der Position des klangs im stereobild (Pan) halten Sie die taste 4 niedergedrückt. Am Display zu sehen sind das Kürzel PAn und anschließend der aktuell eingestellte Wert. Ändern Sie den Wert mit den Value +/- -Tasten (Einstellbereich L64-R63). Der Buchstabe C steht für “Center”. • Zur Änderung des Wirkungsbereichs des Klangs (range left/right) drücken Sie die taste 5. Beim ersten Druck werden am Display lef (Range Left) und dann die zugehörige Note angezeigt. Beim zweiten Druck werden am Display rIg (Range Right) und dann die zugehörige Note angezeigt. Die Noten werden in Form von Nummern mit den Value +/- -Tasten oder durch Anschlagen der Manualtasten auf einem an MIDI IN2 angeschlossenen Masterkeyboard eingegeben. Durch gleichzeitiges Drücken der Value +/- -Tasten wird der Range-Parameter auf off gesetzt, d.h. dass der Wirkungsbereich des Klangs nicht begrenzt ist.
-
Page 52: Beispiel Für Eine Preset-Sound-Änderung
• Drücken Sie die edit-Taste, um zur Ausgangssituation zurückzukehren. Beachten Sie an diesem Punkt, dass alle Änderungen verloren gehen, wenn der bearbeitete Preset-Sound nicht abgespeichert wird, bevor ein weiterer Preset geladen wird. sPeIchern eInes edItIerten Preset-sounds Um einen editierten Preset an einem der verfügbaren Speicherplätze abzulegen, gehen Sie folgt vor: • Drücken Sie die save-Taste einige Sekunden lang. • Wenn die Display-Anzeige zu blinken beginnt, geben Sie über das Zifferntastenfeld den Speicherplatz (zwischen 65 und 128) ein, an dem der laufende Preset-Sound gesichert werden soll. • Drücken Sie erneut die save-Taste, um den Speichervorgang zu bestätigen. Einen vorhandenen Preset mit einem geänderten zu überschreiben ist nur auf den Speicher- plätzen zwischen 65 und 128 möglich. trAnsPoser-menü Das sd4 stellt drei verschiedene Transpositionsmodi zur Verfügung, die vom Benutzer nach Bedarf zu wählen sind. Im global transpose-Modus erfolgt die Transposition allgemein und wirkt sich auf das Soundmodul insgesamt aus. Im midifile-Modus greift die Transposition nur auf dem MIDI-Port, der der Wiedergabe der Midi-Dateien zugewiesen ist. Im keyboard-Modus greift die Transposition nur auf den 3 Sektionen right, left und Bass. -
Page 53: Ändern Des Transpositionswertes
Ändern des trAnsPosItIonsWertes • Drücken Sie die transposer-Taste. Die zugehörige LED beginnt zu blinken, und am Display wird der aktuell eingestellte Wert angezeigt. • Ändern Sie den Wert mit den Value +/- -Tasten (Einstellbereich -24-+24). • Drücken Sie erneut die transposer-Taste, um das Menü zu verlassen und zum Play-Modus zurückzukehren. Wenn der Wert des Transposers ein anderer als 0 ist, leuchtet die zugehörige LED, um dem Benutzer zu signalisieren, dass transponiert wird. Ändern des trAnsPosItIonsmodus • Halten Sie einige Sekunden lang die transposer-Taste niedergedrückt, bis am Display das Kürzel des aktuell eingestellten Modus angezeigt wird. • Ändern Sie den Wert mit den Value +/- -Tasten. Die vorgesehenen Modi sind: • global transpose: Die Transposition wirkt allgemein. Am Display wird das Kürzel glo angezeigt. • midifile: Nur Midi-Dateien werden transponiert. Am Display wird das Kürzel mId ange- zeigt. • keyboard: Nur die 3 Sektionen right, left und Bass werden transponiert. Am Display wird das Kürzel key angezeigt. Zur Aktivierung der Funktion Intelligent transposer siehe den Abschnitt “Function-Menü”. Ändern des sPlItPunktes Der Splitpunkt legt den Wirkungsbereich der 3 Sektionen right, left und Bass fest. -
Page 54: Midi-Menü
smodus ändert. Insbesondere gilt Folgendes: o masterkeyboard- und Akkordeon-modus: Die wählbaren Kanäle sind 16, d.h. die, die dem MIDI IN1-Port zugeordnet sind. o 2xmidifile-modus: Die wählbaren Kanäle sind 32, d.h. die 16 des MINI IN1-Ports und die 16 des MIDI IN2-Ports. o orgel-modus: Es steht kein Kanal zur Auswahl, und am Display werden drei Striche “---” angezeigt. • Zur Volume (Lautstärken)-Änderung drücken Sie die Taste edit/Vol. Die zugehörige LED beginnt zu blinken, und am Display wird der aktuelle Volume-Wert der gewählten MIDI- Spur angezeigt. Ändern Sie den Wert mit den Value +/- -Tasten. • Zur Program change-Änderung drücken Sie die Taste function/P.ch. Die zugehörige LED beginnt zu blinken, und am Display wird die fortlaufende Nummer des aktuell eingestellten Klangs für die gewählte MIDI-Spur angezeigt. Ändern Sie den Wert mit den Value +/- -Tasten. • Um die gewählte Spur auf solo zu setzen, drücken Sie die Taste midi/solo. Die zugehörige LED beginnt zu blinken, und am Display wird der Status (ON/OFF) der Midi-Spur angezeigt. Ändern Sie den Wert mit den Value +/- -Tasten. Nachdem die Spur auf “solo” gesetzt wurde, wird diese im GM-Menü durch einen Punkt neben der entsprechenden Kanalnum- mer gekennzeichnet. Auf diese Weise sind die Midi-Spuren, für die der Parameter “solo”... -
Page 55: Ändern Des Empfangskanals Der Sektion Right
den Kanals visualisiert werden. Bei niedergedrückter Taste 1 kann schließlich über die Value +/- -Tasten der Kanal der Sektion Right nach Wunsch geändert werden. Hier nachstehend finden Sie im Überblick die den Zifferntasten innerhalb des Midi-Menüs zugewiesenen Funktionen. Ändern des emPfAngskAnAls der sektIon rIght (VoIce1 rxchAnnel) • Drücken Sie die taste 1, und halten Sie sie in Stellung. Am Display werden das Kürzel V1R und anschließend der eingestellte Wert zwischen 1 und 16 angezeigt. • Ändern Sie den Wert mit den Value +/- -Tasten. Ändern des emPfAngskAnAls der sektIon left (VoIce2 rxchAnnel) • Drücken Sie die taste 2, und halten Sie sie in Stellung. Am Display werden das Kürzel V2R und anschließend der eingestellte Wert zwischen 1 und 16 angezeigt. • Ändern Sie den Wert mit den Value +/- -Tasten. Ändern des emPfAngskAnAls der sektIon BAss (VoIce3 rxchAnnel) • Drücken Sie die taste 3, und halten Sie sie in Stellung. Am Display werden das Kürzel V3R und anschließend der eingestellte Wert zwischen 1 und 16 angezeigt. -
Page 56: (Global Txchannel) Ändern Des Parameters Midi Out
Letzterer kann folgende Größe annehmen: o “1 2” – Beide Ports, Midi In1 und Midi In2, sind mit dem Ausgang Midi Out verbunden. Damit wird ein Soft Thru beider Midi-Ports im Eingang erzielt. o “1” – Nur der Port Midi In1 ist mit dem Ausgang Midi Out verbunden. Damit wird ein Soft Thru des Ports Midi In1 erzielt. o “2” – Nur der Port Midi In2 ist mit dem Ausgang Midi Out verbunden. Damit wird ein Soft Thru des Ports Midi In2 erzielt. o “off” – Keiner der beiden Midi-Ports im Eingang ist mit dem Ausgang Midi Out verbunden. • Ändern Sie den Wert mit den Value+/- -tasten, wobei Sie die taste 9 stets niedergedrüc- kt halten. Achten Sie auf den Parameter Midi Out insbesondere bei einem Anschluss via USB. Nachdem in diesem Fall die virtuellen MIDI-Ports eine Replik der realen darstellen, wird beim Anschluss des sd4 an einen Computer eine virtuelle Verbindung sowohl der beiden Midi In- als auch des Midi- Out-Ports hergestellt. Wenn der Parameter Midi Out nicht auf OFF gesetzt wird, besteht bei Einsatz eines Sequenzers mit aktivierter Thru-Funktion das Risiko, dass in den Midi-Nachrichten ein Loop generiert wird. Es ist dann erforderlich, den Parameter Midi Out des sd4 auf OFF zu setzen oder die Thru-Funktion des Sequenzers auszuschalten. functIon-menü In diesem Menü können Sie einige Einstellungen des Geräts wie die Grundstimmung oder Art und Stärke des Halls vornehmen und den Modus der “intelligenten Transposition” für Midifiles aktivieren. Ändern der grundstImmung des soundmoduls • Drücken Sie die function-Taste. Die zugehörige LED beginnt zu blinken, und am Display wird der aktuell eingestellte global tune-Wert angezeigt. • Ändern Sie den Wert mit den Value +/- -Tasten innerhalb des Regelbereichs zwischen -50 und +50 Cent. -
Page 57: Aktivierung Und Deaktivierung Der Funktion "Intelligent Transposer
WAhl der AllgemeInen hAllstÄrke • Halten Sie die taste 3 niedergedrückt. Am Display werden das Kürzel Vol und an- schließend ein Wert zwischen 0 und 16 angezeigt, der für die gewählte Hallstärke steht. • Ändern Sie die Einstellung mit den Value +/- -Tasten. user-menü Die Users sind Konfigurationen des Soundmoduls, die sämtliche Betriebsparameter des sd4 umfassen und nach Belieben personalisiert werden können. Es stehen 32 User-Konfigurationen zur Verfügung. Die User Nummer 1 ist die, die immer beim Einschalten des Geräts geladen wird. Aufrufen eIner user-konfIgurAtIon • Drücken Sie die user-Taste, um das entsprechende Menü zu öffnen. Die LED beginnt zu blinken, und am Display wird die Nummer der aktuell verwendeten User-Konfiguration angezeigt. -
Page 58: Sd4Editor
1. Schalten Sie das SD4 aus. 2. Schalten Sie das SD4 wieder ein, und drücken Sie die Tasten 1 und 3 gleichzeitig. 3. Die Display-LEDs leuchten sich im Kreis drehend auf, was darauf hinweist, dass das SD4 im Programmiermodus ist. 4. Schließen Sie nun das USB-Kabel an. 5. Öffnen Sie das Programm SD4Update. 6. Klicken Sie auf den Open-Button. 7. Wählen Sie die Update-Datei der Firmware. 8. Klicken Sie auf den Program-Button. 9. Warten Sie und schAlten sIe dAs sd4 nIcht Aus, BIs der uPdAte-VorgAng ABge- schlossen Ist. 10. Wenn der Update-Vorgang abgeschlossen ist, wir die Meldung “Write Complete” angezeigt und die LEDs am Display kommen zum Stillstand. 11. Bei Fehlermeldungen schalten Sie das SD4 nicht aus und wiederholen den Vorgang ab Punkt 8. 12. Hängen Sie nun das USB-Kabel ab. 13. Starten Sie das SD4 neu. - Page 59 Sommaire Pag. CONSEILS DE SECURITE INTRODUCTION Panneau frontal ConnexionS MiSe SouS tenSion de l’inStruMent SéleCtion d’un PreSet Pour ChaCune deS troiS voix diSPonibleS ModeS de fonCtionneMent deSCriPtion deS ModeS de fonCtionneMent o Mode Masterkeyboard o Mode Accordion o Mode Organ o Mode 2x Midifile Modifier le Mode de fonCtionneMent Génération Sonore...
- Page 60 SéleCtion de la quantité de réverbération Globale Menu uSer raPPeler un uSer enreGiStrer un uSer lead off Sd4editor enreGiStrer leS ModifiCationS MiSeS à jour du MiCroloGiCiel SPeCifiCationS annexe a: liSte CoMPlète deS SonS diSPonibleS annexe b: Midi iMPleMentation (iMPléMentation Midi) annexe C: SySteM exCluSive Ketron...
- Page 61 Manuel d’instruction CONSEILS DE SECURITE inStruCtionS ConCernant leS riSqueS d’inCendie, leS deCharGeS eleCtriqueS ou leS riSqueS d’aCCidentS PerSonnelS. Conseil: pour éviter les risques d’incendie ou de décharges électriques, n’exposez pas l’instrument à la pluie ou à l’humidité. danGer - De mauvais raccordements à la terre peuvent causer des décharges électriques. En cas de doute, faites contrôler votre installation électrique par un électricien qualifié.
- Page 62 Pour brancher l’instrument à la prise du réseau électrique, il faut utiliser exclusivement l’alimentateur KETRON fourni avec l’instrument en question. L’utilisation d’autres alimentateurs pour le courant alternatif pourrait endommager les circuits de puissance de l’instrument. Par conséquent, il est très important d’utiliser les adaptateurs originaux et de demander le type approprié...
-
Page 63: Introduction
MIDI disponible. Le Sd4 est pourvu de 64 Preset réglés en usine et 64 autres pouvant être complètement programmés par l’utilisateur. Chaque ‘sound’ Preset peut être constitué par un maximum de trois différents sons et dispose de nombreux paramètres d’édition et de contrôle. -
Page 64: Connexions
USB Master. MiSe SouS tenSion de l’inStruMent Dans sa condition par défaut on peut imaginer le Sd4 comme étant constitué par deux générateurs sonores distincts. A travers le port Midi in1 il est possible de contrôler simultanément seize canaux MIDI et de régler, pour chacun d’entre eux, l’un des 512 sons de... -
Page 65: Modes De Fonctionnement
Suivant le point de partage, à travers le clavier maître il est possible de piloter une ou plusieurs voix du SD4. Si l’on active séparément chaque voix à travers les boutons relatifs sur le panneau du SD4 (Left – Right – Bass) le point de partage est réglé automatiquement. -
Page 66: Mode Accordion
Par exemple, si l’on n’active qu’’une seule voix, le clavier maître jouera sur toute son étendue tandis que, si l’on active au moins 2 voix, on règlera automatiquement le point de partage. Pour modifier le point de partage appuyer simultanément sur les boutons “lead off”... -
Page 67: Modifier Le Mode De Fonctionnement
à l’arrière de l’instrument. L’échange des données MIDI entre le Sd4 et le PC via USB permet d’utiliser l’instrument aussi comme interface MIDI. Supposons que nous disposons en fait d’un clavier maître pourvu du connecteur classique Midi Out 5 broches et que l’on désire... -
Page 68: Génération Sonore
Génération Sonore La génération sonore de l’instrument est composée des sections suivantes: • 3 banques GM de 128 sons chacun • 32 Drum set • 82 Groove (Drum 2) Il existe une autre banque spéciale de 128 sons pour un total de 512 différents sons. En outre 128 Preset sont disponibles chacun desquels peut être constitué... -
Page 69: Rappeler Un Preset
raPPeler un PreSet Pour attribuer un son Preset à l’une des trois voix il est nécessaire de: Sélectionner la voix sur laquelle on désire charger le Preset en appuyant sur l’un des boutons right, left ou bass. Taper le numéro du Preset sur le bloc de touches numériques ou effectuer un défilement à... - Page 70 suite la note. Lors de la deuxième pression l’afficheur affiche “riG” (Range Right) et par la suite la note. Les ‘codes touche’ peuvent être entrés ou à l’aide des boutons Value +/- ou bien en appuyant sur les touches relatives sur un clavier Maître MIDI branché à l’entrée Midi in2.
-
Page 71: Exemple De Modification D'un Preset
65 à 128. Menu tranSPoSer Le Sd4 dispose de trois divers modes de transposition sélectionnables sur la base des be- soins de l’utilisateur. En mode Global traspose la transposition est globale et agit sur tout l’appareil. En mode Solo Midifile la transposition n’agit que sur le port MIDI dédié à la repro- duction des fichiers Midi. -
Page 72: Modification Du Mode De Transposition
ModifiCation du Mode de tranSPoSition. • Tenir pressée pendant quelques secondes le bouton transposer jusqu’au moment où sur l’afficheur apparaît le sigle du mode actuellement réglé. • Modifier les réglages à l’aide des boutons value +/- Les modes prévus sont listés ci-après. •... -
Page 73: Menu Midi
Modifier la valeur à l’aide des boutons value +/-. • Pour modifier le Program change, appuyer sur le bouton function/P.Ch. La del relative commence à clignoter et l’afficheur montre le numéro progressif du son actuellement réglé sur la piste sélectionnée. Modifier la valeur à l’aide des boutons +/-. •... -
Page 74: Modifier Le Canal De Réception De La Voix Left
• Modifier la valeur à l’aide des boutons value +/- Modifier le Canal de réCePtion de la voix left (voiCe2 rxChannel) • Tenir pressée la touche 2. L’afficheur affiche le sigle “V2R” et par la suite la valeur réglée allant de 1 à 16. •... -
Page 75: Menu Function
Faire attention au paramètre Midi Out en cas de raccordement via USB. Vu que les ports MIDI virtuels USB sont une réplique de ceux réels, si l’on raccorde le Sd4 via USB à un ordinateur on établira un branchement virtuel tant des 2 ports Midi In que du port Midi Out. Si le paramètre Midi Out n’est pas mis sur “OFF”, si l’instrument fonctionne avec un séquenceur où... -
Page 76: Sélection Du Type De Réverbération Globale
• Appuyer de nouveau sur le bouton user pour quitter le menu. enreGiStrer un uSer Une fois que tous les paramètres de fonctionnement du Sd4 ont été réglés il est possible de mémoriser l’état de l’instrument en effectuant un enregistrement dans un User. -
Page 77: Enregistrer Les Modifications
SD4, il est nécessaire de resynchroniser le programme en appuyant sur le bouton “Refresh”. Même si l’on sélectionne un autre Preset sur le SD4 il faut appuyer sur “Refresh” pour mettre à jour les paramètres du SD4Editor. -
Page 78: Specifications
Specifications Stereo Grand Piano, 512 voices: 3 GM Banks + 1 Special Bank Sound Generation: 64 Factory Presets Voices, 64 User Presets Voices 32 New Drum sets. Drum 1: 82 Drum loops, featuring Acoustic, Drum 2: Latin, Jazz and Dance audio Loops Multi effect DSP. Reverberation, Chorus, Delay, Effects: Distortion, Rotor Slow/Fast. Master Keyboard, Accordion, Organ, 2xMidifile Operation Modes: Global Transpose, Keyboard Transpose, Midifile Transpose, General Functions: Intelligent Transpose, Fine Tuning, Keyboard Split, Midi Reset Volume, Program Change, Solo, Lead Voice On/Off Midifile Functions: 2 Midi In, 1 Midi Out (Soft Thru). 32 Midi Channels. MIDI Interface: GM standard USB Interface Stereo headphone, Stereo Output Left/Right Outputs : Alphanumeric 3 x 7 LED segments Display: 24 input buttons. 0 – 9 Numeric Select Tabs: Master Volume, Voice Volume, Midifile Volume Potentiometers : L x W x H = (21x12,3x6,5 cm) (8,3x4,8x2,6 inches) Dimensions : 0,9 Kg. (2 lbs) -
Page 79: Anhang A: Sound-Verzeichnis
Technical Tables APPENDICE A: Elenco completo dei suoni disponibili P. Ch. Name 001 Grand Piano 107 Shamisen 054 Choir 2 002 Rock Grand 108 Koto 055 Synvoice 003 Upright 109 Kalimba 056 Hits 004 Honky 110 Bagpipe 057 Trumpet 1 005 Rodes 111 Fiddle 058 Trombone 1 006... - Page 80 278 Gospel 160 Solid 219 Click 279 Pipe 161 Warm 220 Tonebar 280 Positive 162 Ms Finger 221 Pop Organ 281 Musette 163 Mute 222 JazzOrg3 223 Lower 8’ - 4’ 282 Accordion 164 Bluebass 224 Jazzy 283 Master 165 Precision 225 284 Francaise 166 Synbass 3 167 Synbass 4...
- Page 81 455 Hi Trumpet 337 Trombone2 396 DryVibes 456 Flugelhorn2 338 Miles 397 Malimba 457 Posaune 339 Brass 398 WoodMallet 458 Anderson 340 Dixie Tpt 399 Glock&Pad 459 Lip Flute 400 Elpiano&Strings 341 Flugelhrn 460 Panflute 401 Whiter 342 Mute Tpt 461 FluteVox 343 Fr.Horn 402 Rock Slow 462...
-
Page 82: Anhang B: Midi-Implementation
APPENDICE B: Midi Implementation NOTE ON 9nH kk vv n(0-0FH) midi channel, kk(01H-7FH)=NOTE ON vv=velocity(01H-7FH) (vv=0 means NOTE OFF) NOTE OFF 8nH kk vv n(0-0FH) midi channel, kk(01H-7FH)=NOTE OFF 9nH kk 00H vv=don’t care if command 8nH PITCH BEND EnH bl bh Pitch Bend as specified by bl(low) bh(high), bl=(00H-7FH),bh=(00H-7FH) 14 bit resolution. Maximum swing is +/-1 tone (default). (Can be changed using RPN 0000H) Center position is bl=00H bh=40H Min. bl=00H bh=00H, Max. bl=7FH bh=7FH PROGRAM CHANGE CnH pp Program change. If n=09H Drumset change. Refer to voices or drumset list. CHANNEL AFTERTOUCH DnH vv v v=pressure value(00H-7FH). see System excl. list for Aftertouch effect setting CONTROL 00H BnH 00H cc Bank select. See voices list for details. CONTROL 01H BnH 01H cc Modulation wheel. Rate, Assignment can be set using System excl. CONTROL 05H BnH 05H cc Portamento time... - Page 83 BnH 65H 00H 64H 00H 06H vv Pitch Bend sensivity in semitones (default vv=02H) RPN 0000H RPN 0001H BnH 65H 00H 64H 01H 06H vv Fine tuning in cents. vv=00H (-100) vv=40h (0) vv=7FH (+100) RPN 0002H BnH 65H 00H 64H 02H 06H vv Coarse tuning in half-tones vv=00H (-64) vv=40H (0) vv=7FH (+64) NRPN 0108H BnH 63H 01H 62H 08H 06H vv Lfo1 Rate modify (vv=40H no modify) NRPN 0109H BnH 63H 01H 62H 09H 06H vv Dco Depth modify (vv=40H no modify) NRPN 010AH BnH 63H 01H 62H 0AH 06H vv Lfo1 Delay modify (vv=40H no modify) NRPN 0110H BnH 63H 01H 62H 10H 06H vv Lfo2 Rate modify (vv=40H no modify) NRPN 0111H BnH 63H 01H 62H 11H 06H vv Lfo2 Delay modify (vv=40H no modify) NRPN 0112H BnH 63H 01H 62H 12H 06H vv Dcf Depth modify (vv=40H no modify) NRPN 0113H BnH 63H 01H 62H 13H 06H vv Dca Depth modify (vv=40H no modify) NRPN 0120H...
-
Page 84: Anhang C: System Exclusive Ketron
APPENDICE C: System Exclusive Ketron BASS BOOST F0H 26H 7BH 7DH 00H Boost_gain Freq F7H Boost_gain = 0-6 Freq = 0-7 PARAMETERS GENERAL FORM F0H 26H 7BH Code Data_1..Data_n F7H REVERB1 TYPE F0H 26H 7BH 00H 00H Rev_type F7H Rev_type = 00H Reverb_1 02 H Reverb_3 04 H Reverb_5 06 H Reverb_7 01H Reverb_2 03 H Reverb_4 05 H Reverb_6 7F H OFF REVERB LEVEL F0H 26H 7BH 02H 00H Level F7H Level = 00H - 10H CHORUS TYPE F0H 26H 7BH 01H 00H Cho_type F7H Cho_type = 00H Chorus_1 02H Chorus_3 04H Chorus_5 06H Chorus_7 7FH OFF 01H Chorus_2 03H Chorus_4 05H Chorus_6... - Page 85 SCALE TUNING (ARABIC) F0H 26H 7BH 0AH Chan Data1...Data12 F7H Data: 00H-7FH; 40h = no detune Chan: 00H-1FH 7FH all channels ( not drum sections) MASTER TUNE F0H 26H 7BH 0CH 00h Data1,Data2 F7H Data1 00H-0CH high nibble Es. Data1=06h Es. Data1=00h Es. Data1=0Ch Data2 00H-0FH low nibble Data2=04h (nominal) Data2=00h (-100%) ata2=08h +100%) GLOBAL GM RESET F0H 26H 7BH 0EH 00h Value F7H Value = 00H gm controls reset Value = 01H gm controls reset + all note off GM DRUM PART F0H 26H 7BH 0FH 00H GMPart Value F7 Value = 00H voice Value = 01H drum GMPart = 00H-1FH GM MIDI RX CHANNEL ASSIGN F0H 26H 7BH 12H 00H GMPart Chan F7H Chan = 00H-20H, 20H=OFF GMpart 00H-1FH VELOCITY SLOPE F0H 26H 7BH 3EH 00H Part Value F7H Part : 01H-20H Value: 00H-7fH VELOCITY OFFSET F0H 26H 7BH 3FH 00H Part Value F7H Part : 01H-20H...
- Page 87 Stampa: Flamini s.r.l. - Aspio di Osimo (Ancona)
- Page 88 KETRON s.r.l. 60131 Ancona ITALY Via Giuseppe Taliercio, 7 • • Ph. +39 (0)71 285771 Fax +39 (0)71 2857748 www.ketron.it • •...
Need help?
Do you have a question about the SD4 and is the answer not in the manual?
Questions and answers
Hoe kan ik bank A,B,en C oproepen van de Ketron SD4