Advertisement
Advertisement
Table of Contents

Related Manuals for Taylor Tools Bronco 260P-HL

Summary of Contents for Taylor Tools Bronco 260P-HL
- Page 1 Bronco 260P-HL Floor Removal Machine With Hydraulic Lift Owners Manual...
- Page 2 Donald Pope. Mr. Pope developed this machine over a 5 year period to improve floor removal rates for his business in Ocilla Georgia. Donald has joined forces with Taylor Tools to assist us in bringing you this remakable floor removal machine.
-
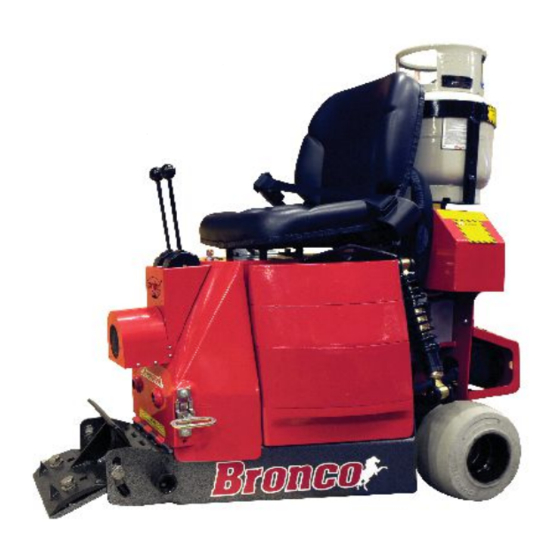
Page 3: Specifications
Safety Alert Symbol and Notations READ AND UNDERSTAND THIS IMPORTANT SAFETY INFORMA- TION BEFORE OPERATING THIS MACHINE! This safety alert symbol is used to attract The following safety notations are used your attention as PERSONAL SAFETY throughout this manual to call attention to IS INVOLVED! When you see this special information or operating procedures. - Page 4 Keep all people and animals away from the adequate ventilation. A carbon monoxide moni- operating area. tor is supplied by Taylor Tools and should be used during operation to ensure proper ventalation.
-
Page 5: Maintenance
Maintenance: 5. While holding the fan box assembly, release Keep the machine in good condition. Maintain the connector clip to disconnect the electrical it as directed in this manual and the wiring from the box assembly. motor manual for propane machines. Check fasteners and hydraulic hose connections at the end of each day of operation. - Page 6 9.The hood is now ready to be tilted forward. 4. CAUTION: use proper lifting techniques. Allow the control levers to rest fully These weights are heavy (45 to 75 lbs.) and forward, with one hand guide the levers should only be lifted by a person that can safely through the opening being careful not to lift this much weight.
- Page 7 (order part # drop-offs. 260P.04.35 and pre filter #260P.04.35A). Look behind when operating in reverse. Look for Use only Taylor Tools accessories, attachments, people and hazards. and replacement parts. Use of other components may void warranty.
- Page 8 Catalog # Description 1 260.40.40 Blade Clamp W/ Deflector 2 260.40.11.KIT Fastner Kit, Blade Clamp 3 260P.41.08.KIT Clevis Pin Front, W/Washers, Keys 4 260P.41.02.KIT Cylinder, Blade Holder 5 260B.15.19 Pump Port, Auto Return 6 260P.41.21 Hose, Cylinder, Front to Valve 7 260P.41.09.KIT Clevis Pin Rear, W/Washers, Keys 8 260P.41.20...
- Page 9 Catalog # Description 1 260.15.22 Control Lever 2 260.15.22.L.ROM Control Lever Guide Left 3 260.15.22.R.ROM Control Lever Guide Right 4 260B.15.26 Threaded Adapter, Control Lever 5 260P.15.25 Trip Collar, Back Up Alarm 6 260P.15.15 Rod End, Linkage 7 260P.15.23 Link Post, Control Weldment 8 260P.15.33 Micro Switch, Back Up Alarm 9 260P.15.32.L...
- Page 10 Catalog # Description 1 260.20.05 Tire, Plain 2 260.20.00 Hub, 3 260.05.04 V Belt 4 260P.60.05.KIT Hood, Painted 5 260.15.57.KIT Feed Hose W/Fittings 6 260.15.57.KIT Feed Hose W/Fittings 7 260.15.58.Kit Return Hyd. Hose, Port / W Fittings 8 260P.70.05 Oil Tank 9 260P.70.02 Muffler Guard 10 260.15.62.KIT...
- Page 11 Catalog # Description 1 260.15.57.KIT Feed Hose W/Fittings 2 260.15.58.KIT Return Hyd. Hose, Port / W Fittings 3 260P.15.39 Hose, Pum p to Motor 4 260P.41.25 Hose, Pum p to Valve A 5 260P.41.23 Hose, Pum p to Valve B 6 260P.41.24 Hose, Valve D to Lock Valve, Rear 7 260P.41.21...
-
Page 12: Periodic Maintenance
Periodic Maintenance: Daily 25 hr. 50 hr. 100 hr. 200 hr. 300 hr. Check hyd. oil level Check Air filters Check engine oil level Check loose fittings Check battery electrolyte Check Belt Tension Clean dust from heads Change engine oil Change hydraulic oil filter Change engine oil filter Change &... -
Page 13: Before Starting Machine
PERATION The right lever controls the speed and direction Before Starting Machine: 1. Check hydraulic oil level indicator and fill the right wheel and the left lever controls the with Mobil DTE 25 or DTE 26 or equivalent if speed and direction of the left wheel. necessary. - Page 14 Pulling the levers toward the operator will To move straight forward, push both levers reverse the machine. The further the levers are simultaneously forward. The further forward pulled back, the faster the machine will travel. the levers are pushed forward the faster the machine will travel.
-
Page 15: Blade Selection
Blade Selection: There are several blades that work well for each type of flooring material. Blades listed below are Remember that the levers must always be the most popular for each substrate. The Taylor depressed by the palm of your hand to keep the Tools catalog has a complete list of available operator present feature engaged and the levers blades. - Page 16 Carpet Pulling: There are some cases where the machine can be used in conjunction with the Taylor Tools Lock Jaws Carpet Clamp, (part #200) to pull the carpet off the floor in 6’-12’ widths. This is usually the fastest way to remove carpet. Most commonly done on “Direct Glue”...
- Page 17 Fuel mixture may need adjusting. This should be Back fire hard to start done by a qualified Kawasaki dealer. Contact Taylor Tools for your nearest dealer location. Spark plugs will need to be changed if there has been backfiring, use Auto Lite or NGK spark plug brands only.
- Page 18 ROUBLE HOOTING o Check the linkage connection to the Control lever will not engage drive wheel pump control arm. o Check belt tension and tighten if necessary. o Check hydraulic oil level. o If there is a loud squeal coming from the pump it may be caused by a loose belt or a pump that has been run without oil.
-
Page 19: Year Limited Warranty
1 Year Limited Warranty Roofing Equipment, Inc., a California corporation that does business under the name “Taylor Tools” (the “Company”), hereby warrants to the original purchaser, on and subject to the terms described herein, that the Product shall be free of defects in material and workmanship for a period of 1 year from date of purchase (the “Limited Warranty”).
Need help?
Do you have a question about the Bronco 260P-HL and is the answer not in the manual?
Questions and answers
The fan on the front melted her was broke and we went to replace it but some wires came unhooked from the switch that raises and lowers the blade and we're not sure how to hook it back up. Is there a diagram or something you can email me to put that back together?
Is there a fues on propane machine