Advertisement
Quick Links
Bluefang® Electronic Fence
INSTALLATION, OPERATING AND TRAINING
MANUAL
Please read this entire manual and study all illustrations before
you begin installing your system
This manual describes set up and operation of the electronic fence
functions. For operation of you Bluefang collar, please refer to the
separate collar manual included with your system.
Advertisement

Related Manuals for High Tech Pet Bluefang TX-2


Summary of Contents for High Tech Pet Bluefang TX-2
- Page 1 Bluefang® Electronic Fence INSTALLATION, OPERATING AND TRAINING MANUAL Please read this entire manual and study all illustrations before you begin installing your system This manual describes set up and operation of the electronic fence functions. For operation of you Bluefang collar, please refer to the separate collar manual included with your system.
-
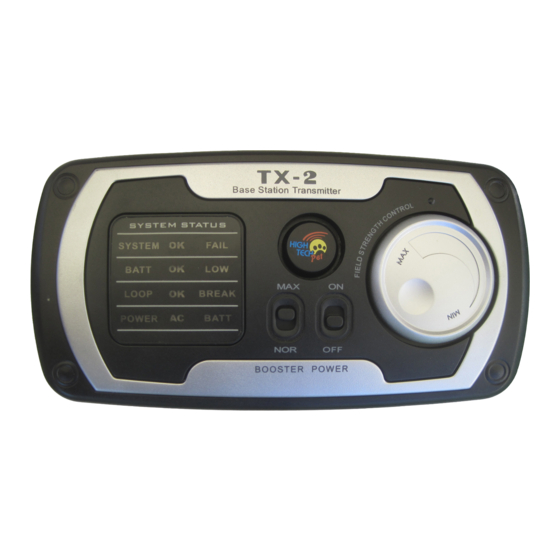
Page 2: Display Functions
DISPLAY FUNCTIONS: TX-2 BASE STATION TRANSMITTER SYSTEM: This is the overall status of your base station. If everything is functioning normally the “OK” lamp to the right of the “SYSTEM” lamp will illuminate. If there is any malfunction, the “FAIL” lamp will illuminate. BATT: Back-up battery charge indicator. -
Page 3: Safety Tip
wire no more than 4 inches deep and use no more than 6,000 feet of total from whom you purchased your Bluefang system and is also available online boundary wire. Typical installations yield a maximum possible field width of at www.hitecpet.com. If you choose not to purchase the Back-up Battery approximately 15 feet. - Page 4 Calculate the total length of wire required to ensure that you have enough to complete the installation. Remember that twisted wire counts as twice its length since there are two strands. Figure 7 shows a basic wire length calculation. In preparing your layout, note that you will need to allow for a field width of at least 3 feet (preferably 6 –...
- Page 5 Once you have chosen to use the “double loop” layout, you can place as many other openings/gates in the boundary field as you wish by twisting the inner and outer wires together, or simply bringing the two wires together tightly. TIP: The amount of twist and the direction of the twist is of little importance, as long as the wires...
- Page 6 Indoor mounting of the TX-2 Base Station Transmitter is preferred. Set Up the Base Station Transmitter However, if your layout prohibits indoor mounting, it is acceptable to mount the TX-2 outdoors. Although the casing is water-sealed, you Assemble the Required Tools should still choose a location that is not directly exposed to rain, wind Here is the list of tools you will need.
- Page 7 Place the wire in the slit and seal with outdoor silicone caulk of matching color. Use asphalt sealant for asphalt driveways. Another option is High Tech Pet’s new optional Driveway Traverse Strip, which easily crosses driveways and walks with your electronic fence wire.
- Page 8 D. Observe your pet: Once you are certain that your pet will INSTINCTIVELY retreat at the first training tone, allow the animal to roam freely and observe Training your dog will require use of a separate restraining collar and short his behavior.
- Page 9 Exclusive: Pulsed Proportional Stimulus The unique corrective stimulus used by your High Tech Pet electronic fence system is delivered in short, intense pulses, not a continuous shock. The pulsed stimulus gives your dog a chance to think and avoids sending the animal into panic.
Need help?
Do you have a question about the Bluefang TX-2 and is the answer not in the manual?
Questions and answers